Darth Lars
Master Member
Hasbro clone helmets are maybe not so popular any more, but many have been sold and I think there may still be quite a few out there still in garages that people have thought of converting but never got around to.
I started working on this one in 2011 but put it aside because I got ill at the time. I resumed work on it first in August last year.
It is almost finished. I am waiting for warm weather before I get to touch up the paint job and clear-coat. Then the rest should go in (meshes, mirror visor, LEDs, edge trim, mouth piece).
If you want a good accurate display piece: I would recommend not to start converting a Hasbro but to get a resin-cast helmet kit. If you want a play-helmet for your kids: Leave it as it is!
If you like me had a half-converted one, then read on:
Impossible plastic
The helmet might seem inviting to work with, but it is made of a soft plastic that is very difficult to work with.
It is probably polypropylene, which does not take glues that well and does not respond to solvent-based "plastic glues" at all.
The only way to cut the plastic is to use a Dremel and a cutting wheel or sanding drum!
Back in 2011, I was stupid enough to use a box-cutter knife to cut the plastic. I slipped and cut a 4 cm long gash in the base of my left thumb - which of course needed stitches and left a permanent scar. I was lucky to having had only 5 mm extended, which is how deep the gash was, to miss any significant blood vessels or tendons and to not have contaminated the wound with plastic debris.
The plastic does take paint and epoxy, and to some extent: auto body filler. Glues for plastics with strong solvents will not work.
CA/Superglue does adhere well but because the plastic is flexible, superglued seams will break if the helmet is handled. CA glue could be used when building up bulk though.
If you are going to handle the helmet then you will need to fibreglass with epoxy over each seam inside the helmet - which I did quite late, sometimes after most of the paintwork because cracks had appeared. I did also try and melt and clamp plastic together in a few places but the fumes were horrible, so I would not recommend that (I did use a respirator, outdoors).
2011 images

Sides details behind ears were cut (lines), bent outwards and filled with styrene and auto body filler. (I had not yet converted to epoxy putty at the time") )
)

Narrow triangles of plastic glued to the sides of the trapezoidal area to get the sides sloping.
Bottom of back below vent was cut away because it protruded too much. New back glued in. 2016: Fibreglassed on inside. Cut around the sides at the top to make the section slope at the same angle as the rounded parts. The vent itself cut open.

Instead of gluing a piece of styrene inside the visor, I screwed and glued the existing visor in place and built up with strips of styrene on top of it and thin styrene along the edge. In retrospect I should have glued large pieces of styrene on top of the entire face to make the transition to the ears more accurate. I have a mirror visor cut to fit inside.
I don't remember how I modified the teeth, sorry.

On each side, I centred the side vents below the ears by filling the frontmost side vent and cutting a new vent further back. I built up bulk between vents with styrene and filled with auto body filler to make the sides bulge out more accurately. 2017: Filled on the inside to even out the thickness which made the holes look better, also detail sanding.
2016/2017 images
To make the neck ring, it helped a lot that I had widened the helmet in the sides.
The slope of the existing ring was too flat in the sides but OK at the front and back.

In the front, I built up with filler and filed to make a ledge for the ring.

In the back, I glued sheet plastic inside the ring and then 2mm styrene on top of that, which widened the existing neck ring.

The sides needed to slope more. I glued sheet plastic inside the ring in places but most of all I built up bulk with pieces of 2mm styrene in layers on both sides.
The gaps were filled with a home-made epoxy filler: West Systems epoxy with West Systems microsphere blend. I made sure to make ledges at the sides for the neck ring that I was going to make out of 2mm. styrene. Having ledges meant that the transition would look more natural and I would not have to build up too much to make it slope at the right angle.
The whole base of the ring was then taped with flexible 3/4" tape around and cut with Dremel sanding drum to the width of the tape.
I made templates out of card from the neck ring base I had, and used that to cut out left and right pieces of the outer neck ring from styrene.
The pieces were made a little bit wider than the template, bent with a heat gun, glued on with more thickened epoxy and held in place with lots of clothing pins. (I'm sorry I don't have a photo of this step).
This outer ring was then also taped with 3/4" tape all around and trimmed with a Dremel sanding drum to the width of the tape.
I estimated from images that the bottom of the neck ring is only a cylindrical surface, which would be easy to bend in only one axis.
Because the front of the bottom of the neck ring is slightly lower than the back, I divided the bottom into a front and a back and decided to wing it in the middle.

I made templates for the front and back out of card before cutting out each piece from styrene a little bit larger than the template.
The styrene was bent with heat gun and then filed and filed until it fit with only small gaps. It is almost impossible not to get any, so I plastic-welded it styrene-to-styrene by smearing plastic sludge (plastic dissolved in acetone) onto one edge and plastic cement (mostly strong solvent) on the edge.
Only after it was glued on did I cut it open in the middle.
I then built the inner ring the same way: templates, cut styrene, bent with heat-gun, adjusted, plastic sludge and poly cement. (I'm sorry I don't have pictures of this step).
I managed to make the inner ring fit my relatively large head. I had first made sure that my head would fit through the templates that I had made of card stock.
The original idea had been to make the neck ring removable, with magnets or velcro, but that was not needed.
Having widened the base of the helmet beforehand also helped.

After the neck ring was glued on, I cut the slot at the back and then glued plastic behind that. I have not found any good images of the back of the neck, so this is my interpretation. The neck ring was then further filled (plastic goop) here and there and sanded in a few iterations.
I also grooved out the transition between the helmet shell and the neck ring with needle files (triangle cross-section).
There were of course, several iterations of primer, sanding and filling to prep the helmet before paint.
By Christmas last year, I thought that the helmet was practically done ... when cracks appeared in the dome. I filled and painted ... but cracks reappeared. The dome pieces had been glued together only with CA glue and baking powder ...
I then had to cut it open on the top - and I noticed that the CA glue inside had turned to dust, which had to be scooped out. To fit fibreglass inside, I had to dremel away quite a lot of the battery compartment inside to make surfaces parts flush for the fibreglass weave. (after it had already been painted black, and through the small neck ring ...). After the weave had been laid, I cut off some excess inside, puttied the edges, sanded and painted again.
Other accurized details
I don't remember everything I did back in '11, but:
* Bottom of cheek indent filled with styrene and body filler.
* Top of cheek indent cut, and replaced with wall of styrene higher up. Did this once in 2011, then redid it in 2016. I also built up with styrene inside for support and fibreglassed inside over the cheek. Lots of small tweaks with filler, sanding etc to make both sides symmetrical.
* Fin front: The front was lowered and glued back in to get a more accurate profile. The sides were filled.
* Fin back: The back was removed and the edge cut to a more accurate shape with less curve and flatter bottom at the top. The back curve also starts a few mm higher up on the dome. The very tip was opened and shaped by cutting away at the bottom. A new back was built from styrene and glued in, gaps filled and sanded.
* Inside. Most of the bulk of the fin has been cut away and the dome's seams fibreglassed. (several steps in 2011 and 2016....). I messed up here and dremelled through both sides of the fin wall - which I covered with plastic on the inside and filled from the outside.
Most of the inside of the face has been cut away.
* Ears: Filled with sheet plastic of just the right thickness. The circular depressions are holes cut in sheet plastic backed with other pieces of plastic before they were glued in.
* Grey band around neck: Front curves resculpt with Milliput to align it with visor opening.
* Cup in the back: Glued plastic salad-dressing cup on top of it to make more sloping walls and better grooves. Filled gaps. Cut off ovals and glued on new ones.
* Mouth: details dremelled down. I cut a hole and built a small box for the rectangular mouth part under the "vocoder". The sides were narrowed with pieces of plastic and then filled some more with Milliput which I then made grooves into with needle files to simulate seam-lines between panels. I have sculpt a vocoder in Sculpey and painted it but it is not too accurate, so I may redo it.
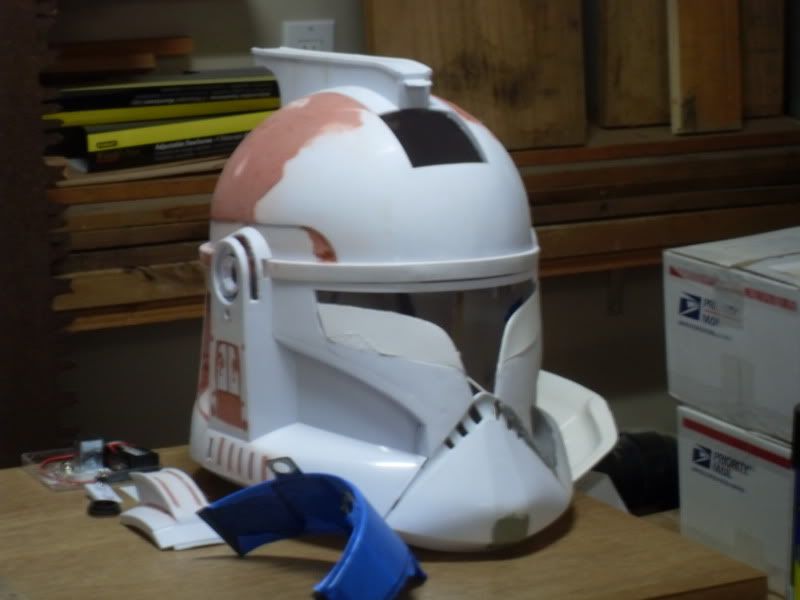
The helmet yesterday:

To do
I am going to touch up the paint somewhat before adding the finishing touches:
* Mesh for side vents has been cut and painted with light-grey primer.
* Fabric for inside of back vent.
* Tape or glue in vocoder.
* Mirror visor has been cut.
* I am going to attempt the edge trim with electrical tape - which is something I saw people used for accurizing the brow of the 2016 Hasbro Stormtrooper helmet.
I think that should look more like rubber than simple paint would.
I have kept a part of the inside of the face for mounting the visor against. I also kept the helmet liner and its slots inside.
Edit: Fixed broken images, in case anyone is interested...
I started working on this one in 2011 but put it aside because I got ill at the time. I resumed work on it first in August last year.
It is almost finished. I am waiting for warm weather before I get to touch up the paint job and clear-coat. Then the rest should go in (meshes, mirror visor, LEDs, edge trim, mouth piece).
If you want a good accurate display piece: I would recommend not to start converting a Hasbro but to get a resin-cast helmet kit. If you want a play-helmet for your kids: Leave it as it is!
If you like me had a half-converted one, then read on:
Impossible plastic
The helmet might seem inviting to work with, but it is made of a soft plastic that is very difficult to work with.
It is probably polypropylene, which does not take glues that well and does not respond to solvent-based "plastic glues" at all.
The only way to cut the plastic is to use a Dremel and a cutting wheel or sanding drum!
Back in 2011, I was stupid enough to use a box-cutter knife to cut the plastic. I slipped and cut a 4 cm long gash in the base of my left thumb - which of course needed stitches and left a permanent scar. I was lucky to having had only 5 mm extended, which is how deep the gash was, to miss any significant blood vessels or tendons and to not have contaminated the wound with plastic debris.
The plastic does take paint and epoxy, and to some extent: auto body filler. Glues for plastics with strong solvents will not work.
CA/Superglue does adhere well but because the plastic is flexible, superglued seams will break if the helmet is handled. CA glue could be used when building up bulk though.
If you are going to handle the helmet then you will need to fibreglass with epoxy over each seam inside the helmet - which I did quite late, sometimes after most of the paintwork because cracks had appeared. I did also try and melt and clamp plastic together in a few places but the fumes were horrible, so I would not recommend that (I did use a respirator, outdoors).
2011 images

Sides details behind ears were cut (lines), bent outwards and filled with styrene and auto body filler. (I had not yet converted to epoxy putty at the time
)
Narrow triangles of plastic glued to the sides of the trapezoidal area to get the sides sloping.
Bottom of back below vent was cut away because it protruded too much. New back glued in. 2016: Fibreglassed on inside. Cut around the sides at the top to make the section slope at the same angle as the rounded parts. The vent itself cut open.

Instead of gluing a piece of styrene inside the visor, I screwed and glued the existing visor in place and built up with strips of styrene on top of it and thin styrene along the edge. In retrospect I should have glued large pieces of styrene on top of the entire face to make the transition to the ears more accurate. I have a mirror visor cut to fit inside.
I don't remember how I modified the teeth, sorry.

On each side, I centred the side vents below the ears by filling the frontmost side vent and cutting a new vent further back. I built up bulk between vents with styrene and filled with auto body filler to make the sides bulge out more accurately. 2017: Filled on the inside to even out the thickness which made the holes look better, also detail sanding.
2016/2017 images
To make the neck ring, it helped a lot that I had widened the helmet in the sides.
The slope of the existing ring was too flat in the sides but OK at the front and back.

In the front, I built up with filler and filed to make a ledge for the ring.

In the back, I glued sheet plastic inside the ring and then 2mm styrene on top of that, which widened the existing neck ring.

The sides needed to slope more. I glued sheet plastic inside the ring in places but most of all I built up bulk with pieces of 2mm styrene in layers on both sides.
The gaps were filled with a home-made epoxy filler: West Systems epoxy with West Systems microsphere blend. I made sure to make ledges at the sides for the neck ring that I was going to make out of 2mm. styrene. Having ledges meant that the transition would look more natural and I would not have to build up too much to make it slope at the right angle.
The whole base of the ring was then taped with flexible 3/4" tape around and cut with Dremel sanding drum to the width of the tape.
I made templates out of card from the neck ring base I had, and used that to cut out left and right pieces of the outer neck ring from styrene.
The pieces were made a little bit wider than the template, bent with a heat gun, glued on with more thickened epoxy and held in place with lots of clothing pins. (I'm sorry I don't have a photo of this step).
This outer ring was then also taped with 3/4" tape all around and trimmed with a Dremel sanding drum to the width of the tape.
I estimated from images that the bottom of the neck ring is only a cylindrical surface, which would be easy to bend in only one axis.
Because the front of the bottom of the neck ring is slightly lower than the back, I divided the bottom into a front and a back and decided to wing it in the middle.

I made templates for the front and back out of card before cutting out each piece from styrene a little bit larger than the template.
The styrene was bent with heat gun and then filed and filed until it fit with only small gaps. It is almost impossible not to get any, so I plastic-welded it styrene-to-styrene by smearing plastic sludge (plastic dissolved in acetone) onto one edge and plastic cement (mostly strong solvent) on the edge.
Only after it was glued on did I cut it open in the middle.
I then built the inner ring the same way: templates, cut styrene, bent with heat-gun, adjusted, plastic sludge and poly cement. (I'm sorry I don't have pictures of this step).
I managed to make the inner ring fit my relatively large head. I had first made sure that my head would fit through the templates that I had made of card stock.
The original idea had been to make the neck ring removable, with magnets or velcro, but that was not needed.
Having widened the base of the helmet beforehand also helped.

After the neck ring was glued on, I cut the slot at the back and then glued plastic behind that. I have not found any good images of the back of the neck, so this is my interpretation. The neck ring was then further filled (plastic goop) here and there and sanded in a few iterations.
I also grooved out the transition between the helmet shell and the neck ring with needle files (triangle cross-section).
There were of course, several iterations of primer, sanding and filling to prep the helmet before paint.
By Christmas last year, I thought that the helmet was practically done ... when cracks appeared in the dome. I filled and painted ... but cracks reappeared. The dome pieces had been glued together only with CA glue and baking powder ...
I then had to cut it open on the top - and I noticed that the CA glue inside had turned to dust, which had to be scooped out. To fit fibreglass inside, I had to dremel away quite a lot of the battery compartment inside to make surfaces parts flush for the fibreglass weave. (after it had already been painted black, and through the small neck ring ...). After the weave had been laid, I cut off some excess inside, puttied the edges, sanded and painted again.
Other accurized details
I don't remember everything I did back in '11, but:
* Bottom of cheek indent filled with styrene and body filler.
* Top of cheek indent cut, and replaced with wall of styrene higher up. Did this once in 2011, then redid it in 2016. I also built up with styrene inside for support and fibreglassed inside over the cheek. Lots of small tweaks with filler, sanding etc to make both sides symmetrical.
* Fin front: The front was lowered and glued back in to get a more accurate profile. The sides were filled.
* Fin back: The back was removed and the edge cut to a more accurate shape with less curve and flatter bottom at the top. The back curve also starts a few mm higher up on the dome. The very tip was opened and shaped by cutting away at the bottom. A new back was built from styrene and glued in, gaps filled and sanded.
* Inside. Most of the bulk of the fin has been cut away and the dome's seams fibreglassed. (several steps in 2011 and 2016....). I messed up here and dremelled through both sides of the fin wall - which I covered with plastic on the inside and filled from the outside.
Most of the inside of the face has been cut away.
* Ears: Filled with sheet plastic of just the right thickness. The circular depressions are holes cut in sheet plastic backed with other pieces of plastic before they were glued in.
* Grey band around neck: Front curves resculpt with Milliput to align it with visor opening.
* Cup in the back: Glued plastic salad-dressing cup on top of it to make more sloping walls and better grooves. Filled gaps. Cut off ovals and glued on new ones.
* Mouth: details dremelled down. I cut a hole and built a small box for the rectangular mouth part under the "vocoder". The sides were narrowed with pieces of plastic and then filled some more with Milliput which I then made grooves into with needle files to simulate seam-lines between panels. I have sculpt a vocoder in Sculpey and painted it but it is not too accurate, so I may redo it.
The helmet yesterday:

To do
I am going to touch up the paint somewhat before adding the finishing touches:
* Mesh for side vents has been cut and painted with light-grey primer.
* Fabric for inside of back vent.
* Tape or glue in vocoder.
* Mirror visor has been cut.
* I am going to attempt the edge trim with electrical tape - which is something I saw people used for accurizing the brow of the 2016 Hasbro Stormtrooper helmet.
I think that should look more like rubber than simple paint would.
I have kept a part of the inside of the face for mounting the visor against. I also kept the helmet liner and its slots inside.
Edit: Fixed broken images, in case anyone is interested...
Last edited: