My first Thread on RPF - a Han Solo ANH Costume - for Halloween 2013'.

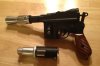
So, I tried two different paint styles with the booster (not seen anyway) - 1 side of the booster with Valspar Black Lacquer and the other side with Rustoleum Black Enamel semi-gloss paint - both painted directly on the primer.

I have to admit that I thought the Black Lacquer was superior in regards to how it looked in comparison to the Enamel.

So, I have moved on to painting the rest of my Denix and DEC conversion set with the Black Lacquer - will see how it turns out shortly. Good thing with the lacquer is that it dries quickly - dry to the touch in 30 minutes!

I may apply a clear lacquer coat as well - for extra protection etc. I will see how the final coat looks shortly. :)
 
Hey everyone!

I just completed the Black Lacquer and it looks great. It does hide surface details some but I love how it looks overall and the Lacquer was easy to work with. I will post some picture updates on how it looks later today!

I will then be putting 3 additional coats of clear Lacquer afer to help with protecting the finish and will put it all together tomarrow!

I can't wait!

On a different note - I should be getting my vest, shirt, and pants in the next two days and my leather holster rig should be in my hands in the next 1-2 weeks - just in time for Halloween! I will post pictures on how they turned out as well.
 
Your photos of the parts and progress are much appreciated. Looking forward to seeing the painted metal. Debating which direction to go myself.
-JC
 
Hey JC - you are very welcome and I am glad they are helpful. I am finding that I am learning a lot along the way (from others on RPF and some of these experiences on my own) and I happy to pass on the results with different things.

Along those lines - while I love how the primer and paint turned out - very smooth looking and very even glossy black - I would have likely gone with bluing the gun (if I was playing arm chair quarterback now). Also, if you are working with the DEC kit you have to take into account that paint and primer add to the sizes of the pieces (lol, as I found out with the booster and FH last night).

That said I am going to keep my paint job for now and work on making it look more weathered and smooth out the gloss finish with a 3M final buff pad - going to work on that tonight after work. I will then consider whether I need to add the clear lacquer on top of that - simply to provide more protection etc. I am not sure I will though. We will see and I will update with some pictures later as well.

Quick question to everyone - how do I download my pictures so they show on the page - rather than having a link that the picture is on?

I did it at first and now I can't figure out what I am doing wrong! HELP!
 
The pictures issue is a site problem, nothing you're doing wrong :)

If you upload them to an image host like photobucket, you can use the IMG code to post the pictures that way.

Regarding bluing vs painting, I would go the bluing route personally. It gives a more authentic finish, especially if you're going to be doing any weathering. If you want a fresh factory finish, a satin black paint will certainly get the job done
 
Thanks Kevin! I appreciate your input and reassurance on the pictures thing. :)

Oh, and I totally agree with you about the bluing - but I am going to make the most of my paint job for now (hey, it's a good learning experience) and then after Halloween I am going to strip the paint/primer and go back and do the bluing. Again, painting is good for covering blemishes and evening out the look (at least from my perspective) but it also removes a lot of the details and I think the details/flaws are what makes it stand out as more realistic prop. Also the BC bluing products are very easy to use - seriously. The BC Black Brass worked awesome with my brass pieces for the scope - you just have to be patient and remember to be generous with the liquid.

I do look forward to see what you all think of the final product - I am hoping to have pictures up by the end of the weekend. And, don't feel bad about being critical - as long as we are nice about it - it will help me do a better job on my future costume work afterall! :D

I am also hoping to have my shirt, vest, and pants in by this weekend (and will post pics of that as soon as they arrive) and I want to test fit them - especially with the boots - to see if I need to have my boots adjusted.

Quick questions - my boots are leather - with a semi-gloss finish - were the ANH boots more like patent leather (very glossy)? If so, does anyone have any reccomendations on shoe polish to help step up the shine? Thanks!
 
Hey Kevin, thank you! I figured it wasn't that shiny but I saw a picture of the Motorcowboy boots (which seem to be a popular choice for some) on their webpage and they certainly looked high gloss! :D

So, I decided after working on the weathering earlier to finish the blaster entirely. So, with the exception of figuring out how the %$^& to get the screws for the scope' brass endpieces cut down and wee bit more on the buffing - it is done (at least for now...lol).

So, here are some pictures of what it looks like now in it's almost finished state :

View attachment 241271
View attachment 241272
View attachment 241273
IMG_20131010_231907.jpg
IMG_20131010_231951.jpg
IMG_20131010_232058.jpg
IMG_20131010_232115.jpg
IMG_20131010_232145.jpg
IMG_20131010_232202.jpg
IMG_20131010_232207.jpg
IMG_20131010_232234.jpg
IMG_20131010_232252.jpg
IMG_20131010_232259.jpg

I am actually satisfied with it any my tools/droid caller - especially since this my first real prop building experience. I learned a lot and while finishing my blaster was more bittersweet than I expected - I am already thinking about my costume for next year! :)
 
Hey everyone - had a nice surprise in the mail today!

I received my custom made vest, shirt, and pants - based on my measurements. They look great and I am really pleased with the quality/fit. It is a big relief to have these done and I actually look good in them too. The costume thus far also meets Rebel Legion Specs for formal attire.

Here are some pictures of my costume so far:

IMG_20131011_181846.jpg
IMG_20131011_181900.jpg
IMG_20131011_181910.jpg

So, the only big item left to complete the costume is my belt rig - which should be ready within the next week - in the meantime I am going to bring my boots in to be adjusted (a bit big in the calf now) and work on some final touches on my blaster. :D
 
Thought I would post an update -

1) I decided to hold on having my boots altered for now for the simple reason I want them to go to a reputable shoe shop - hard to find one that is close to me that will work on leather boots. I am working on this though and will likely have these done after Halloween but before I take the costume to my local Lexington Comic Con (early next year).

2) I am still waiting for the blaster rig - I should have it by next wednesday though!

I will be sure to post some wrap up pictures of the whole costume together and few pictures of me in it. Hopefully, my short hair won't throw the whole costume! lol. :)
 
Hey everyone.

I finally got my belt rig in yesterday. It is very nice but a bit big on the hips - which is more obvious when you have a heavy blaster in the holster. Otherwise, I like it!

Here are some pics of it along with my belt tools, droid caller, and blaster:

IMG_20131023_120254.jpg
IMG_20131023_120305.jpg
IMG_20131023_120321.jpg
IMG_20131023_120332.jpg
IMG_20131023_120343.jpg

So, after all that - we are now ready for the Halloween party I am attending this Saturday. Just in time! lol.

I will post some pics of me in my costume from the party after the weekend.

I hope that everyone has a great weekend! :)
 
WOW!
GREAT lookin' Rig, Machiavelli!

Congrats with your great results with this whole project!
(Especially for getting everything worked out and pulled together in time for your event this weekend - Nicely done!)

Looking forward to seeing a few shots from the party once it's all said and done.

Now...
Have a BLAST!
 
Hey Mitch!

Thanks for the kind words. I had a great time at the party!

Here are a couple of pictures from the party I went to:

IMG_2960.jpg
IMG_2956.jpg
1377995_10202630551431995_69170252_n.jpg

I will put up some better pictures of the costume (with it on me) in the next week - which I will use to submit to Rebel Legion.

Have a great week everyone! :)
 
Last edited:
Love the payoff pics. Came together very nicely. Pics follow of my blaster, caller, and bro-in-law (I added the Falcon Corridor for his amusement).

I had to make some concessions with the blaster for my brother-in-law due to time constraints, but it all worked in the end. The Leica/Leitz Ceyoo (flash gun) made an (costume party) acceptable droid caller, and looked far better (metallic, complex) than the rough resin one he was able to acquire. I stopped with the black (Plastikote) sandable primer enamel (no time to paint before his party cutoff) on the blaster as the finish was "party" acceptable. I used a 3/4 inch copper joiner as a quick-and-dirty bull barrel. In a panic, I bought a Dark Energy "factory second" flash hider as my special order ones had not arrived (and it turns out, did not arrive in time). This accounts for the non-sw-canon mix of greeblies and temporary flash hider. In the end, I also had to mount a dead aluminum flashlight for a scope (while I struggled with tapping a resin M19).

Thanks for all of the detail, the tips, the photos, and above all, the inspiration.
 

Attachments

  • dl44.jpg
    dl44.jpg
    183.3 KB · Views: 214
Last edited:
Machiavelli--

Great job and the blaster and your entire costume! Can you please share the sellers name that you bought the costume from?
Thanks!
 
Back
Top