Hello folks. I am happy to present my very first prop replica progress "article." If you stick it out, you can learn about the twist at the end. Man, what a rollercoaster ride this project has been! I suggest you start at the beginning and join me on my adventure today:
"GROW FOR ME"
First, I should say that attempting to make an Audrey II, when I was six or seven, might be my very first prop replica building experience. I colored a styrofoam ball with a green sharpie, stuck it with a pencil, and placed it into a small ceramic pot with some dirt. I also remember memorizing every line of Little Shop of Horrors and getting in trouble for singing in the hallways at elementary school. My FAVORITE scene was the "grow for me" number when Seymour sings to "Twoey" and begs her to grow. I LOVED the part when Twoey begins to make those kissing/sucking noises after Rick Moranis pricks his finger. I think its one of the most pivotal moments of the film.
With that said, imagine how excited I was to own my very own Audrey II!
I had a day off today, so to celebrate, I decided to take on this project. About a month ago or so, I was going to buy one of the Audrey II kits that were sold here in the past from an RPF member. I went away and didn't have internet access so I lost that one. I then was able to track one down from another member that included the accurate leaves.
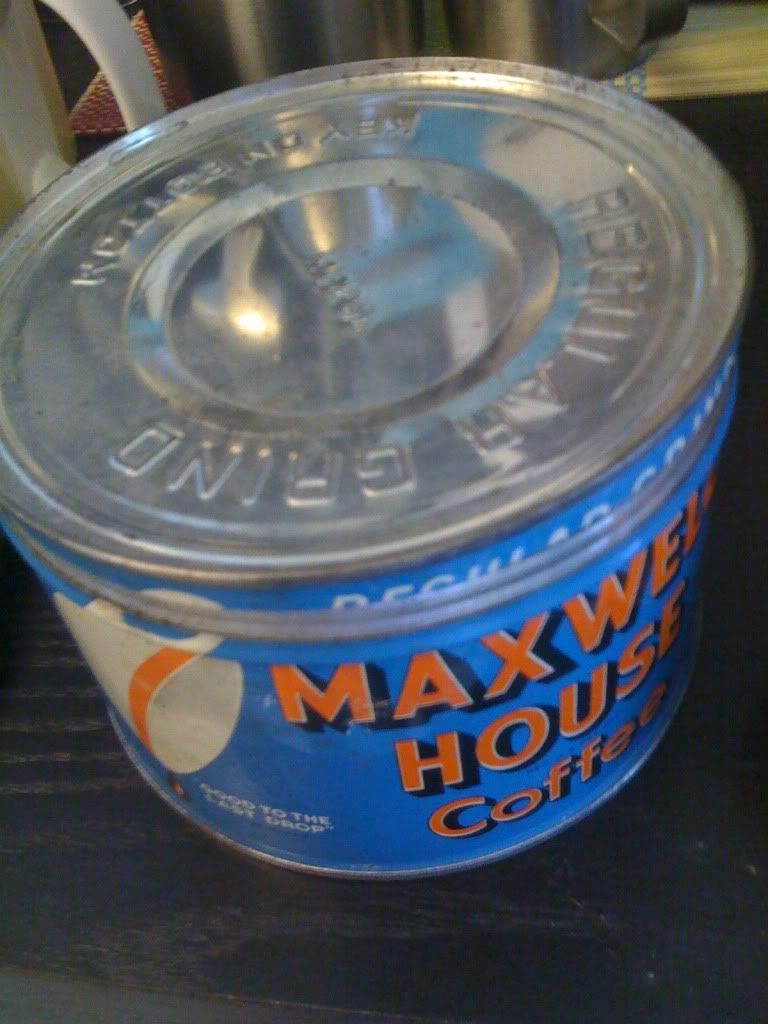
The kit was pre-made, and pre-painted (except for the leaves). It WOULD have been easy peasy to stick it to my Maxwell House can, paint and glue the leaves to it, and be done with it.
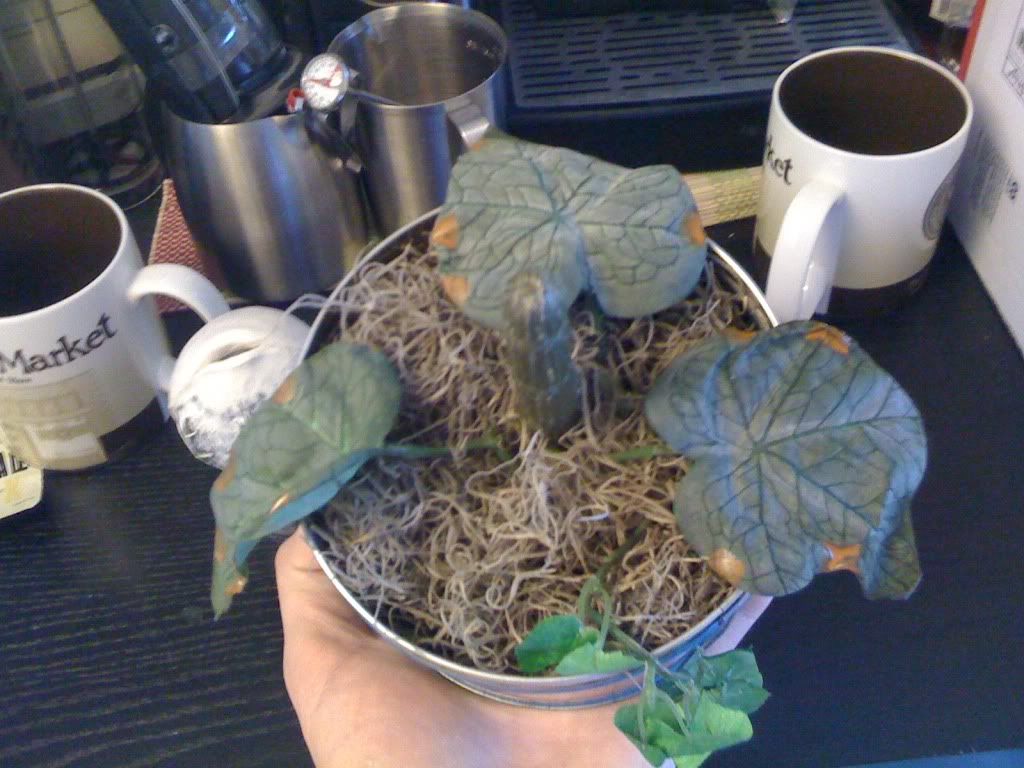
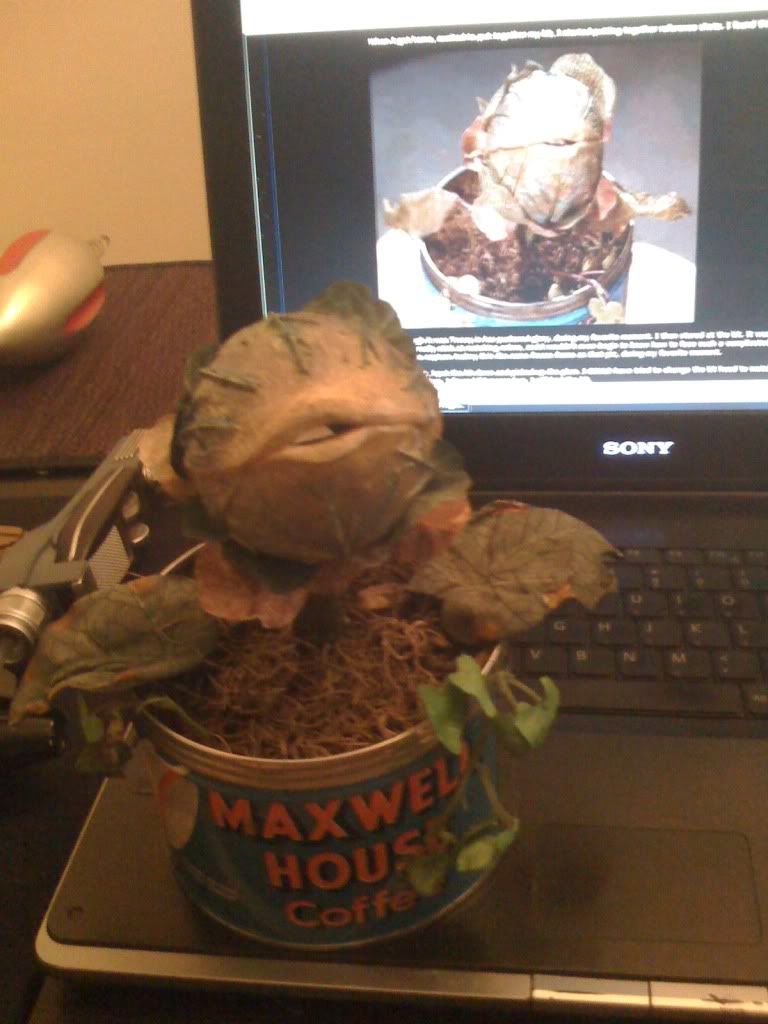
Here is my can:
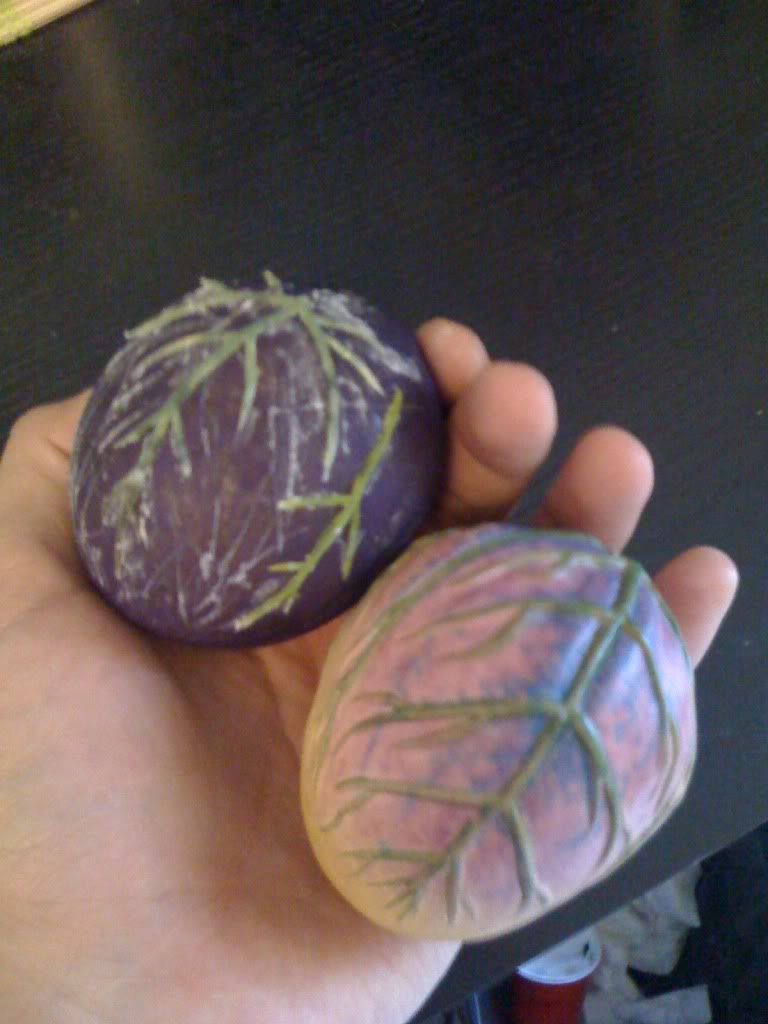
And the beautiful Audrey II kit:
Quite literally after taking these pics, I walked to the local florist and asked if they had any fake leaves. They showed me to a pretty nice selection. I had some shapes and colors in mind, but took a wide range of items since they were inexpensive. Next to the leaves was some fake fruit. I noticed that the fake plum was remarkably similar to the shape of my Audrey II body. Being only a few bucks, I bought it.
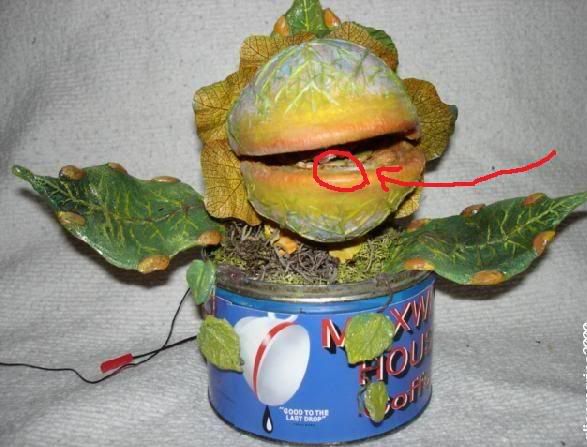
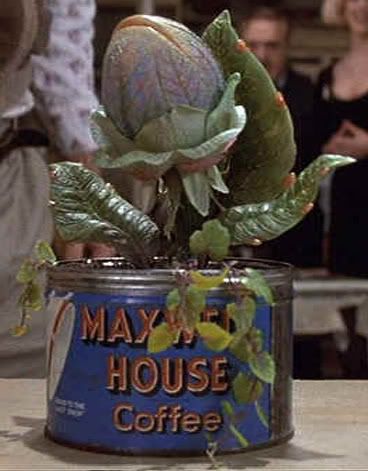
When I got home, excited to put together my kit, I started putting together reference shots. I found this one:
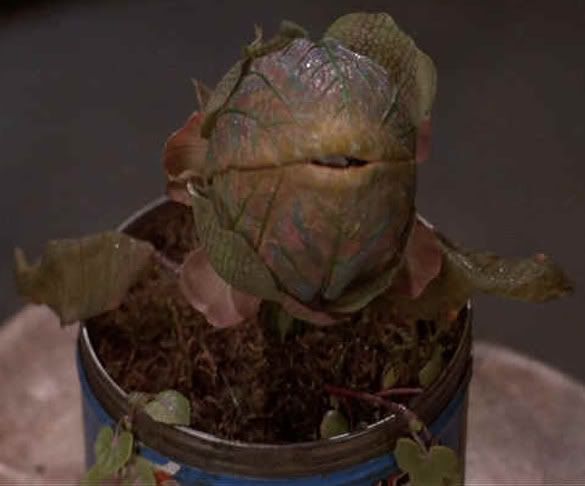
Sure enough it was Twoey in her puckered glory, during my favorite moment. I then stared at the kit. It was gorgeous, and the selling point for me was that it was pre-painted. I really stink at matching colors, and I wouldn't even begin to know how to face such a complicated arrangement. BUT, I couldn't help but think how awesome it would be to capture Audrey II in the same freeze frame as that pic, during my favorite moment.
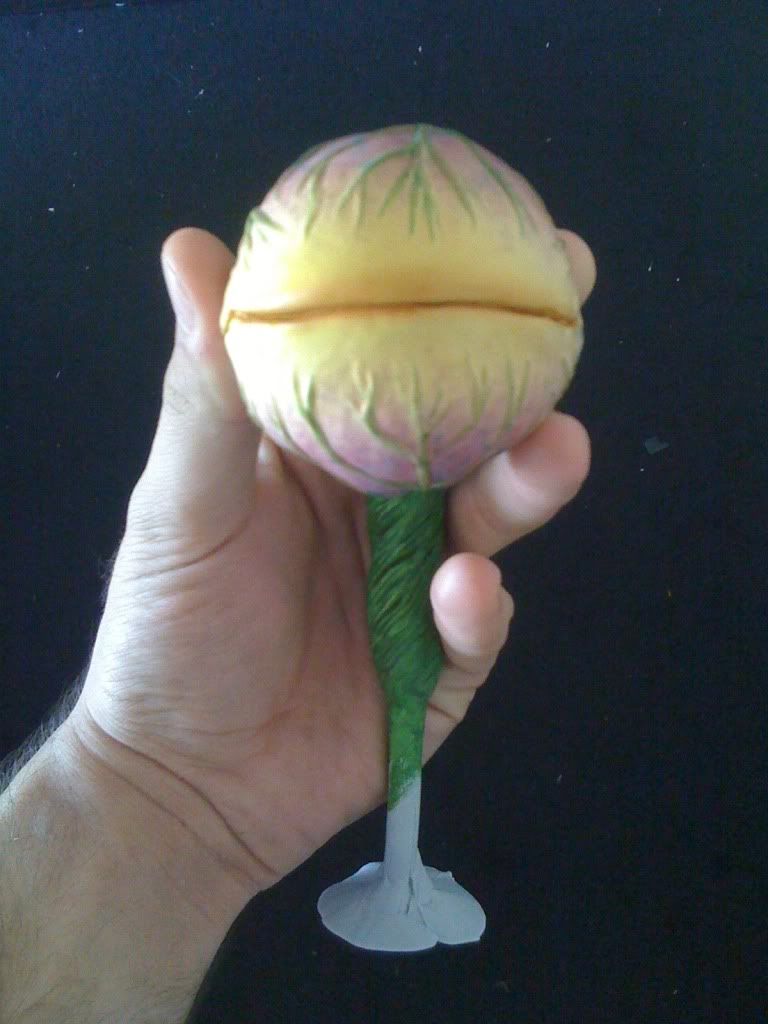
At that point, I put the kit down and picked up the plum. I COULD have tried to change the kit head to match the photo, but I was so afraid to ruin it, I decided instead to work on the plum. I figured if I messed up, I still had the kit.
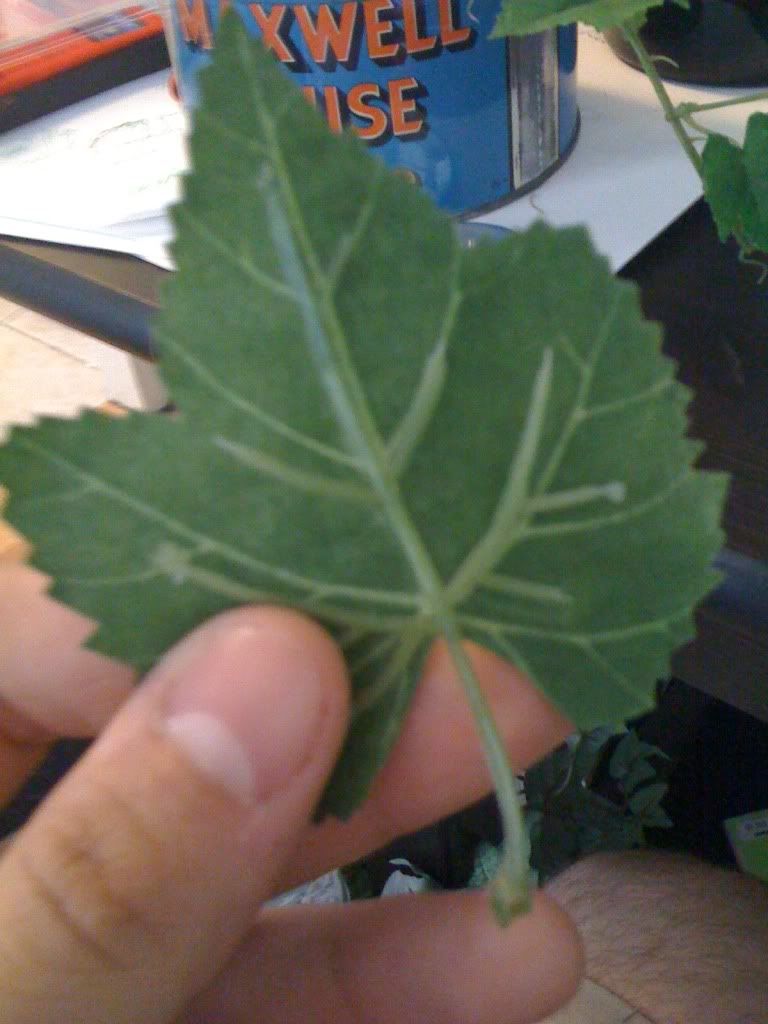
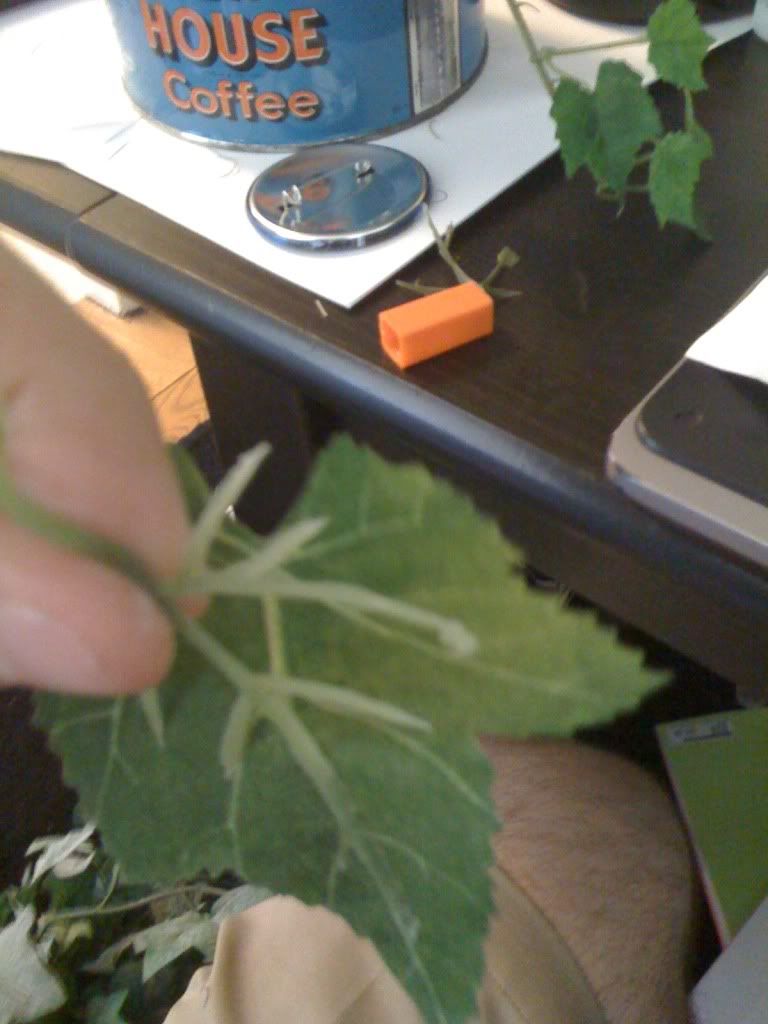
I tried to think. How was I going to make this plum look as good as the kit? How was I going to make it pucker its lips? WHERE WAS I GONNA' EVEN GET LIPS? What can I use to make those grooves and veins that appear on Audrey II's head? Staring around the room, my eyes caught this bag of fake leaves...
THEN IT HIT ME. :eek
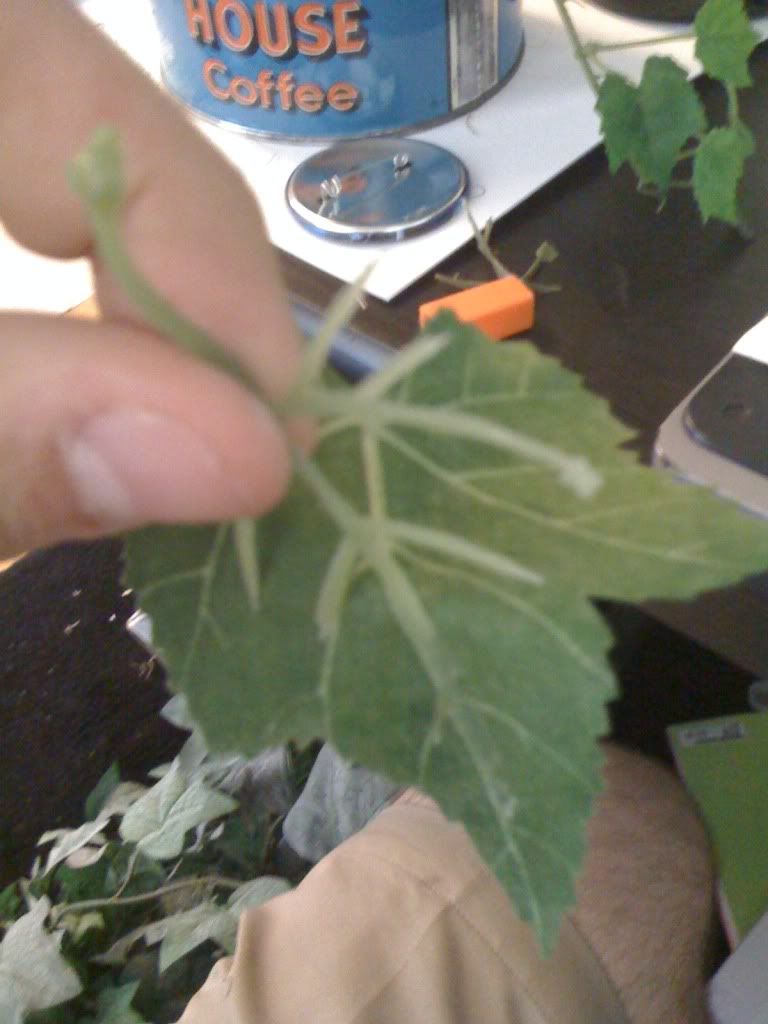
On the back of the leaves, glued, were faux veins.
If I could just...PEEL IT OFF!!! Yep, they came right off!!!!:
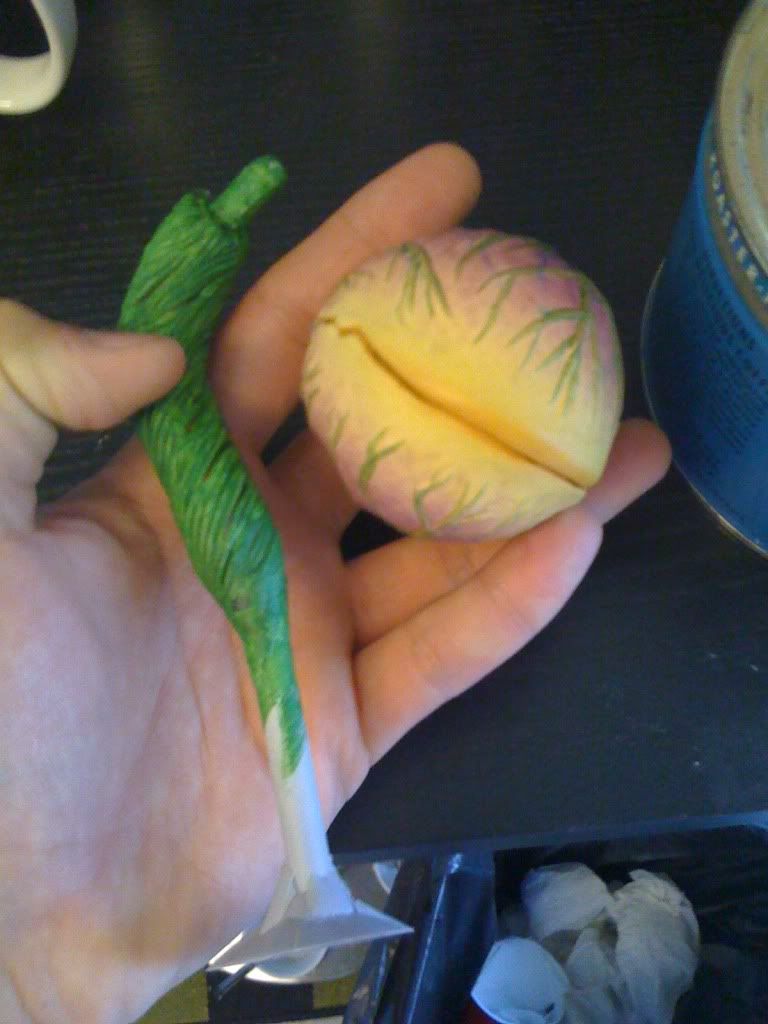
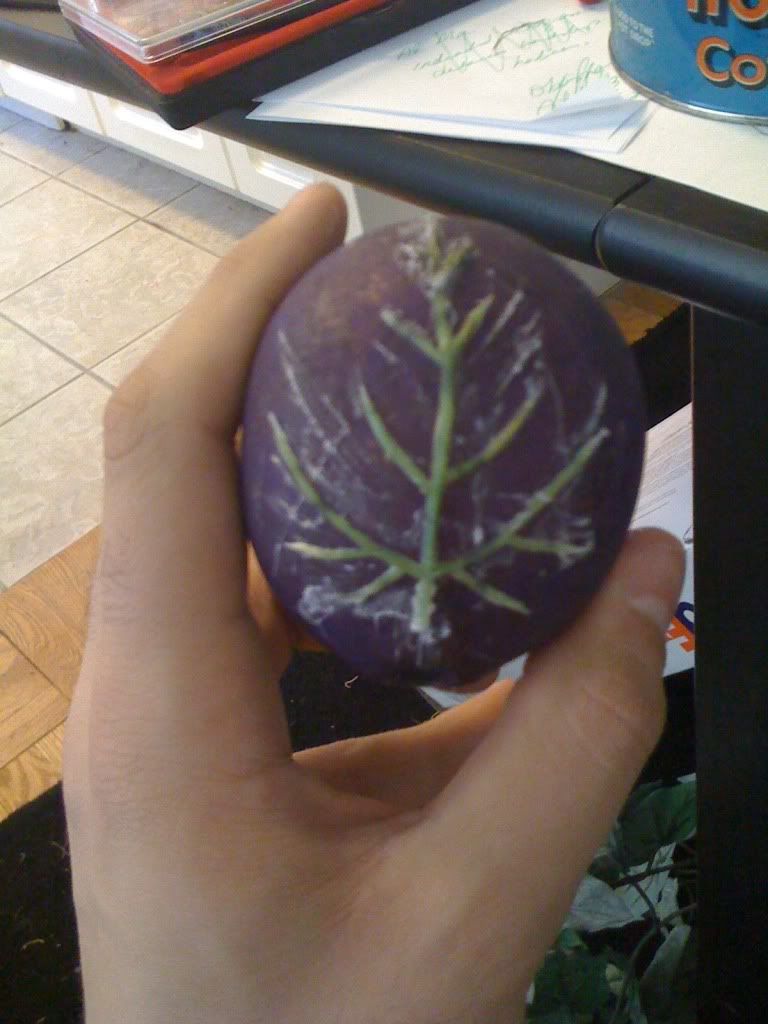
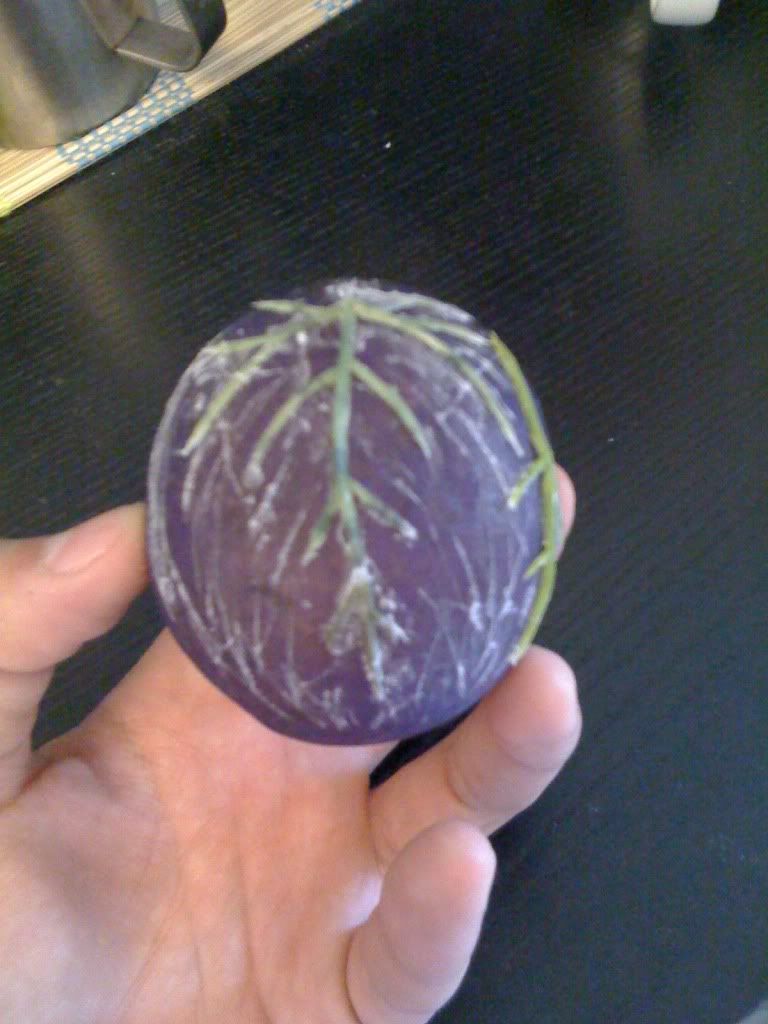
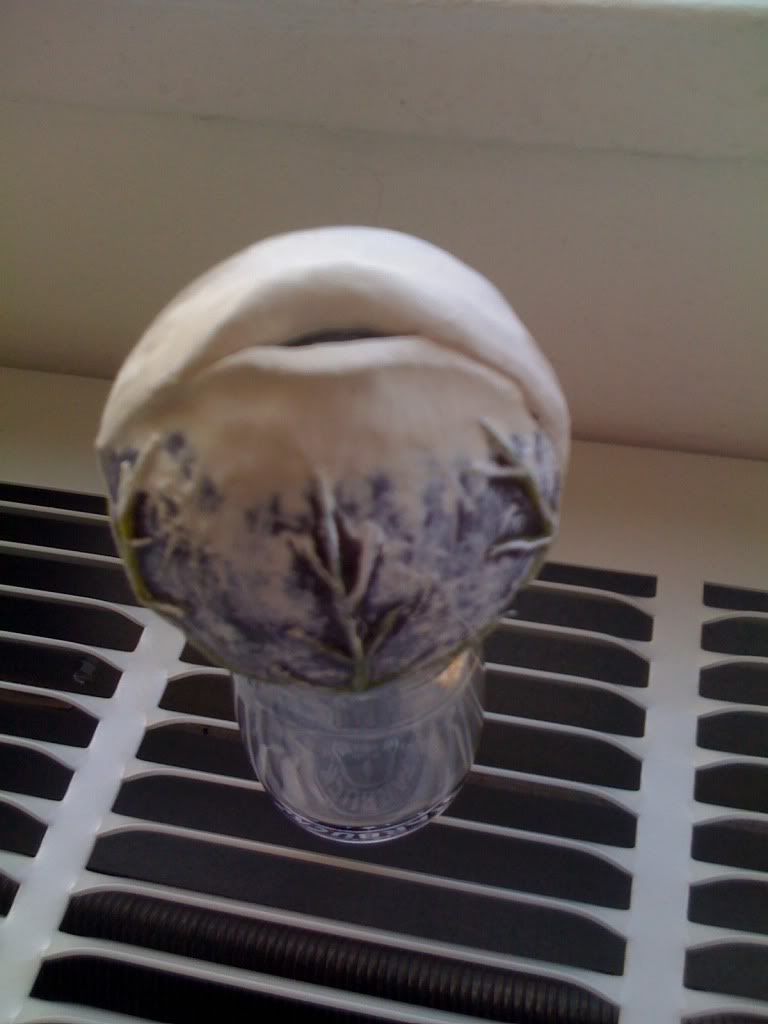
I grabbed my fake plum and glued the fauz veins too it. I then used the super glue nozzle and applied small lines of glue to add texture to the plum:
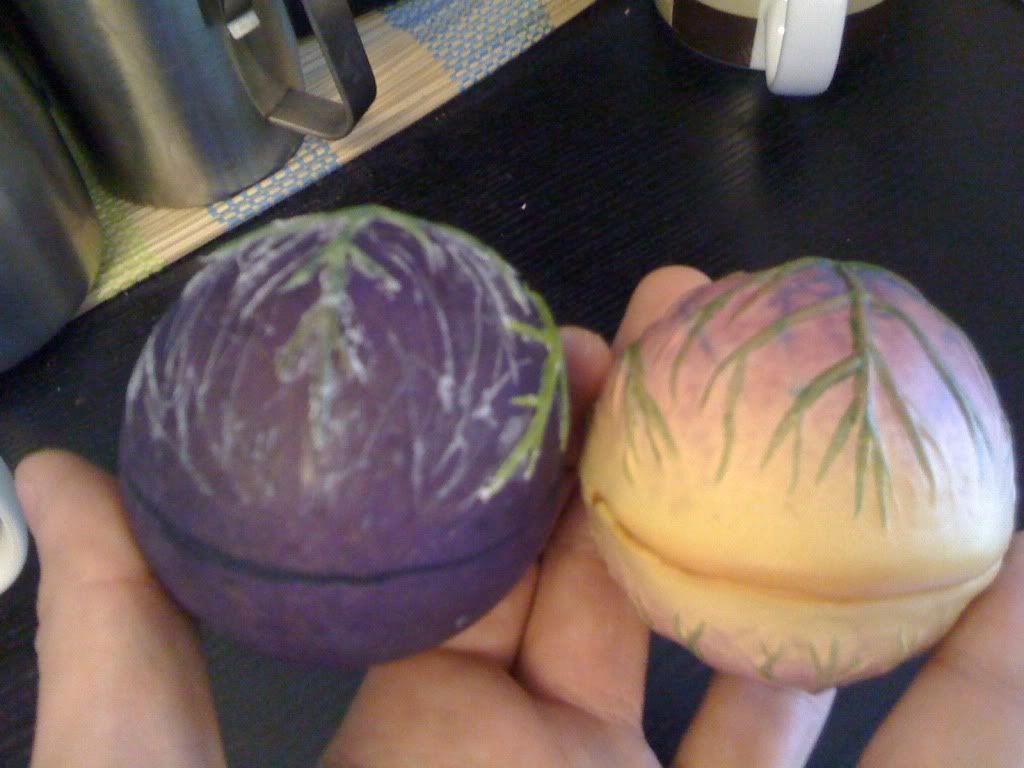
Here's the plum next to the kit head:
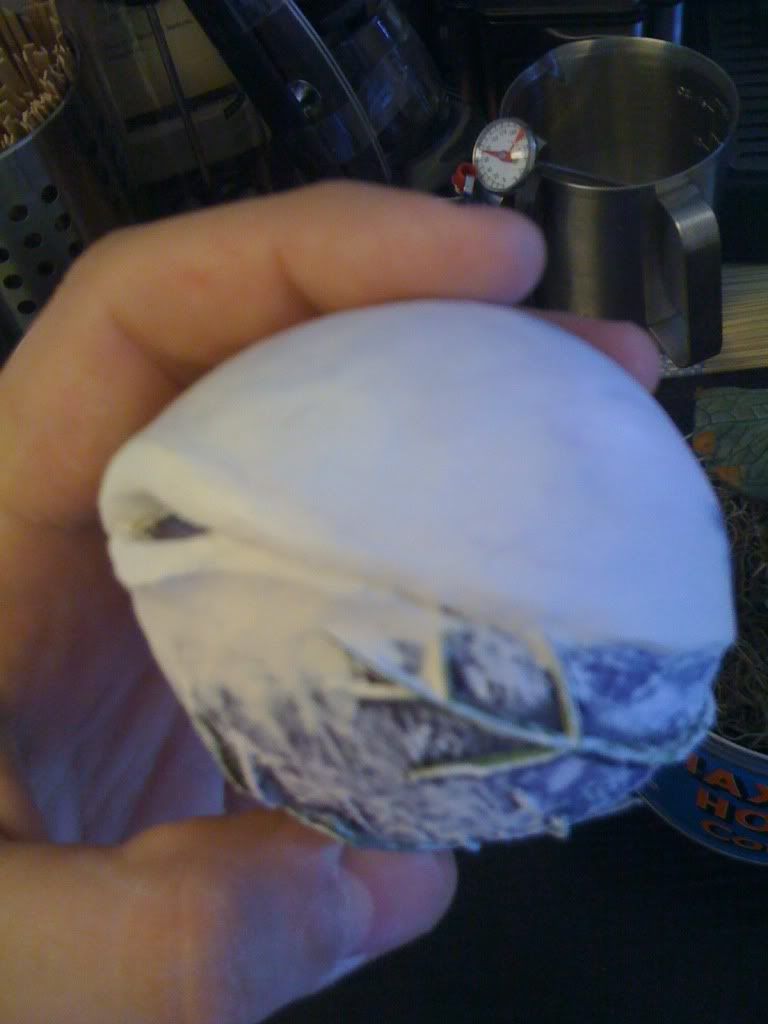
Still off, I then took some of my air-dry crayola clay, and started to apply it carefully. After a few minutes, I realized my high school scupting class paid off and I was left with my very own puckered Audrey II head:

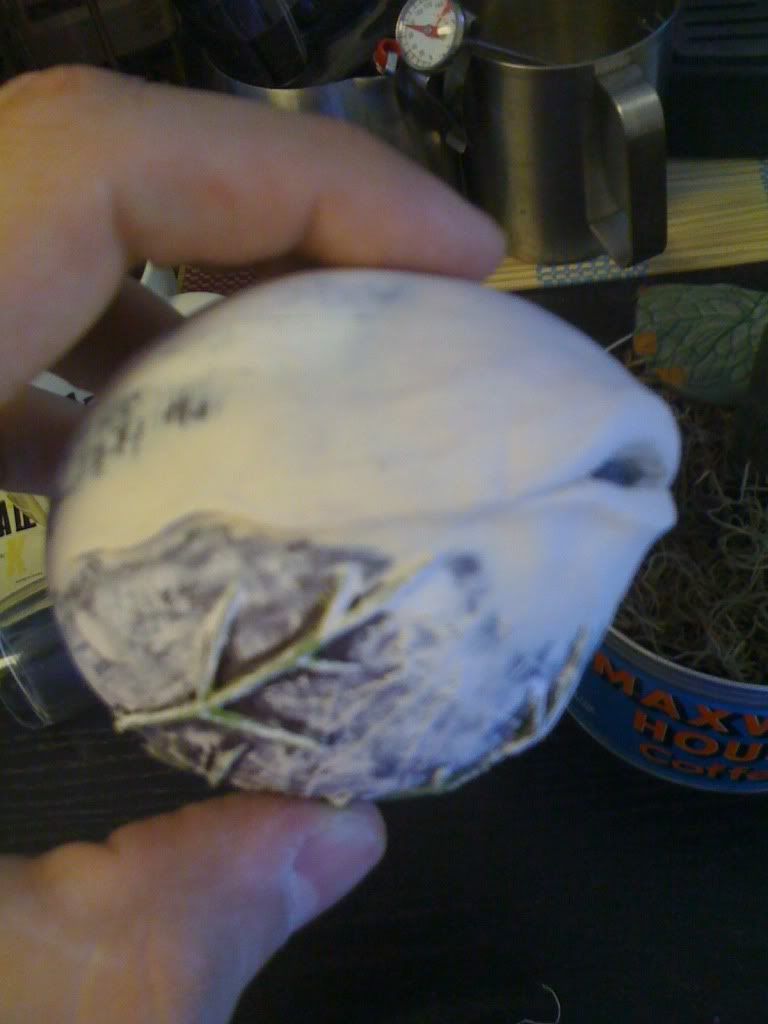
Afraid of cracking, I decided to glaze the entire head with super glue. I just poured it on, and rubbed it smooth around the entire thing.
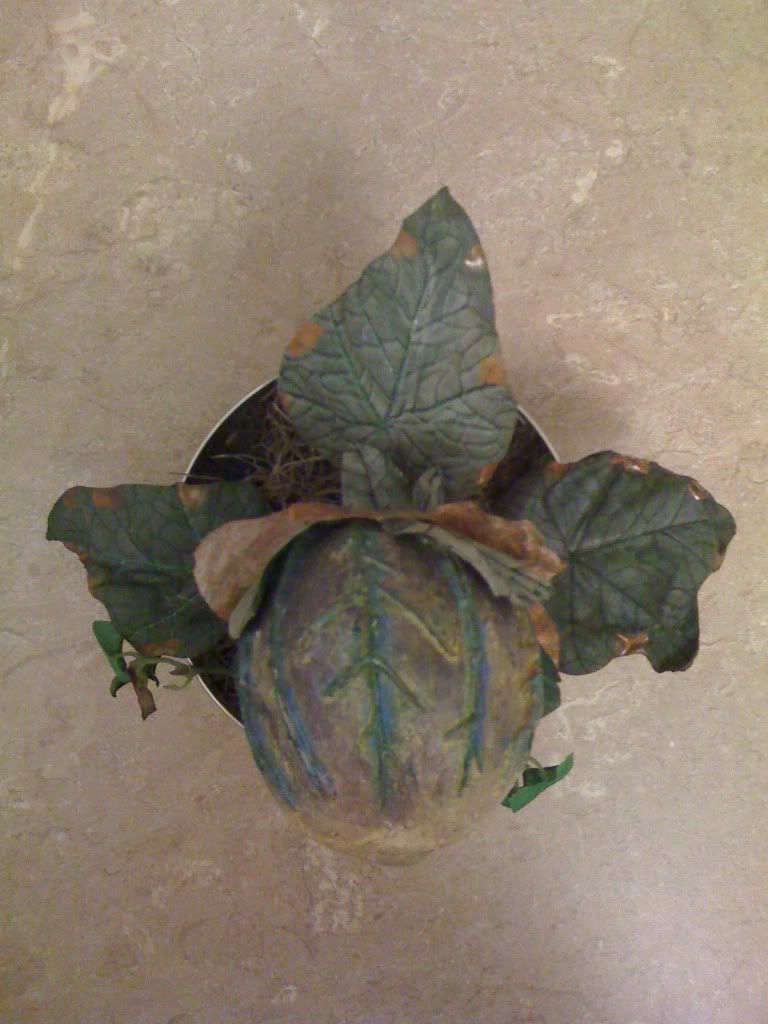
While it dried, I went to work on adding spanish moss to my Maxwell House can. I was going to paint my ACCURATE leaves and glue my stem down. I then realized I had a bit of a problem. I realized that Audrey II was seen in five stages throughout the movie. The baby bud, grown a little more in the M.H. can, Bigger still at the radio station, about five feet tall, and lastly about seven feet tall. At the M.H. stage we see Audrey II proudly displayed in the window:

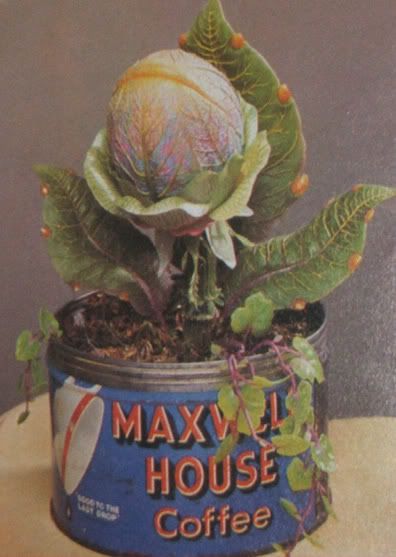
The above stage is how the kit came, with the leaves large and big and bright.
BUT
At the puckered stage, we see another side of Twoey, one where she's sick. As a result, she loses a whole layer of leaves under her head while Seymour holds her, and by the time he brings her to the basement, her leaves are dried, shriveled, and MUCH smaller.
At this point, I realized to be accurate, I couldn't use my nice leaves either!!!
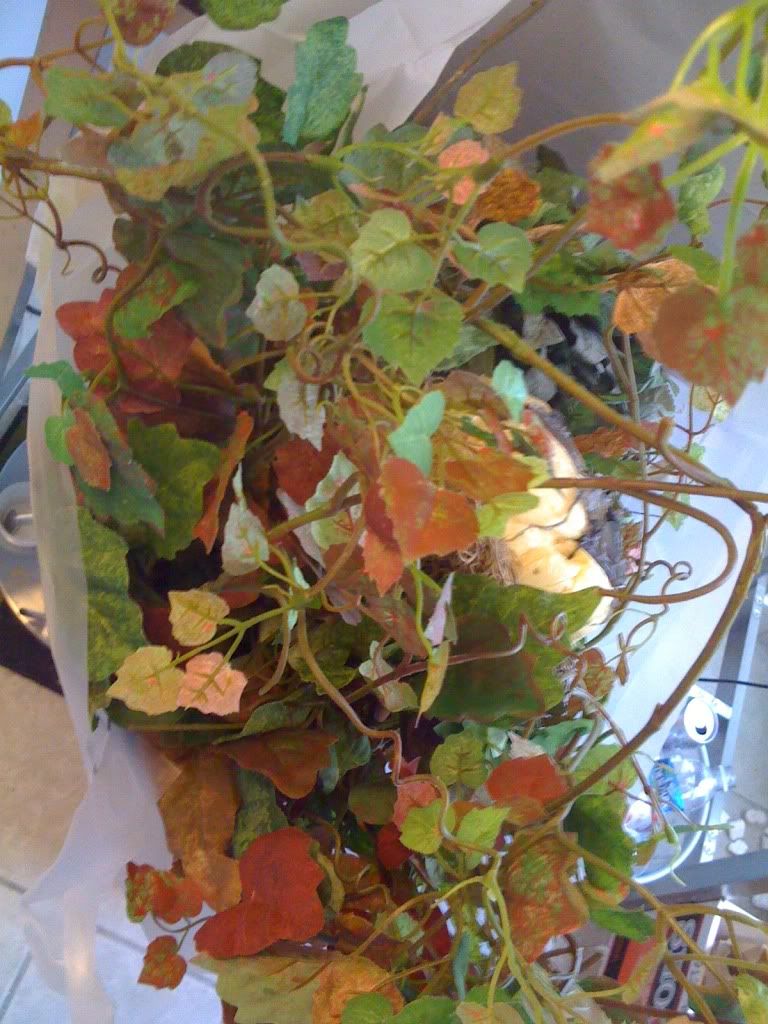
Sooo, I ended up scrounging in my bag and finding a good alternative. To approximate the proper shrivel effect, I took a flame to them. I ended by putting the orange spots in the various places.
Next, since I didn't use the head, nor the leaves, I figured at THIS point, I should start looking for another stem so I can recoup how much I paid for this thing!
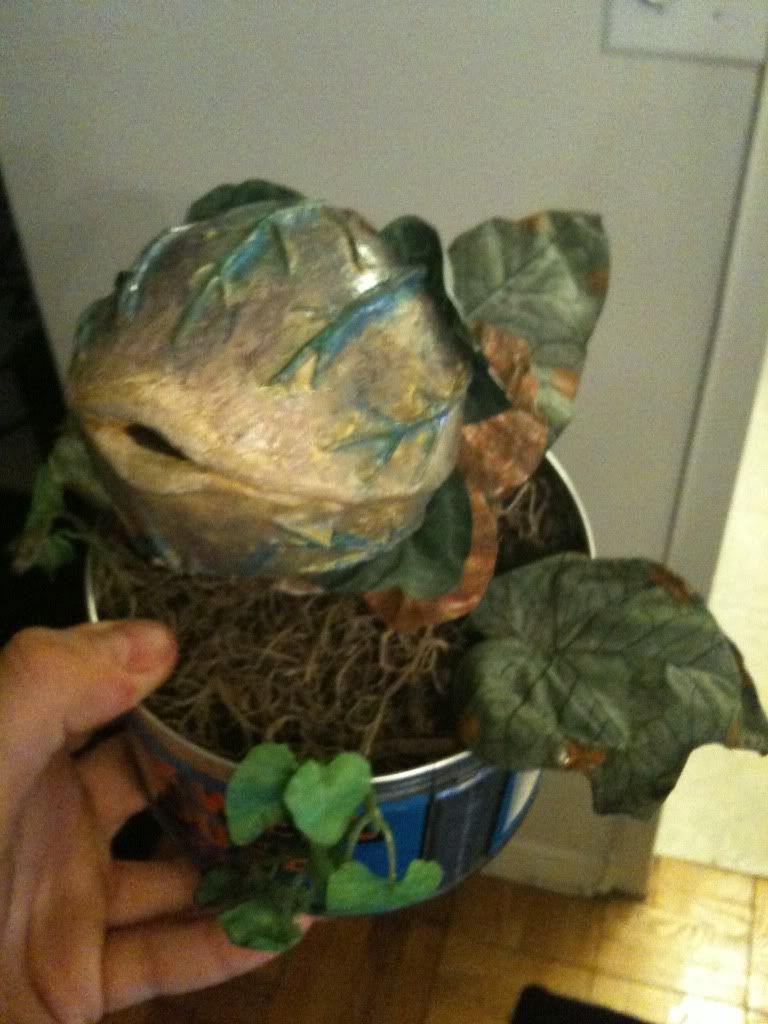
Again, searching through the bag, I found ONE stem. Amazingly, it looked A LOT like the stem in the film. I put in in the pot, and snapped these pics:
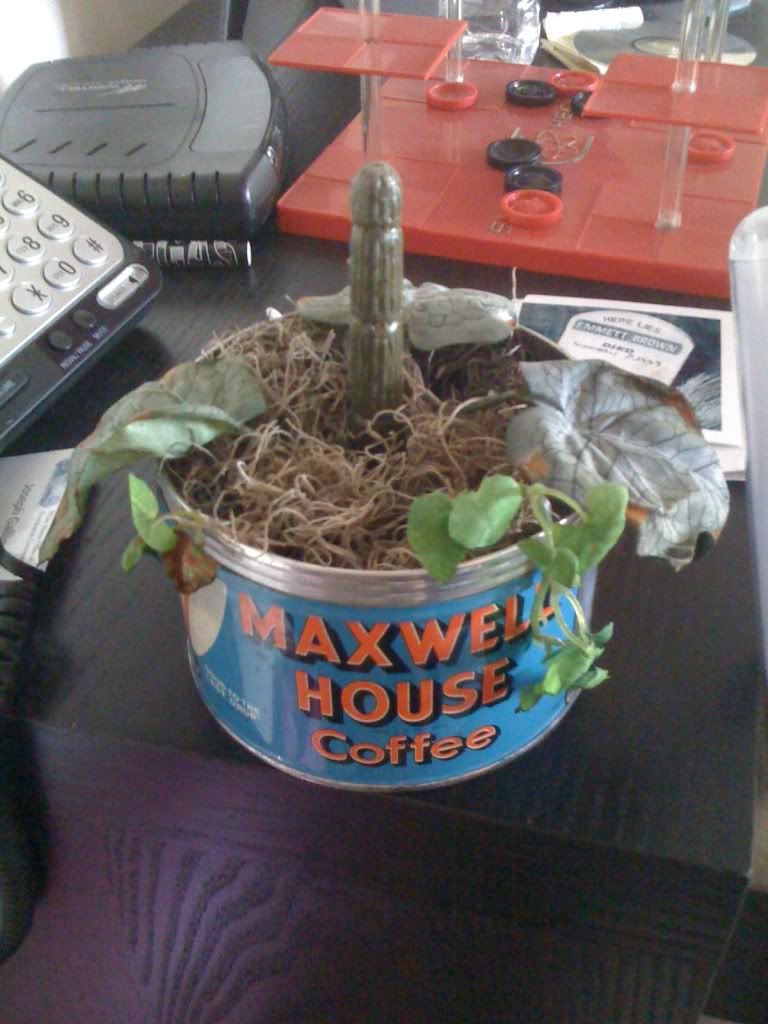

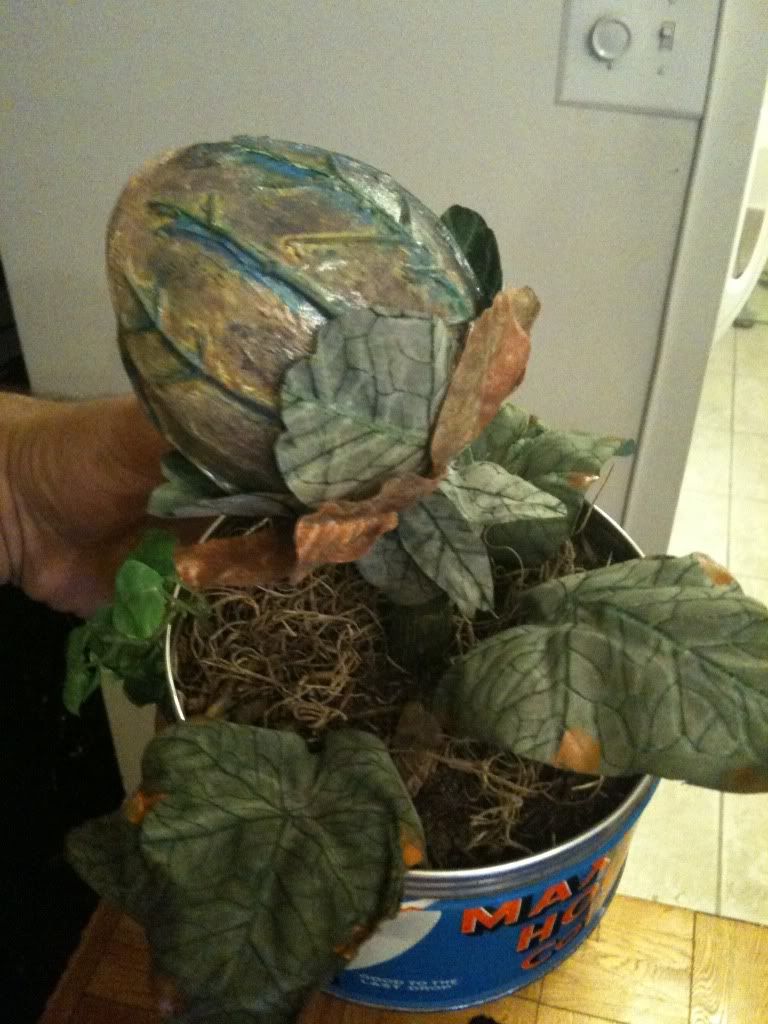
My puckered Audrey II was coming together:
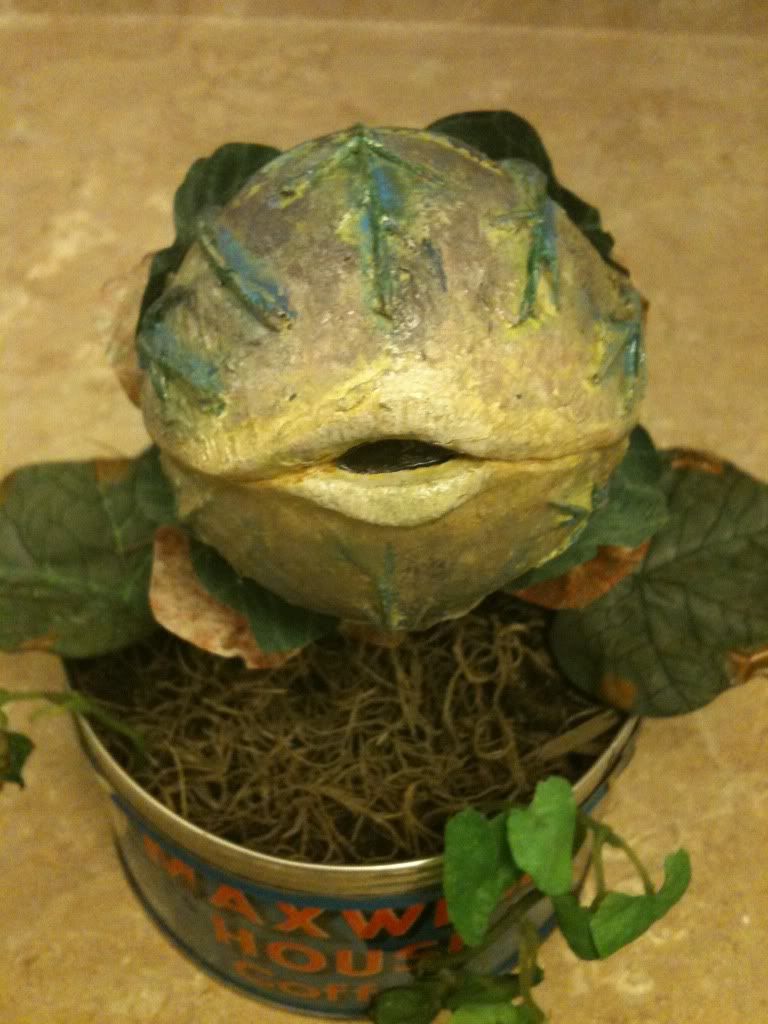
Next, I began to prepare to paint her. I didn't know where or how to begin. I decided to start with the lightest shade I noticed in Twoey's face, that light golden brown at the lips. I painted the whole thing that color. Then, I layered it, next the greens, then the beiges, then the purple, finally with the blue accents, all the while blending the best I could. Before long, I arrived at a color I was happy with. My number one goal was to make Twoey look as organic as possible, stuck in that freeze framed moment.
I used model oil paints. Typically, it could take at least a day if not more to dry, but today the angels were on my side and it literally dried to the touch in about three hours. I was then able to start on the leaves. Unfortunately, I misplaced my phone during this and couldn't take any pics until completion.
I carefully cut and measured the fake leaves as I saw in the reference photos and freeze frames. First I glued on the four green leaves, then the six pink leaves.
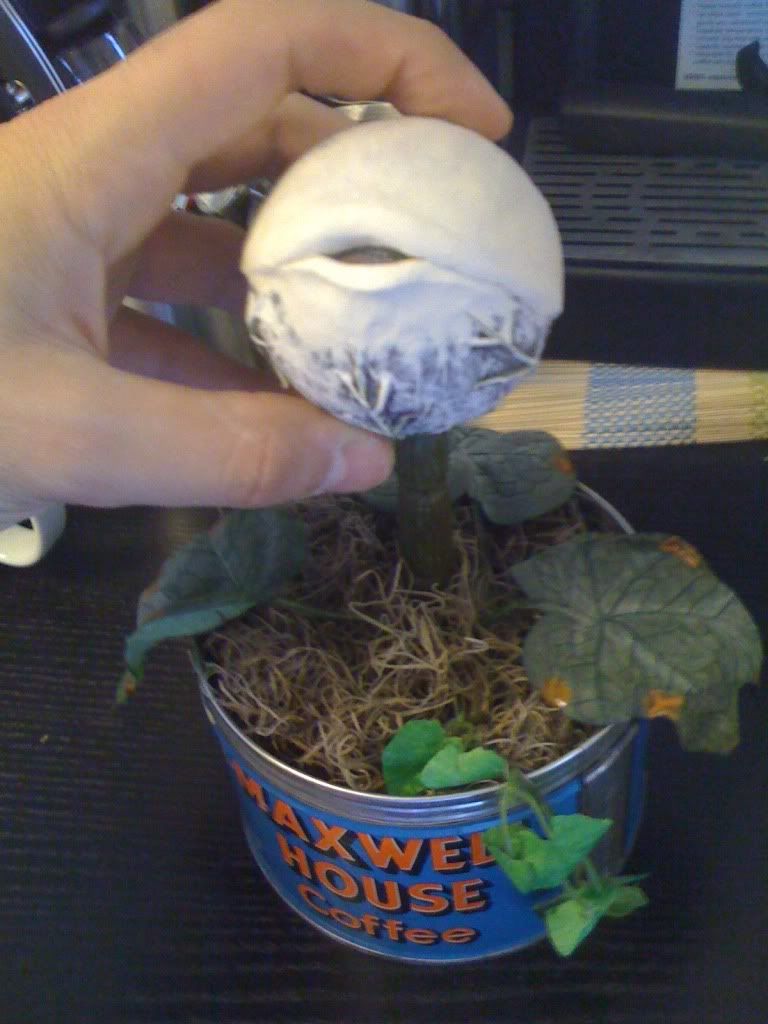
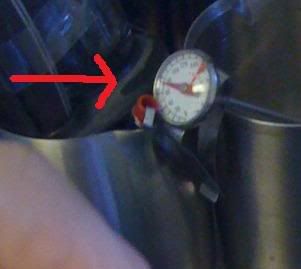
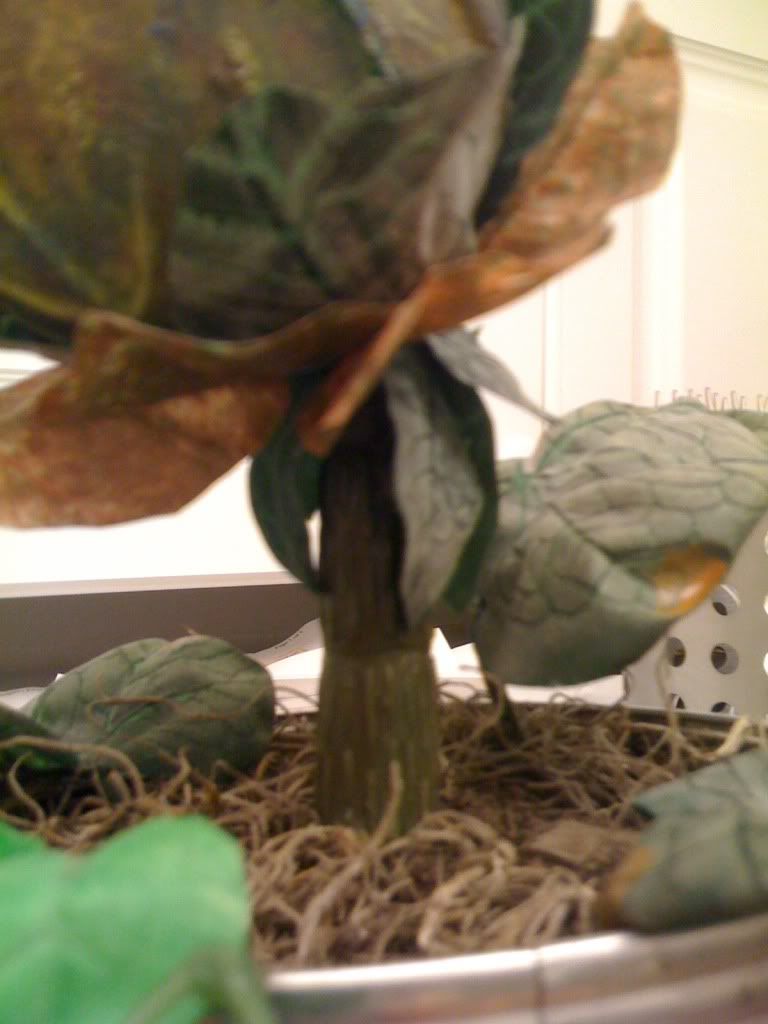
I needed a way to attach the colored head to the stem. Looking for some thin metal, I noticed the shaft of a small milk thermometer...in fact, you probably saw it in the background of some of my earlier pics:
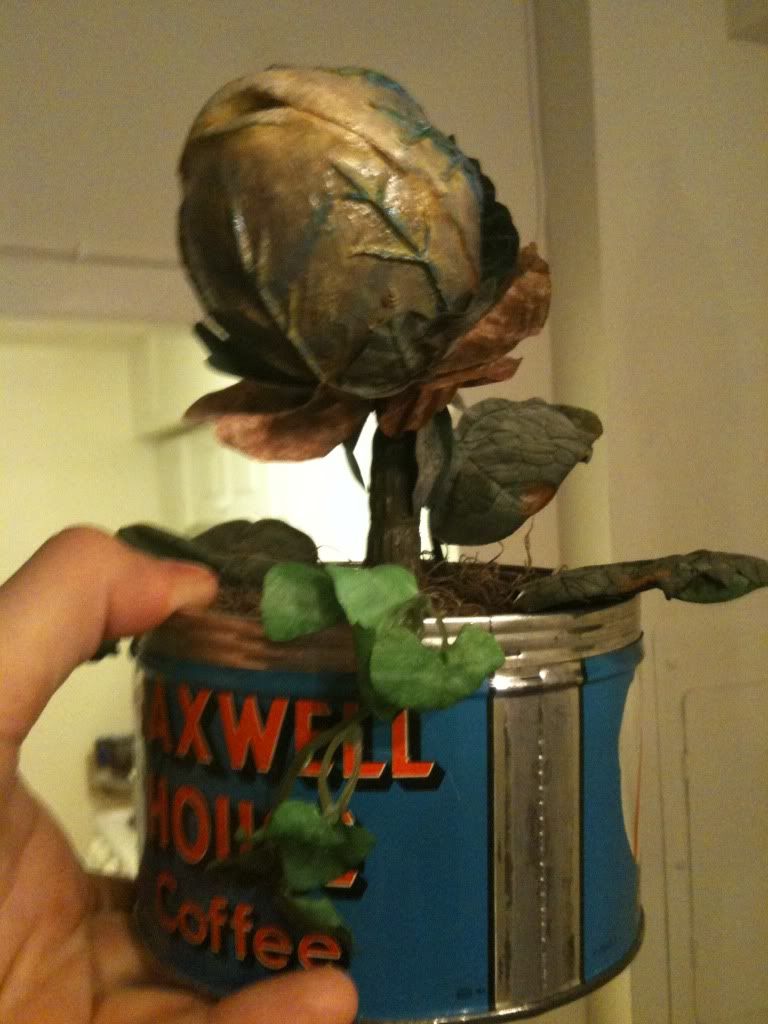
This meant my Twoey head was somewhat moveable, being able to bend up and down at the axis (but I only took advantage of this once to position the head. I wouldn't at the risk of the metal snapping eventually). I then glued two sets of small green leaves pointed to the opposite direction on the stem.
I then glued the stem to the bottom center of the can. Running downstairs, outside my building, I filled a bag of dirt. I then wet it a little and packed it into the can, further securing the stem. Lastly, I covered the whole thing with spanish moss.
Next came the leaves. It was fairly easy to stick them right into the dirt. I used a pen cap to force the back leave to stick up.
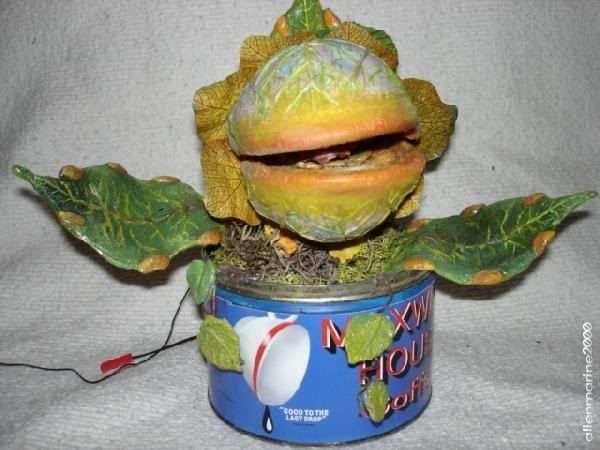
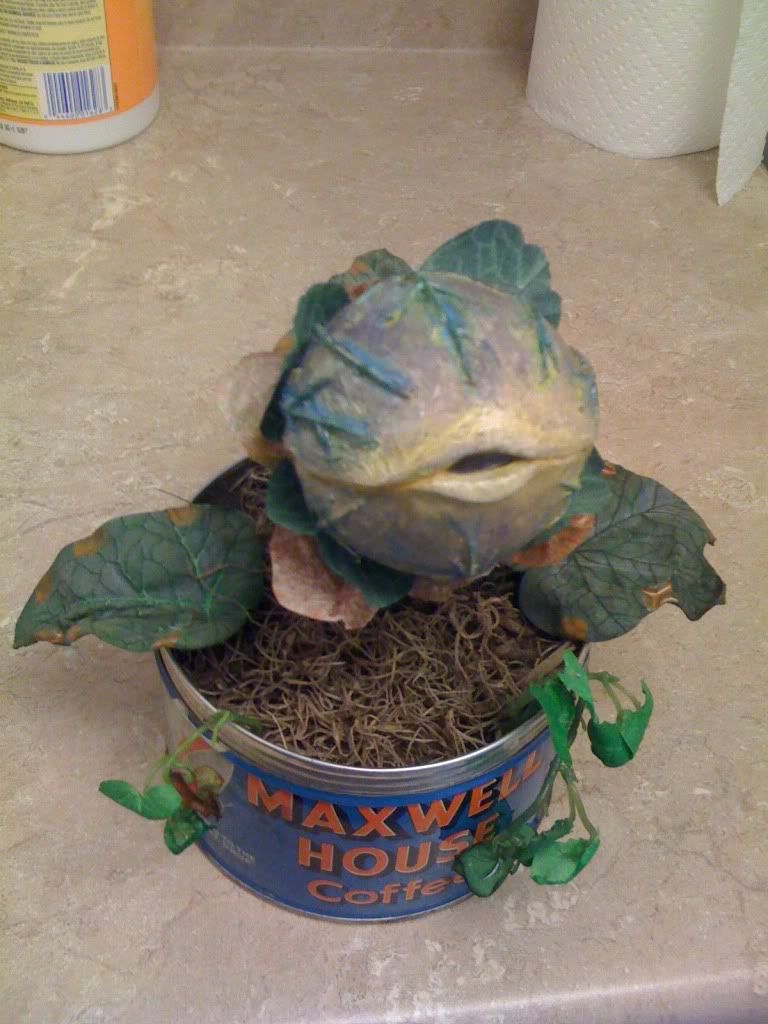
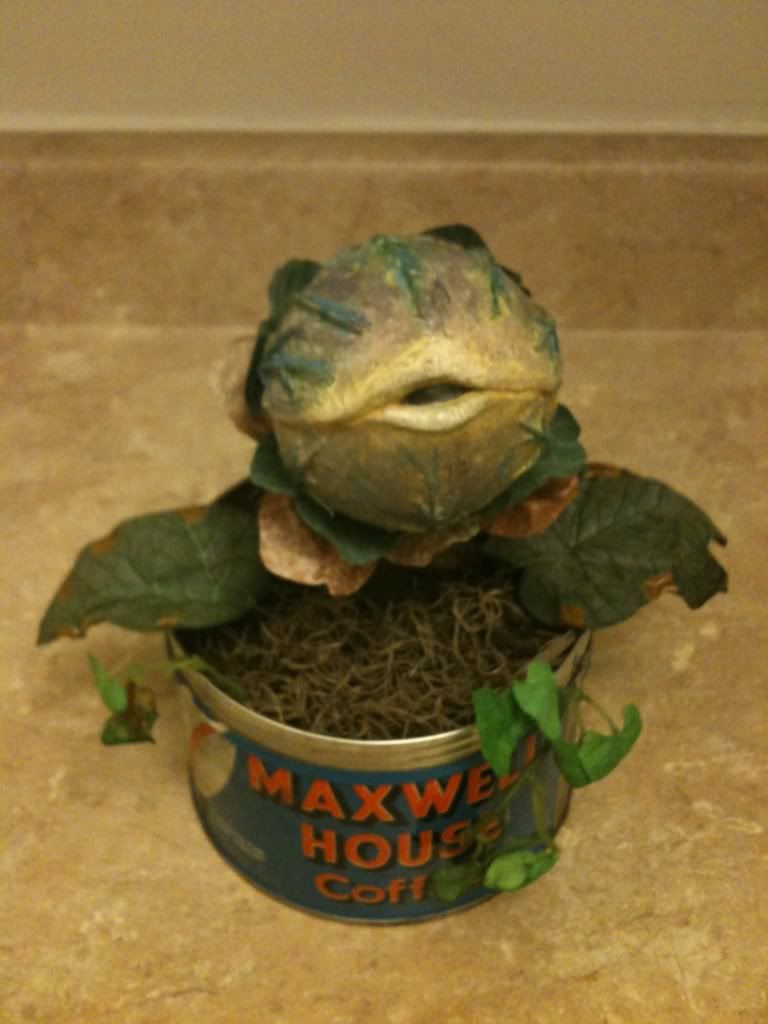
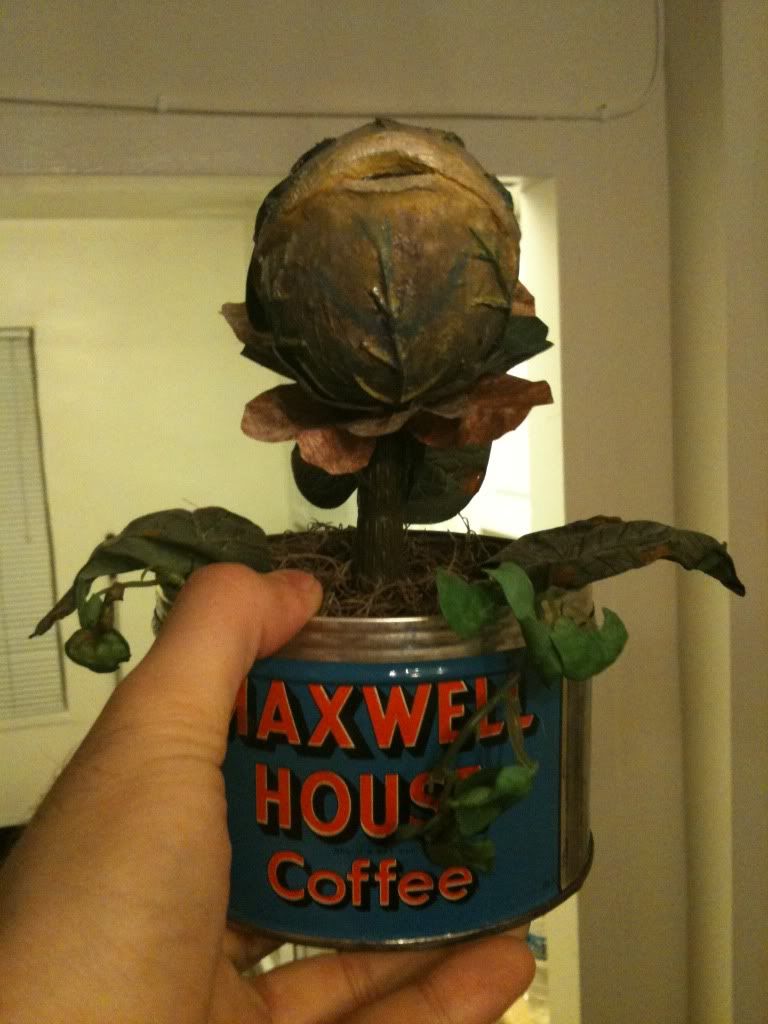
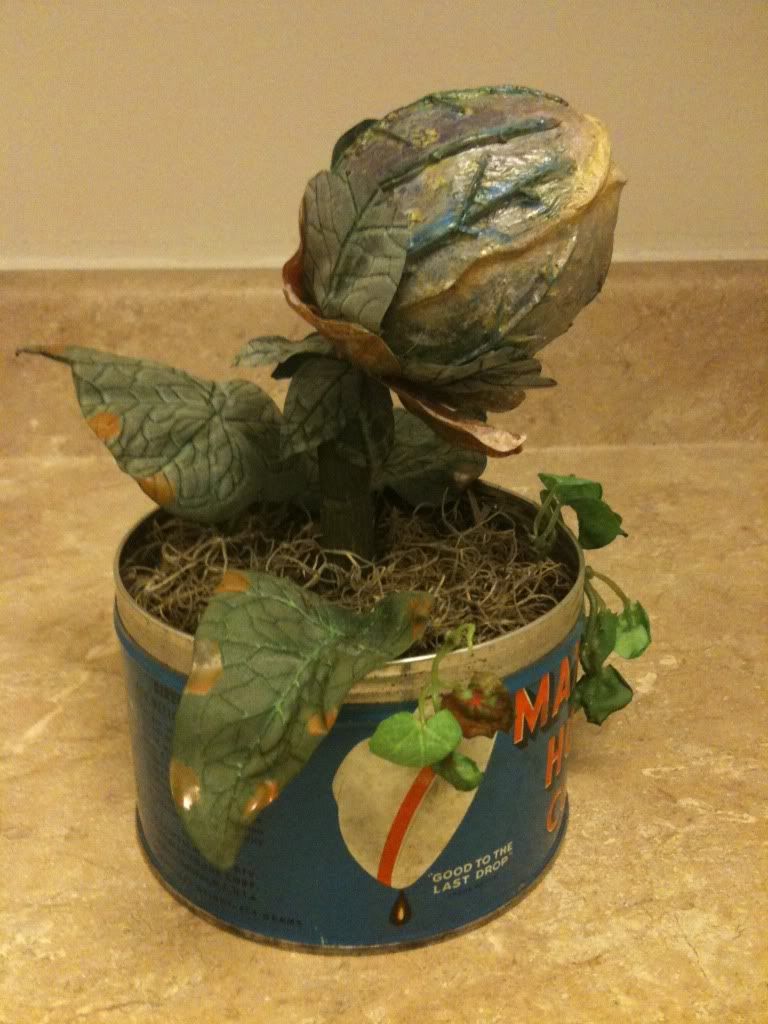
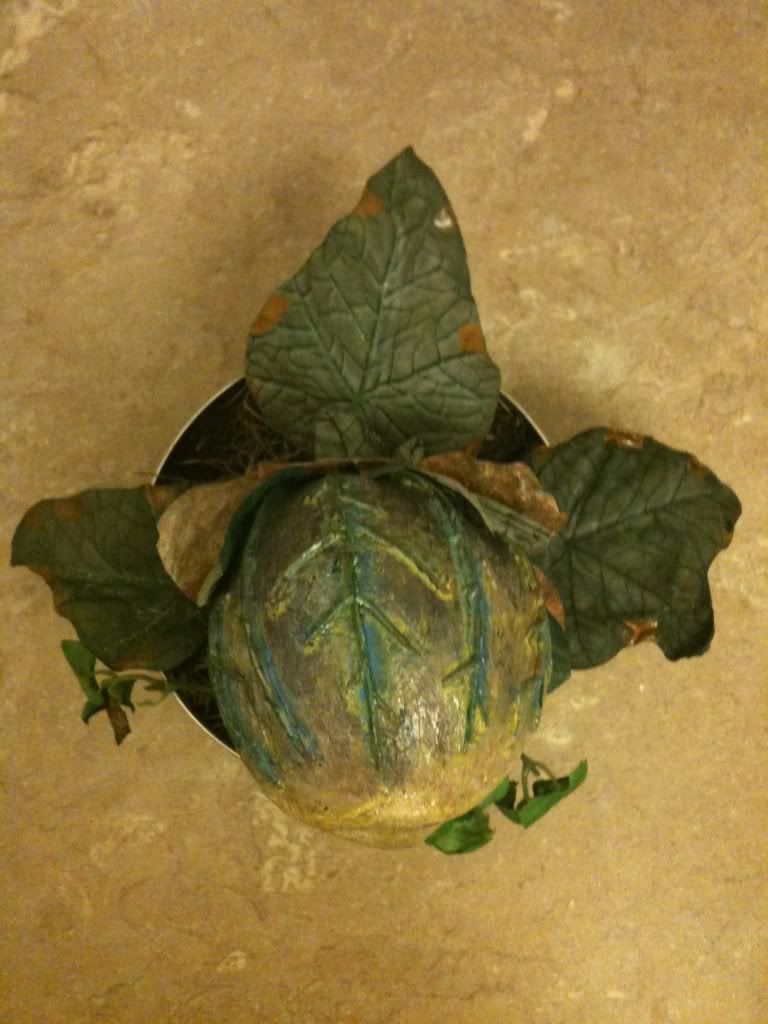
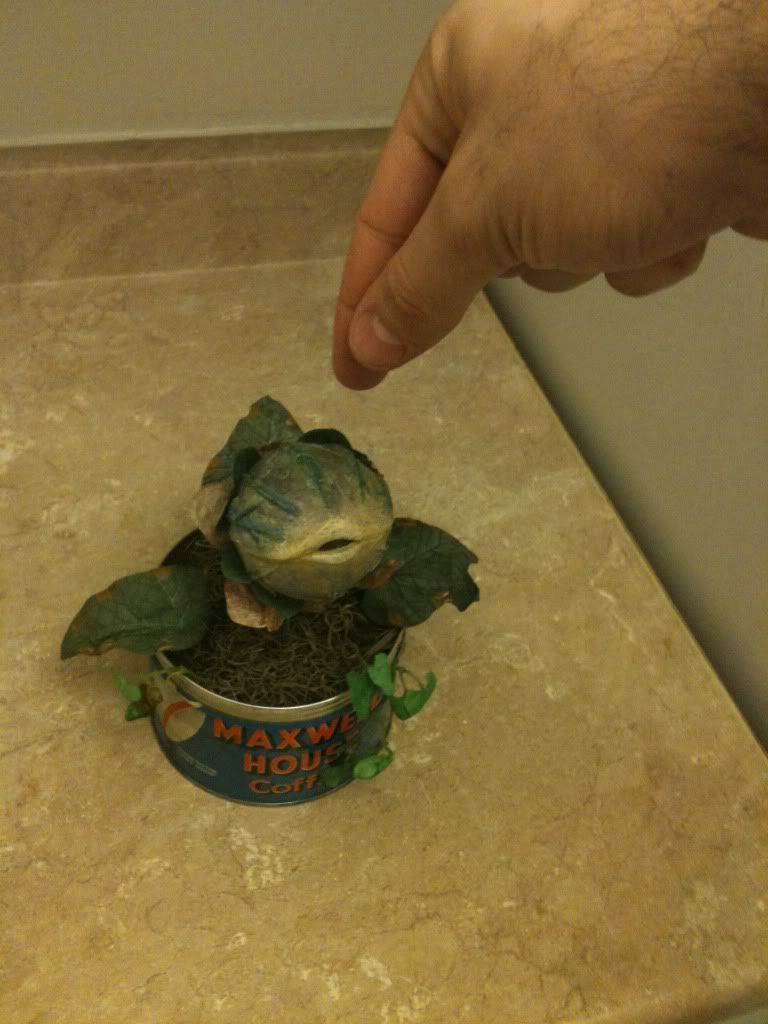
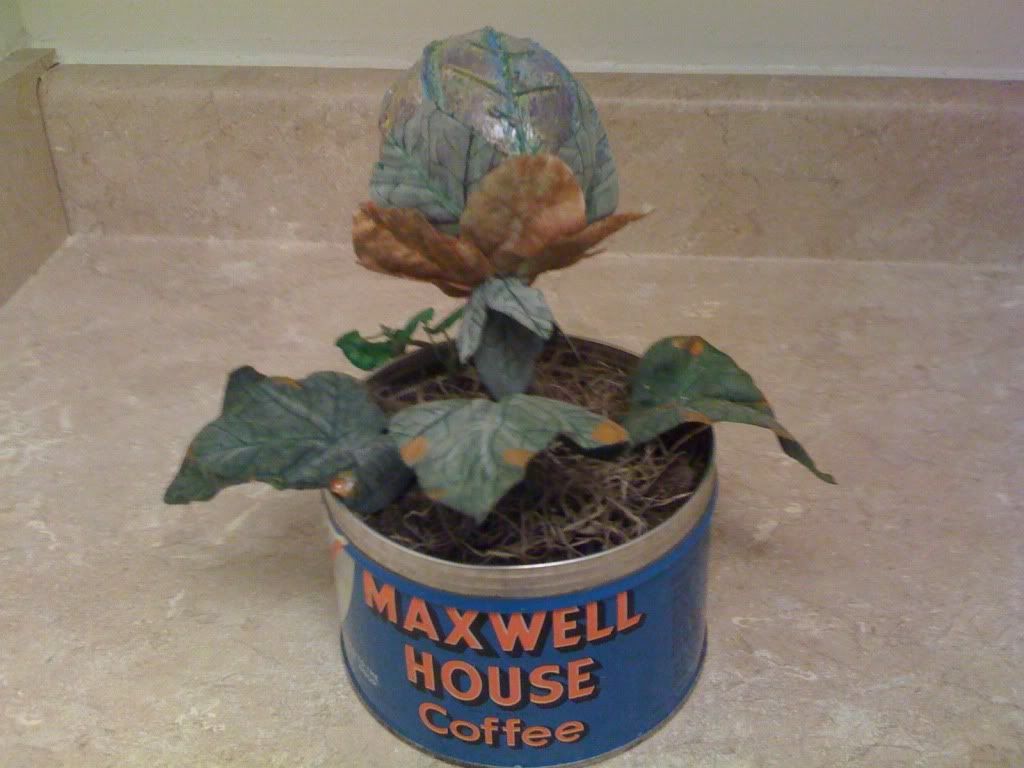
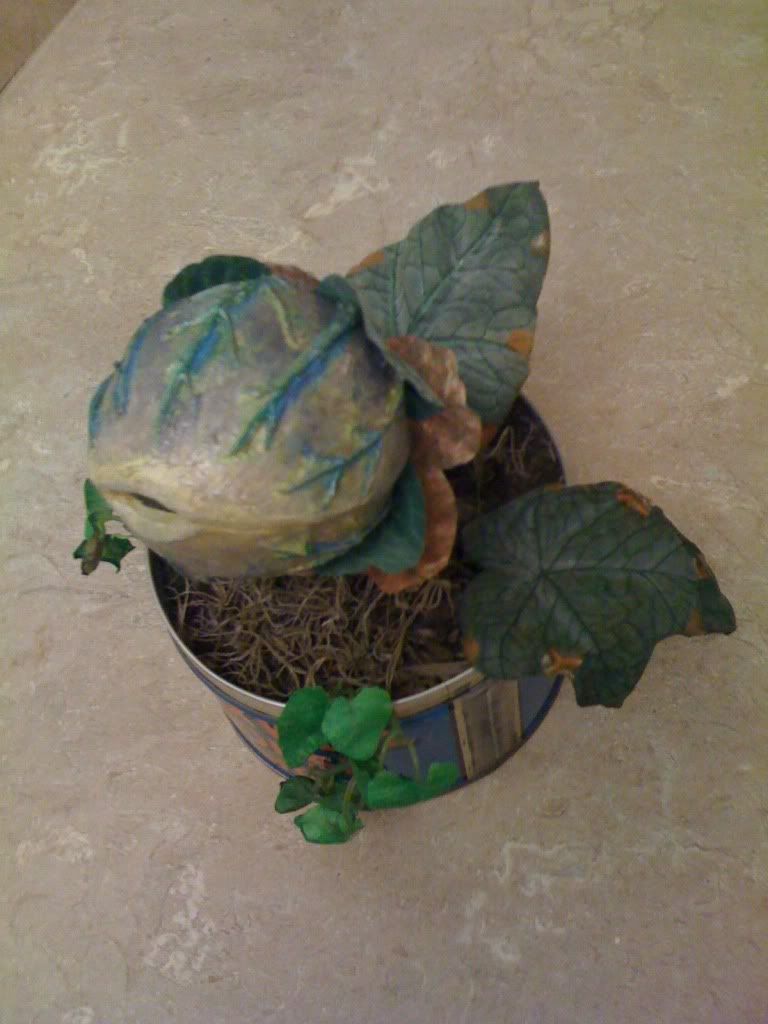
AND I WAS DONE (I do want to add that tooth(?) you can see in the pic, but for now, it can wait)
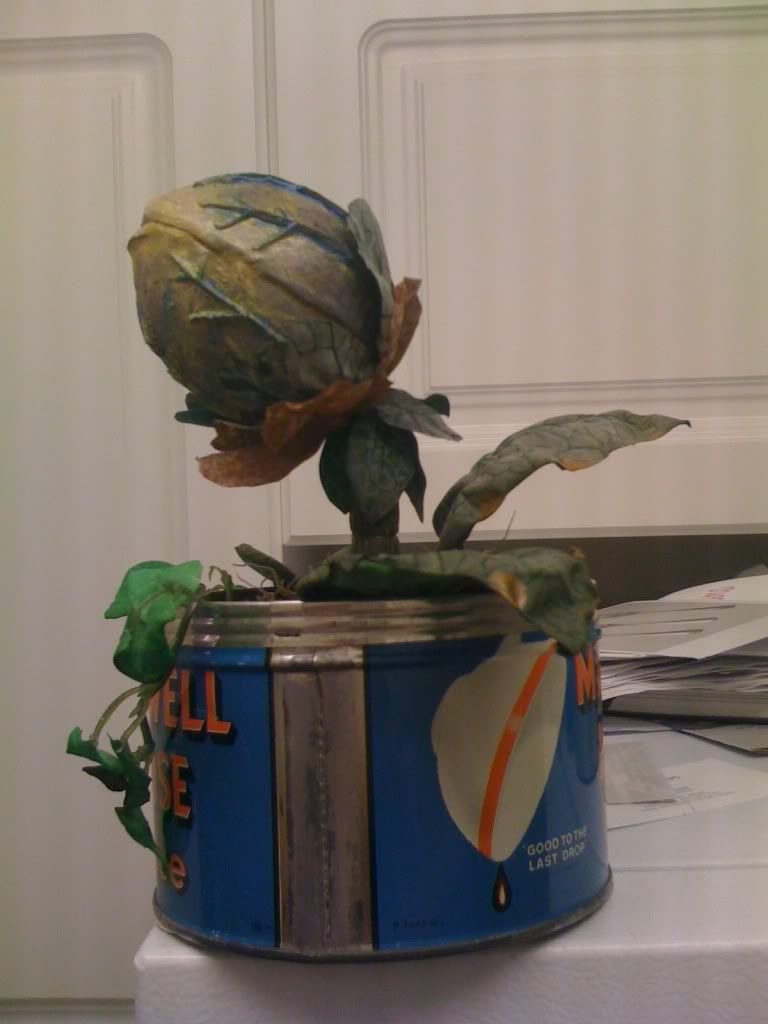
I am very happy how it turned out. Unfortunately, all I have is my iphone which tends to skew the tone, but I think you can get the idea.
I think it worked out perfectly. I was able to customize Twoey and make the project even more special than it would have been with the great kit. I was also able to get some sculpting/painting practice to use on another worthwhile project.
And without further delay, here is my Twoey!!
"GROW FOR ME"
First, I should say that attempting to make an Audrey II, when I was six or seven, might be my very first prop replica building experience. I colored a styrofoam ball with a green sharpie, stuck it with a pencil, and placed it into a small ceramic pot with some dirt. I also remember memorizing every line of Little Shop of Horrors and getting in trouble for singing in the hallways at elementary school. My FAVORITE scene was the "grow for me" number when Seymour sings to "Twoey" and begs her to grow. I LOVED the part when Twoey begins to make those kissing/sucking noises after Rick Moranis pricks his finger. I think its one of the most pivotal moments of the film.
With that said, imagine how excited I was to own my very own Audrey II!
I had a day off today, so to celebrate, I decided to take on this project. About a month ago or so, I was going to buy one of the Audrey II kits that were sold here in the past from an RPF member. I went away and didn't have internet access so I lost that one. I then was able to track one down from another member that included the accurate leaves.
The kit was pre-made, and pre-painted (except for the leaves). It WOULD have been easy peasy to stick it to my Maxwell House can, paint and glue the leaves to it, and be done with it.
Here is my can:
And the beautiful Audrey II kit:
Quite literally after taking these pics, I walked to the local florist and asked if they had any fake leaves. They showed me to a pretty nice selection. I had some shapes and colors in mind, but took a wide range of items since they were inexpensive. Next to the leaves was some fake fruit. I noticed that the fake plum was remarkably similar to the shape of my Audrey II body. Being only a few bucks, I bought it.
When I got home, excited to put together my kit, I started putting together reference shots. I found this one:
Sure enough it was Twoey in her puckered glory, during my favorite moment. I then stared at the kit. It was gorgeous, and the selling point for me was that it was pre-painted. I really stink at matching colors, and I wouldn't even begin to know how to face such a complicated arrangement. BUT, I couldn't help but think how awesome it would be to capture Audrey II in the same freeze frame as that pic, during my favorite moment.
At that point, I put the kit down and picked up the plum. I COULD have tried to change the kit head to match the photo, but I was so afraid to ruin it, I decided instead to work on the plum. I figured if I messed up, I still had the kit.
I tried to think. How was I going to make this plum look as good as the kit? How was I going to make it pucker its lips? WHERE WAS I GONNA' EVEN GET LIPS? What can I use to make those grooves and veins that appear on Audrey II's head? Staring around the room, my eyes caught this bag of fake leaves...
THEN IT HIT ME. :eek
On the back of the leaves, glued, were faux veins.
If I could just...PEEL IT OFF!!! Yep, they came right off!!!!:
I grabbed my fake plum and glued the fauz veins too it. I then used the super glue nozzle and applied small lines of glue to add texture to the plum:
Here's the plum next to the kit head:
Still off, I then took some of my air-dry crayola clay, and started to apply it carefully. After a few minutes, I realized my high school scupting class paid off and I was left with my very own puckered Audrey II head:
Afraid of cracking, I decided to glaze the entire head with super glue. I just poured it on, and rubbed it smooth around the entire thing.
While it dried, I went to work on adding spanish moss to my Maxwell House can. I was going to paint my ACCURATE leaves and glue my stem down. I then realized I had a bit of a problem. I realized that Audrey II was seen in five stages throughout the movie. The baby bud, grown a little more in the M.H. can, Bigger still at the radio station, about five feet tall, and lastly about seven feet tall. At the M.H. stage we see Audrey II proudly displayed in the window:
The above stage is how the kit came, with the leaves large and big and bright.
BUT
At the puckered stage, we see another side of Twoey, one where she's sick. As a result, she loses a whole layer of leaves under her head while Seymour holds her, and by the time he brings her to the basement, her leaves are dried, shriveled, and MUCH smaller.
At this point, I realized to be accurate, I couldn't use my nice leaves either!!!
Sooo, I ended up scrounging in my bag and finding a good alternative. To approximate the proper shrivel effect, I took a flame to them. I ended by putting the orange spots in the various places.
Next, since I didn't use the head, nor the leaves, I figured at THIS point, I should start looking for another stem so I can recoup how much I paid for this thing!
Again, searching through the bag, I found ONE stem. Amazingly, it looked A LOT like the stem in the film. I put in in the pot, and snapped these pics:
My puckered Audrey II was coming together:
Next, I began to prepare to paint her. I didn't know where or how to begin. I decided to start with the lightest shade I noticed in Twoey's face, that light golden brown at the lips. I painted the whole thing that color. Then, I layered it, next the greens, then the beiges, then the purple, finally with the blue accents, all the while blending the best I could. Before long, I arrived at a color I was happy with. My number one goal was to make Twoey look as organic as possible, stuck in that freeze framed moment.
I used model oil paints. Typically, it could take at least a day if not more to dry, but today the angels were on my side and it literally dried to the touch in about three hours. I was then able to start on the leaves. Unfortunately, I misplaced my phone during this and couldn't take any pics until completion.
I carefully cut and measured the fake leaves as I saw in the reference photos and freeze frames. First I glued on the four green leaves, then the six pink leaves.
I needed a way to attach the colored head to the stem. Looking for some thin metal, I noticed the shaft of a small milk thermometer...in fact, you probably saw it in the background of some of my earlier pics:
This meant my Twoey head was somewhat moveable, being able to bend up and down at the axis (but I only took advantage of this once to position the head. I wouldn't at the risk of the metal snapping eventually). I then glued two sets of small green leaves pointed to the opposite direction on the stem.
I then glued the stem to the bottom center of the can. Running downstairs, outside my building, I filled a bag of dirt. I then wet it a little and packed it into the can, further securing the stem. Lastly, I covered the whole thing with spanish moss.
Next came the leaves. It was fairly easy to stick them right into the dirt. I used a pen cap to force the back leave to stick up.
AND I WAS DONE (I do want to add that tooth(?) you can see in the pic, but for now, it can wait)
I am very happy how it turned out. Unfortunately, all I have is my iphone which tends to skew the tone, but I think you can get the idea.
I think it worked out perfectly. I was able to customize Twoey and make the project even more special than it would have been with the great kit. I was also able to get some sculpting/painting practice to use on another worthwhile project.
And without further delay, here is my Twoey!!
Last edited:
") :thumbsup
:thumbsup