I wanted to try my hand at a 3D printed Yoda. I can't remember where I got this model from because I have about 10 different projects in the works. I did find a pretty good starting base coat color, Rustoleum "Eden", that I found at ACE hardware. It's Satin, but sometimes looks glossy if sprayed on too thick. No worries though, I'm going to give this whole thing a coat of Flat Clear, then start layering in other colors.


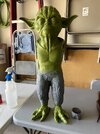
I had to modify the body because when I assembled him, he leaned too far forward for my liking. So I cut the legs at the knees, added some shims, re-attached the legs with some epoxy, took some lengths of elastic bandage, dipped them in Elmer's glue, and wrapped the legs and waist to loosely resemble pants. You won't see any of this when his robe is on, but I did it more to re-enforce the cuts at the knee. Probably overkill, but oh well.

Once this dries I'll add the Flat Clear coat and start applying layers to get the tone I'm after. It's hard to tell in the photo below, but the top arm is clear coated and the bottom isn't. It's easier to see in person and will obviously look much better for the skin tone.

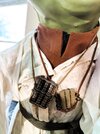
I also designed a quick version of his ESB pendant and printed it. I did a base coat in a metallic bronze, but I'll add a hint of a lighter bronze and some weathering to this later.


I had to modify the body because when I assembled him, he leaned too far forward for my liking. So I cut the legs at the knees, added some shims, re-attached the legs with some epoxy, took some lengths of elastic bandage, dipped them in Elmer's glue, and wrapped the legs and waist to loosely resemble pants. You won't see any of this when his robe is on, but I did it more to re-enforce the cuts at the knee. Probably overkill, but oh well.
Once this dries I'll add the Flat Clear coat and start applying layers to get the tone I'm after. It's hard to tell in the photo below, but the top arm is clear coated and the bottom isn't. It's easier to see in person and will obviously look much better for the skin tone.
I also designed a quick version of his ESB pendant and printed it. I did a base coat in a metallic bronze, but I'll add a hint of a lighter bronze and some weathering to this later.
Attachments
Last edited: