More updates on my Terminator T-800

iowadude41

Active Member
Hey everyone,
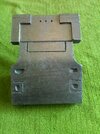
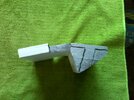
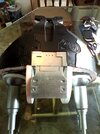
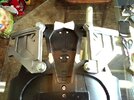
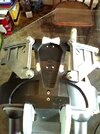
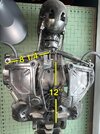
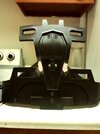
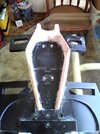
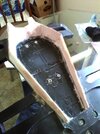
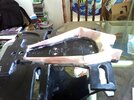
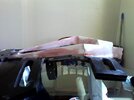
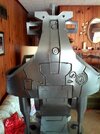
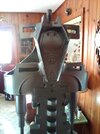
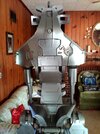
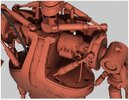
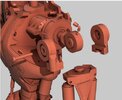
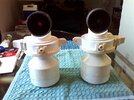
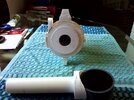
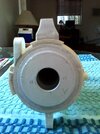
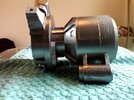
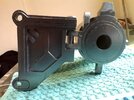
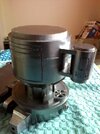
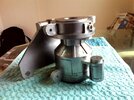
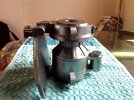
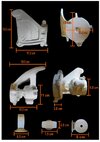
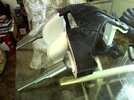
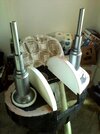
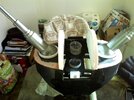
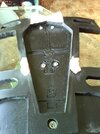
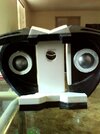
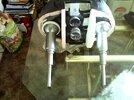
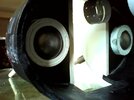
Sorry I haven't posted in awhile, but if you live in the United States, specifically in Iowa, then you'll understand why. We have been having Arctic weather here for the last few weeks. Actual temps below zero, and wind chills near -30 or colder. That being said, I haven't been able to do much on my build, but I have done a little which I'll discuss here. I'm still working on my chest cavity, and have decided to add some hydraulics to the pistons once I get that far. In the meantime, I've taken a few new pics to give you an idea of my progress thus far. I'm going to also attach a pic of what I'm trying to achieve on the back. You can see in that pic that there are some 3D angled pieces going up both sides to the neck. On mine so far, you'll see at the top 2 small white pvc pieces that are for reference right now. This is proving to be a challenge, but I do love a good challenge. Now onto the good stuff. You can now see that I've actually glued into place the side pistons that attach to the pelvis. These were actually made out of 3" shatter proof pvc christmas ornaments. I glued the pistons to them, and re-enforced them with gorilla glue. The tricky part was how to keep them from falling out of the chest cavity. I was able to find a pvc pipe that the orbs fit into, and I created a small pvc ring that goes around the top as you can hopefully see if the pics, and then another with a curved inner side so the orb can rotate around. I glued that one on the under side, and with these rings in place, the entire piston can do a 360 degree rotation. I've also attached the 2 side pieces that go down around the spine. Still a work in progress as there are some parts I need to make to attach to them. I'm also working on a part that nobody has done yet. It's a hydraulic motor, and pump. I'm going to have the hoses attach to it as if it is a real system. My thinking is, if you're going to have hoses going to the pistons, and everywhere, you need a hydraulic motor and pump to give it realism. Once I get all this done, I'll paint it like I did to the rest of my T-800, and take some pics to share of the finished product, both off the body, and attached. So here are some new pics for you to view and leave comments. Hope you like what you see...
 

Attachments

  • e4b128f517190d2a79f3c49f1f183c1d.jpg
    e4b128f517190d2a79f3c49f1f183c1d.jpg
    117.9 KB · Views: 112
  • IMG_20210213_153218.jpg
    IMG_20210213_153218.jpg
    388.3 KB · Views: 116
  • IMG_20210213_153332.jpg
    IMG_20210213_153332.jpg
    328.9 KB · Views: 96
  • IMG_20210213_153351.jpg
    IMG_20210213_153351.jpg
    342.2 KB · Views: 92
  • IMG_20210213_153451.jpg
    IMG_20210213_153451.jpg
    355.2 KB · Views: 88
  • IMG_20210213_153600.jpg
    IMG_20210213_153600.jpg
    297.5 KB · Views: 89
  • IMG_20210213_153134.jpg
    IMG_20210213_153134.jpg
    378.7 KB · Views: 87
  • IMG_20210213_153634.jpg
    IMG_20210213_153634.jpg
    248.7 KB · Views: 106
Last edited:
Looking good! Full size is quite an undertaking.

It looks like you are starting new threads each time you update this project.
You don't need to do that. You can keep adding to this thread each time you have an update as you go.
Just FYI
 
Looking good! Full size is quite an undertaking.

It looks like you are starting new threads each time you update this project.
You don't need to do that. You can keep adding to this thread each time you have an update as you go.
Just FYI
Thank you. Since I'm fairly new to this site, I didn't know that. I'll follow your advice from now on. Thanks again..
 
Hey everyone,
Just a quick update as of 2/19/21. I've finished designing the lower mechanism that mounts to the front of the lower chest plate. I've attached a couple pics to share. I'm also attaching a picture to show what it looks like on an actual Terminator. It's not the greatest in the world, but looks pretty good to me. I actually made it out of 4 layers of PVC expanded foam board. You'll notice that I didn't paint the sides of the top part because I'm going to use those edges to glue the mechanism to the chest plate. The actual mechanism I've been told is two pieces, and they move, but mine is just one piece, and won't move. I did heat it up, and bent it to give it the curve that some pics show. I'll finish painting the back tomorrow, and give it a second layer of paint, and then glue it in place. Once that is done, I'll take a couple pics to share of that to keep everyone updated. So let me know what you think of this part that I designed. Thanks....
 

Attachments

  • IMG_20210219_140543.jpg
    IMG_20210219_140543.jpg
    577.2 KB · Views: 94
  • IMG_20210219_140627.jpg
    IMG_20210219_140627.jpg
    637.3 KB · Views: 87
  • 1205_t800.jpg
    1205_t800.jpg
    36.4 KB · Views: 101
Hey everyone,
It's 02/26 and I have a few more pics for another update. I've finished the shoulder blades, and painted them. So what I'm posting now is just the shoulder blades as they will look after the entire chest cavity is complete. I've also just put in place the lower chest mechanism. So here are the updated pics. Hope you like them, and I look forward to your feedback.
 

Attachments

  • IMG_20210226_125214.jpg
    IMG_20210226_125214.jpg
    363.4 KB · Views: 68
  • IMG_20210226_125421.jpg
    IMG_20210226_125421.jpg
    352.1 KB · Views: 56
  • IMG_20210226_125516.jpg
    IMG_20210226_125516.jpg
    339.6 KB · Views: 65
Hey again everyone,
The weather has finally turned great. In the 50's every day now. So I have plenty of time to work.
I hope nobody is getting bored with my updates!!! Well, here's another quick one to show what I've done in the last 3 days. I started on the angled part that goes up to the neck on the back plate, but it has been a challenge. I had to cut 8 separate pieces of pvc board, and shape them at different angles with a disk sander, oscillating sander, and files. I glued each piece into place, and sanded each piece until it fit together with the others. Yesterday I used Bondo to fill in all holes, and spaces, then let dry over night. This morning I sanded it all down to the desired look, and shape. Now I still need to do some fine sanding, and then it will be ready to paint once I design the hydraulic pump, and mount that inside the chest. So I'm going to attach a pic of what it should look like after painting, one of how the back looked before I designed this part, and 4 of how it looks now before painting. Looks better than I thought it would. Let me know what you think..
 

Attachments

  • 1CBB67B4-99EB-4F41-96CD-69AEA10FFD8C.jpeg
    1CBB67B4-99EB-4F41-96CD-69AEA10FFD8C.jpeg
    291.7 KB · Views: 74
  • IMG_20210108_175640.jpg
    IMG_20210108_175640.jpg
    254.6 KB · Views: 58
  • IMG_20210302_131131.jpg
    IMG_20210302_131131.jpg
    360.1 KB · Views: 46
  • IMG_20210302_131235.jpg
    IMG_20210302_131235.jpg
    327.8 KB · Views: 53
  • IMG_20210302_131302.jpg
    IMG_20210302_131302.jpg
    365.4 KB · Views: 54
  • IMG_20210302_131316.jpg
    IMG_20210302_131316.jpg
    252.1 KB · Views: 68
Every time you add to your thread, it gets put back at the top of the list so people can see it.
There is also a counter that shows how many people have viewed your thread. Not everyone comments or reacts, every time they look, the ticker counts another one.
 
Every time you add to your thread, it gets put back at the top of the list so people can see it.
There is also a counter that shows how many people have viewed your thread. Not everyone comments or reacts, every time they look, the ticker counts another one.
Thank you for that information. I've added to the thread several more times, but the counter hasn't moved. So did you see my progress as of today?
 
I'm seeing your updates. Frankly this site is pretty bad for supportive comments or even likes given to posts. I'm not sure if the traffic is lower than I think it is, or there's just way too many lurkers who view but don't offer feedback. Cool project though!
 
I'm seeing your updates. Frankly this site is pretty bad for supportive comments or even likes given to posts. I'm not sure if the traffic is lower than I think it is, or there's just way too many lurkers who view but don't offer feedback. Cool project though!
Thank you for your feedback. I've finished sanding the angled part on the center of the back. I noticed on other pics where the shoulder blades mount to the back the angled part curves outwards. So I added more Bondo this morning to those areas, and let dry. I didn't have any circular sanding blocks so I used a piece of 1" di. pvc pipe and glued sandpaper to it, and used that to create the curves. Looks pretty good, and I had to use a little caulk to fill in some little holes, and grooves. It's now ready to paint, but have to design the hydraulic pump before painting. This is what I'm doing for the next few days and will post pics of that...
 
Hey everyone,
Can someone help me with a little knowledge? I'm starting on the hydraulic cylinders in the chest cavity, and need to know exactly how big they are? Any pics with measurements would be awesome. Thanks
 
Hey everyone,
I've gotten a few replies on the cylinders. Thanks...Helps a great deal. Now onto new things. I'm updating again on the chest cavity. I also post on facebook, but here's the update....
Hello everyone,
I have an update on my Terminator T-800. With all this nice weather, I've been busy working hard on it. I've painted the chest cavity, and glued into place the lower mechanism on the front. I've mounted it on the body so you can see how it looks right now. On the blurred pic attached, that is just to show the added details to the lower curved section. I still have a couple things to add to it like the hydraulic pump, and mounting rods that go on the upper back for the hydraulics to the shoulders. I'm working on all the cylinders now which is a total guess job since I don't have the measurements for them. I've also been working on the shoulder motor which I'll post on later with pics. Hope you like the progress.
 

Attachments

  • IMG_20210311_154718.jpg
    IMG_20210311_154718.jpg
    348.7 KB · Views: 47
  • IMG_20210311_154736.jpg
    IMG_20210311_154736.jpg
    319 KB · Views: 52
  • IMG_20210311_154846.jpg
    IMG_20210311_154846.jpg
    267 KB · Views: 43
  • IMG_20210311_154904.jpg
    IMG_20210311_154904.jpg
    364 KB · Views: 43
Well,
I have another update on my Terminator. This part has proven to be a pain in my butt, but it's actually coming along pretty good so far. I'm working on the motor that is on the inside of the chest that goes to the arms to make them move. I'll attach pics of how it will look when finished or close to it, and then my pics so you can see what I'm working on. I still have parts to design that go on the motors, and needs to be painted when finished. These get attached to the shoulder blades on the back. I had to get my brother to help me on the holes because I destroyed the parts several times using my drill press. Hope you like the progress so far.. Arms will be next once these are finished...
 

Attachments

  • chest cavity6.JPG
    chest cavity6.JPG
    44.5 KB · Views: 53
  • chest cavity7.JPG
    chest cavity7.JPG
    35.2 KB · Views: 48
  • IMG_20210320_135411.jpg
    IMG_20210320_135411.jpg
    365.2 KB · Views: 47
  • IMG_20210320_135612.jpg
    IMG_20210320_135612.jpg
    379.4 KB · Views: 45
  • IMG_20210320_135731.jpg
    IMG_20210320_135731.jpg
    336.5 KB · Views: 41
  • IMG_20210320_135757.jpg
    IMG_20210320_135757.jpg
    392.3 KB · Views: 45
I'm just kinda lowkey watching this thread and seeing the progress. I have nothing really useful to add because I'm not any kind of expert on building Endos :p
 
I'm just kinda lowkey watching this thread and seeing the progress. I have nothing really useful to add because I'm not any kind of expert on building Endos :p
Good morning,
That's cool. I'm always open to any feedback or just someone interested in my progress. I'm no expert myself, and never had a single thought about building one until I found this website, and a guy scratch building a full scale one out of PVC. I enjoy working with PVC so I decided to give it a try. My very first attempt was back in 2004 when I built the entire arm out of wood. That's all I ever did until now. I'm also ok with sharing plans and how I modified parts to make mine more movie exact.
 
Hey everyone,
Well, here's another update on my Terminator. I've added all the other parts which are: small motor on side of larger motor section, the small fan like device towards the inside middle, the rib like parts on the middle, the rectangle holes, and attached the shoulder blade. I also added a mounting bracket on the bottom of the large motor so a 3rd cylinder can be added. I only took pics of one motor/shoulder blade, but there are 2 actually. The smaller motor on the side isn't exactly like the movie, but was hard to design, so made it as simple as possible. I also painted the entire part. I will update again when I have both fully mounted on the chest cavity. I did mount this unit to check how the hydraulic cylinders will line up, but came as no surprise when I noticed they were too long, and had no room to add the piston rods. So back to the drawing board for these parts. But all in all, everything looks really good to me so far.
One thing that is totally different on mine than others is that most people add a small bracket bar on the back of the shoulder blade, and secure it to the back of the large motor. This makes no sense to me because the arm has to be able to move around to the front like a real arm, but that bar makes everything stiff, and only move in and out, up and down. Mine can swivel around. I'll add a pic to show you what I'm talking about.Hope you like these new pics, and ask me any questions if you like.
 

Attachments

  • IMG_20210327_162212.jpg
    IMG_20210327_162212.jpg
    382.7 KB · Views: 48
  • IMG_20210327_162234.jpg
    IMG_20210327_162234.jpg
    372.5 KB · Views: 41
  • IMG_20210327_162320.jpg
    IMG_20210327_162320.jpg
    345.8 KB · Views: 45
  • IMG_20210327_162351.jpg
    IMG_20210327_162351.jpg
    385.9 KB · Views: 37
  • IMG_20210327_162417.jpg
    IMG_20210327_162417.jpg
    405.4 KB · Views: 38
  • sholder.jpg
    sholder.jpg
    145.8 KB · Views: 42
Read your thread. Great work on a difficult, but scary subject. No experience on 3D printing, however have done a lot of similar detailed work using brass and aluminum on model aircraft and boats requiring machine type fittings. Appreciate your skill.
 

Your message may be considered spam for the following reasons:

If you wish to reply despite these issues, check the box below before replying.
Be aware that malicious compliance may result in more severe penalties.
Back
Top