Modelers Workbench Design

trekman1017

Well-Known Member
I am going to be designing and building a workbench for my basement. It's primary function will be for modeling. What should it be like?
 
I say, first make it a comfortable height, And at least twice as big as you first think. I have 3 , 4 by 8 foot tables, and I always need more space, LOL Of course the shop is 80 x 80 foot, :) Make it as big as you have space for. I used hardboard as a cover over my plywood top. I can remove the 1/8 inch hardboard, when it gets the inevitable glue and paint stains. I also have a second level underneath for storage of tools and supplies. But I still manage to pile the tops full of junk. I used 2x4 pine to make the frame for them, and glued the 1/2 inch ply to the frame. Makes a very strong table. If you don't need that much strength, you can use smaller stuff. I have the space so I built em big. Also if it's gonna be against the wall, you better not make it much deeper than 2 feet. You want to be able to reach to the back of the bench. I did that with some tables against the shop wall. I made them 32 inches, and can't reach the back. So now I gotta break out the saw, and cut them down. Hope that helps,


Joe


Here's a few pics without the hardboard cover. And please disregard the non code wiring in the pics. It's just temporary, I promise, ;)
 
Last edited:
If you're going to be doing any sanding, etc., you might want to incorporate a screened opening to vacuum up dust, etc.
 
I built mine almost a year and a half ago. I have a large L shape bench at about 34" height. 15' on one side and 10' on the other. Underneath storage too. I fills up pretty fast. I am always looking for more space. I should probably just better organize myself. I have an area of shelves for books/reference material and a dedicated 40 amp service running out to it. Well insulated and space heater/air conditioner to keep the temperature constant and the humidity down. I am currently working on a paint booth area on the other side. Run a satellite cable out, throw in a tv and bar fridge, and you have a really relaxing environment. Door lock to keep the little ones out too! These are when it was being built. It's much messier now!

HPIM1729.jpg


HPIM1736.jpg
 
Last edited:
Here's a good thread on the subject.

I recently moved to a new place with enough room for dedicated workspace (a dream come true for me). I learned a lot of lessons working in the old space and I also made a neat discovery about configuring a good workbench.

First, be sure to make your work area safe and comfortable. The most important things are (in order), good VENTILATION and good lighting. If you're using fluorescent tubes, get some UV sleeve filters. I had installed 400W of fluorescent lights in the old garage because the walls were dark brown and it took a LOT of light just so I could see to work. As a result, something surprising happened -- I ended up with a bad sunburn in the middle of Winter! It turns out, these lights crank out dangerous UV-B rays that cause DNA damage and maybe even skin cancer. They also cause eye strain and may damage your eyes over time. UV filters are expensive, but they not only reduce damaging rays a good 99%, they also cause a color shift effect that turns cold fluorescent light into something more resembling daylight.

To make your lighting more efficient, paint your entire work area bright white. When I did this, it made a really huge difference. I am not kidding, I needed 5 hanging fixtures in my old work area with two 40W 4-ft T-12 tubes in each one. That was 10 tubes to light my shop area and make it bright enough to work. In my new space, I have just *one* 4-foot fixture with two T-8 bulbs. Thanks to the white paint, the new space is almost as bright as the old one.

Now to the workbench: For years, I used a banquet table 30 X 96 inches as a work surface. Since I originally used it as a computer desk, I had cut down the legs to place the work surface 26 inches off the floor. This was too low for a hobby bench, so I placed a 24 X 48 banquet table top on the larger table using short pieces of scrap 2X4 as risers.

This created a dual-level work area. It was never a design feature, it just sort of happened that way by accident. Over time, I found this to be the single most useful feature I had ever encountered in a workbench. I could place all my tools, etc. on the lower level which extended up underneath the main work surface. It was very convenient for keeping everything within easy reach, yet not directly on the main work surface where things would get in my way.

I enjoyed the ergonomics of this approach so much, I intend to design this feature into any custom workbench I build in the future.

One last tip: The height of the bench can be very important. Ergonomic standards dictate a height of 29-30 inches for a desk if you are going to be seated while you are working. This would be a perfect height if you plan to sit on something like an office steno chair. Many workbenches are 36 inches tall as this is the standard height for kitchen counters. That can be ideal if you plan to work while standing. It all depends on how tall you are -- adjust the height up or down to find a comfortable work height while standing at the bench. A typical range might be 34-42 inches. You can also work at a taller bench while sitting down, you'll just need a shop stool rather than a normal chair. Many stools are adjustable in height. A drafting stool would be ideal for this task.
 
Design it to suit YOUR needs, not others. Only you know what your requirements are. For reference, I have mine setup like my guitar building workshop--one area for design and prep work, one area for building, one area for painting finishing, and another area for drying. A few things to make sure to include are florescent lighting, a lighted magnifying glass, and plenty of shelves. Another thing to consider is to have plenty of drawer space with dividers for supplies: glues, paints, brushes, files, sandpaper, etc. Shelves above the work area are ideal for storing kits and other bigger supplies.
 
Go to your local warehouse store (Costco/Sam's Club/etc.) and look for the 6' fiberglass folding table. It's less than $50, the perfect height for sitting, chemical proof and it's ready to go, out of the box.

A nice, comfortable, leather office chair, preferably one with arms and reclines. If you're going to spend any considerable time modeling, might as well be comfortable.

Then, go to Staples (or any office supply store) and get one or two 3' plastic, 4-drawer storage units. They're perfect for storing all your tools while they're not on the bench - and they fit perfectly, under the bench I mentioned above.

If you have a Harbor Freight nearby, check them for an 18" tall, metal turntable (think a 5 level lazy suzan, made of aluminum). It has a 1' sq. footprint and will hold dozens of bottles of paint. No need to take up precious wall space. If you're going to get a lot of paint, get 2 turntables. I have them and they're invaluable. Instead of paint being on a shelf (because you know the color you want is always going to be at the far end), it's all right in front of you.

Check ebay and craigslist for those cheap metal shelf units (a lot of businesses use them and sometimes, they damn near give them away). These are great for unbuilt kit and miscelaneous storage.

Lighting. At least 1 draftsman's lamp (the kind on the multipoint arm that clamps to the table). It can be swung to any position for the perfect light. All bulbs should be in the "daylight" temperature range. They simulate daylight, so you get perfect color representation every time. No crazy yellowish cast from incandescents or green cast from flourescents. Daylight bulbs can be purchased at grocery stores, so it's not a specialty item.

A few outlets, or at least a few heavy duty rated power strips.

If you have a window in the basement and are looking to get into airbrushing, check ebay for a spraybooth. If you want to build one, the most expenisve part is the shaded pole blower - anywhere from $20 - $150, depending on how much power you want out of it. and a 3 gallon compressor from Sears, to power said airbrush.

Miscellaneous - a small dorm fridge, radio/tv/internet connection (for porn AND researching for your model) and a hotplate (keeps your coffee and water for your decals, warm).

-Fred
 
Hi bwayne64,

One of the best things you can do is to search for Jeweler's benches. There are top quality wooden work benches already designed and ready to purchase. If you wish to build it yourself, you can copy the designs you like. There are some excellent drawer stacks that you could purchase that can mount on the side of your bench.

I work on a butcher block top bench I ordered from MSC, close to twenty years ago and it is still going strong. I also found a butcher block dining room table at a yard sale that matches perfectly! I believe both are 2" thick. You will also want a pull out drawer directly in front of you to catch small parts of they slip out of your hands.

Just my 2 cents. Good luck and have fun with this project.

Regards,

Scott
 
A electical strip with lots of outlets.
Ventilation fans. A window is a good place for a box fan. An exhaust hood for gluing and painting.
Work tables at two heights, one for sitting, and one for standing. I like standing when I work.
Melamine cabinets and drawers, they clean easily.
An air line from a compressor (that doesn't need to be in the same room, due to noise) with a filter and regulator for your airbrush.
Airbrush holders
lots of shelving
a moniter to view research material and the RPF, would be nice if it was hooked up to TV too.
a Dust Buster mounted under the work station. Modeling is messy.
a down draft table for sanding.
rubber floor mats for standing while working, it will save you back, and feet.
a hanging dremel with flex shaft.
and everything else listed above
 
I built mine almost a year and a half ago. I have a large L shape bench at about 34" height. 15' on one side and 10' on the other. Underneath storage too. I fills up pretty fast. I am always looking for more space. I should probably just better organize myself. I have an area of shelves for books/reference material and a dedicated 40 amp service running out to it. Well insulated and space heater/air conditioner to keep the temperature constant and the humidity down. I am currently working on a paint booth area on the other side. Run a satellite cable out, throw in a tv and bar fridge, and you have a really relaxing environment. Door lock to keep the little ones out too! These are when it was being built. It's much messier now!

That is a beautiful work bench! I love all the storage incorporated into it and above it.

I just moved into a new house a year ago with a garage that's bigger than my old apartment lol. I laid claim to 1/4 of it for my workshop but currently just have 2 large folding picnic tables in a L that I'm using. As soon as finances permit I hope to build something much like yours...in fact I saved the pictures you posted for reference so thanks! :D
 
You definitely need to build your work bench/room to your own requirements. When I was building mine I gathered a lot of info from pictures of what others have done and found it very helpful.

Here’s a link to my workroom:

My Work Room
 
Take the time, money and effort to get set up with the proper lighting! LEDs are coming way down in price. It is worth the effort!
 
First things first...

Realize that this thing is going to get TRASHED, if you work on it a lot. So... and this is absolutely critical, as far as I'm concerned... make sure that you can easily replace the top surface. In my case, I have a top laminate sheet which is clamped down, around all edges, to the underlying substrate. The top layer is fine-surfaced euca-board (designed for wall paneling), and it's clamped by aluminum extrusions on all edges (with set-screws on the underside to allow clamping and unclamping.

This provides an easily replaceable top surface (which you'll likely want to do periodically... say, every two years... without having to totally rebuild!). The extrusion used to clamp it down provides a nice "rim" to the top surface, which prevents tiny parts from rolling off the surface.

The top should be a minimum of 24" deep. 30" or even 36" is not unreasonable if you have the space.

You want a power-strip mounted on the wall right behind the desktop... if you want jars and other part carriers along the rear edge, be sure to mount it high enough to clear those easily (my own is 8" above the top work surface). They make LARGE power strips, specifically intended for this purpose... ranging from 4' to 6' in length, usually. Get the biggest one which fits within the space you'll be using. Ideally, get one with "covers" over the unused plugs, and the highest total capacity you can get (you want your circuit breaker, not the power strip, to be the "point of failure" if you overload things!)

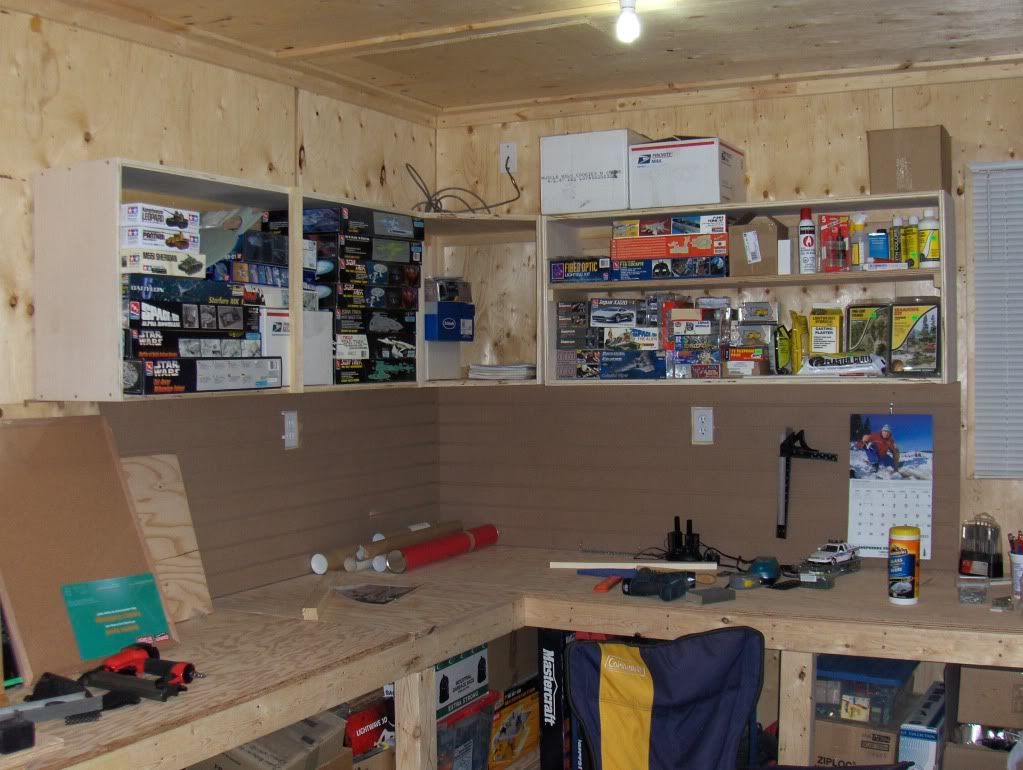
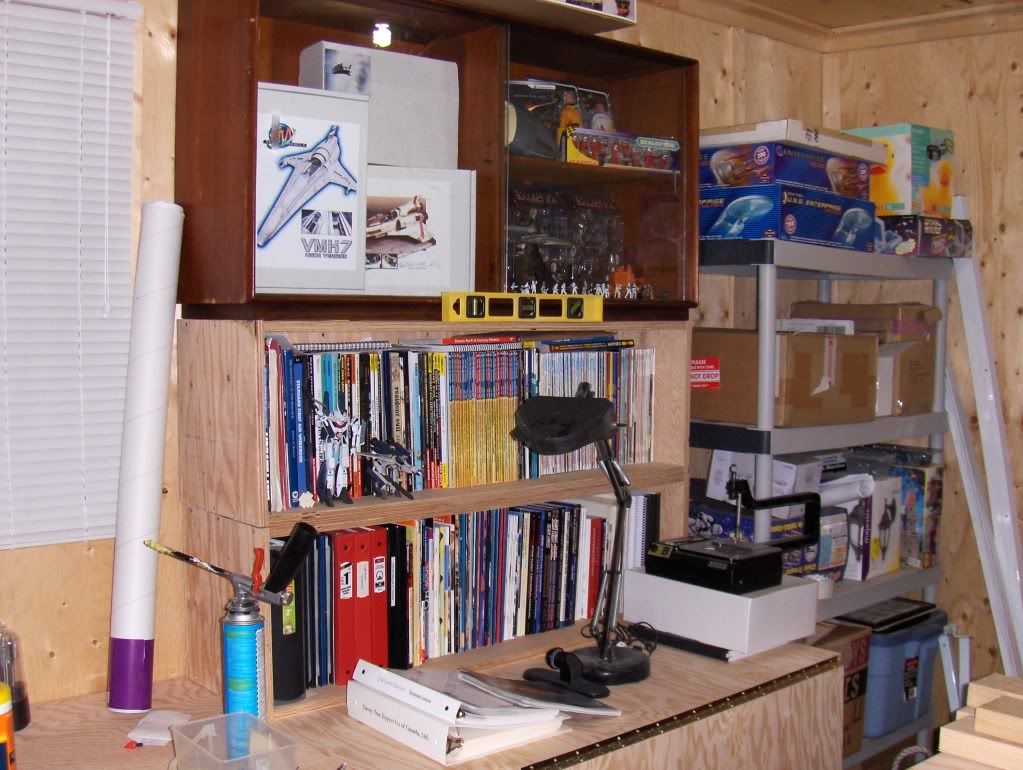
A pegboard is always useful... especially with little bins which can be mounted to the pegboard. My own goes from the top of the work surface (with the power strip mounted directly to it) My own is 2' tall, total.

Above that, I have wire-mesh shelves mounted to the wall. The deeper ones, not the little 12" ones. These are good for storing model boxes, boxes filled with sandpaper, etc. LARGE stuff which you don't need regular access to. I have two tiers of these 20" stuff above my working area, but 16" would probably have been good enough, in retrospect, for most purposes. This stuff is cheap, and very useful, if not "pretty" (as my wife likes to point out).

There should be one or two SHALLOW shelves underneath the workbench. 8" or 10" is normally fine. You want to be able to store your heavier stuff (power tools, etc) down there, without knocking your knees on them all the time. These are not going to be wire shelves, most likely... but rather wooden ones (or rather "pressed wood" if you buy your stuff at Home Depot, etc) Paints, thinner, etc. Whatever's too bulky to just leave on the bench, too heavy to want way up over your head, and which you (probably) want more frequent access to.

You need a COMFORTABLE seat. Trust me on this... DO NOT SKIMP on seating. I have a "Drafter's chair" with a very cushy seat. My feet don't touch the floor when I'm on that at its "normal" height. This allows me to sit while working, OR stand while working, with the bench at the proper height for either. If you use a regular chair, you won't be able to stand while working, or else you'll need to have a standing-height bench and won't be able to sit while working. The drafter's stool is the perfect solution to that. It has a back, it spins, but the base is stationary. And it has a "rung" on the main body at the proper height for my feet to rest on. (I also often rest my feet on one of the shelves underneath my workbench.)

You need good lighting. I recommend having a hanging lamp (there are some great LED-based "shop lamps" available these days), AND a "daylight lamp" clamped to your workbench surface, on a moveable arm. Many of these come with a magnifier included as well... something to consider. I don't have the magnifier, and instead use my magnifying goggles or loupe, but you may want to do differently. The hanging "shop lamp" is a necessity, but having a moveable light source to focus on whatever you're doing at the time is a huge help. "Daylight" lamps are my own personal preference... you don't want a lamp which puts out "blue" light (many standard flourescents) or "yellow" light (standard incandescents and tungsten lamps). LED "Daylight" lamps are really the best choice, I think.

Finally... if you're working there a LOT... give some consideration to having a little mini-fridge. I have one, which has cans of stuff to drink, and is also where I store my cyanoacrylate glues (to lengthen their shelf life). If you keep them in there, remember to take them back out and let them warm up before using them (otherwise they'll be too thick to work with most likely, and will cure slower than you might like). I keep mine in an airtight container, inside the fridge, to prevent any potential for cyanide-based gases from getting into anything else I might keep in there. :)

That's what I would consider to be a "perfect" workspace. My own is CLOSE, but because I used 20" shelving, my hanging lamp is a bit further back than I'd have preferred, making the clamped lamp much more necessary than it really needed to be.

And one last point... if you're doing "permanent" installation, that's one thing. But if you're in an apartment, or expect to move regularly, you may want to get "locking casters" for your bench rather than merely resting its legs on the floor.

And also, if you ever expect to move, make sure that you can get your bench, without disassembly, through the doors coming in and out of where you live (or wherever you might live in the future!)
 
Last edited:
First things first...

Realize that this thing is going to get TRASHED, if you work on it a lot. So... and this is absolutely critical, as far as I'm concerned... make sure that you can easily replace the top surface.

No, if you WORK on it and not have 2 left hands ..... i see no reason why the surface should become "TRASHED".
 
No, if you WORK on it and not have 2 left hands ..... i see no reason why the surface should become "TRASHED".
Nonsense.

A workbench is a place where you work. You cut on it, you drill on it, you get sandpaper scrapes on it, you get paint and glue spills on it.

No matter how careful you are, any surface you do work on will become degraded over time. That's not a sign that you're "careless," it's a sign that you're USING IT.

It's like car tires. You can keep them looking showroom-new, as long as you never actually drive your car. But if you drive them, they WILL wear down, get stains on them, get scuffed, and generally wear out and need to be replaced.

A well-used workbench will need a new working surface (if you want a clean, smooth, neat surface to work on) roughly every two to three years.

Professional-grade workbenches almost always have replaceable top surfaces. And very often, these are hardwood, and get planed, sanded, and refinished periodically, to retain a good quality working surface.

For example:
http://www.butcherblock.com/product/industrial-bench-top/

For the average home user, working with glues, paints, x-acto knives, soldering irons, pin-vises and dremels and so forth, this is not necessarily where you want to go, however, and it makes more sense to just replace the top surface.

I'm sorry you disagree, "Licht," but please try to keep it civil. Snarky responses aren't particularly constructive.

I gave my own approach... one which works very, very well for me. You don't have to use the same approach, but "making fun" of it is actually pretty foolish.
 
yeah multiple angles for light sources and for models making a mini spray booth is handy as well
Agreed re: the spray booth, in general. I didn't mention that because my own is on a rolling base (a very old 1960's era TV stand, actually, converted). The spray booth is on top, and I removed the wire rack on the bottom and put a wooden shelf down there to hold my compressor and accumulator tank. A second shelf (above that) holds my airbrushes and associated hardware.

I didn't think about that because mine is a "portable" setup. But for most people, a spray booth will likely be a fixed part of their workbench.

Any spray booth will need a filter, an exhaust blower, an inside light source (or more than one) and should be made from unpainted metal (so it can be cleaned with thinner, easily).

This is a currently-available one which is a good choice.
https://www.towerhobbies.com/cgi-bi...MIzJeXpOb71gIViSaGCh3JAAmmEAQYBiABEgJl4PD_BwE

And this is (less the wooden construction, which I'd avoid) pretty close to what I have in my own setup.
http://www.velodramatic.com/?p=8178
 
This thread is more than 6 years old.

Your message may be considered spam for the following reasons:

  1. This thread hasn't been active in some time. A new post in this thread might not contribute constructively to this discussion after so long.
If you wish to reply despite these issues, check the box below before replying.
Be aware that malicious compliance may result in more severe penalties.
Back
Top