You are using an out of date browser. It may not display this or other websites correctly.
You should upgrade or use an alternative browser.
You should upgrade or use an alternative browser.
Model Builds with Archive-X Paints (Star Destroyer, AT-AT, Falcon, X-Wing, Slave 1, and other projects).
- Thread starter skahtul
- Start date
Very nice! That's a pretty cool stand as well!
SB
SB
Okay, now I have started something here and I also really needed more kits/projects to work on ")
At first, I was lamenting the build quilty and detail of the first MPC X-Wing I built above, but the more I built it and especially after I completely finished and mounted it, the more I liked it. Yes, arguments can be made about the "Studio Scale", don't read too much into it

So, as of late, when I start in on a project I find myself wanting more and that is exactly what I did:

These kits actually are a lot of fun, detail is questionable, the quality is just okay, but the size is perfect for me, it's my new favorite scale. I will build these over the tiny Bandi version of these ships all day long.
I will probably start on the TIE next. My only real difficult decision is going to be the color, I am trying to decide between Grey and Stormy Blue, both of which I have on hand.
The Archive-X calls out Stormy Sea, and I do like the way my 1:24 TIE Interceptor turned out which was painted with a close approximation to that color.
At first, I was lamenting the build quilty and detail of the first MPC X-Wing I built above, but the more I built it and especially after I completely finished and mounted it, the more I liked it. Yes, arguments can be made about the "Studio Scale", don't read too much into it
So, as of late, when I start in on a project I find myself wanting more and that is exactly what I did:
These kits actually are a lot of fun, detail is questionable, the quality is just okay, but the size is perfect for me, it's my new favorite scale. I will build these over the tiny Bandi version of these ships all day long.
I will probably start on the TIE next. My only real difficult decision is going to be the color, I am trying to decide between Grey and Stormy Blue, both of which I have on hand.
The Archive-X calls out Stormy Sea, and I do like the way my 1:24 TIE Interceptor turned out which was painted with a close approximation to that color.
Very nice job on the MPC X-Wing! I am working on one of those right now as well.
Nice, would love to see a picture when it's completed. I am pretty sure I am going to hit my Vader TIE next. I have been trying to finish up a few projects that have been on the back burner. This weekend I added Rey's saber to my Kylo, both 3D printed with PLA (the top of Kylo's saber is Resin). Not crazy accurate but they sure are fun to build!Very nice job on the MPC X-Wing! I am working on one of those right now as well.
Okay, it's been a bit but it's time to throw in a few more very random projects. I seem to have a new collection that I am building, I call it 'collecting intentions'. I have a lot of intentions to finish so many different projects, but right now I can only seem to get 25 to 30% into a project before I pause and start a new one.
So, here are a few very random ones I have on the 'bench':
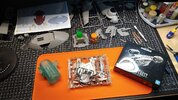
First up in my mini-Crest. I did not think I was going to pick this one up and I am not really a fan of this scale at all, but then Target had them in stock so I picked up this and the Bandi Mando. I figured it would make a nice desk piece:


The Primer is drying now and then I will apply the Chrome and see how it turns out.
So, here are a few very random ones I have on the 'bench':
First up in my mini-Crest. I did not think I was going to pick this one up and I am not really a fan of this scale at all, but then Target had them in stock so I picked up this and the Bandi Mando. I figured it would make a nice desk piece:
The Primer is drying now and then I will apply the Chrome and see how it turns out.
Attachments
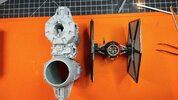
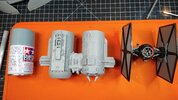
The second project is this Star Destroyer, I think it's about 36" or so when it's fully printed. It's all FDM as the files are not very accurate (some details are great, others are missing) but it will be a fun piece to light and put on my wall. That's my 1:2700 next to it:

The third project is a series of Slave 1 ships. I have done the Bandai one and I think the paint turned out okay but I really want to get these to look "right". I even purchased a cheap model sub to practice on.
I also got in a new shipment of Archive - X that has all the paints I need for my TIE fighters, my 1:72 PG Falcon, and the Slave 1 kits along with a few others:


I also got in a new shipment of Archive - X that has all the paints I need for my TIE fighters, my 1:72 PG Falcon, and the Slave 1 kits along with a few others:
And the last but certainly not least is the 1:48 TIE Bomber. I have two versions of the files and the artists took very different approaches to cutting them up for printing. I am actually a fan of the ones from Etsy by MosEisleyModelworks but the ones pictured below are from NerdMaker.
Because I am having a heck of a time getting the bomber to print correctly, the prints below are pretty bad so they are going to be used for testing some paint and how they react to some different washes, chipping fluids and a few other tests:


Because my Saturn is waiting for Christmas, I am printing the wings in PLA on my MINI as they will not fit on my Mars:

I will throw this bomber into a separate build thread once I can actually get a good print of it done.
Because I am having a heck of a time getting the bomber to print correctly, the prints below are pretty bad so they are going to be used for testing some paint and how they react to some different washes, chipping fluids and a few other tests:
Because my Saturn is waiting for Christmas, I am printing the wings in PLA on my MINI as they will not fit on my Mars:
I will throw this bomber into a separate build thread once I can actually get a good print of it done.
Just printed off the 1:48 Bomber as well, but put it in a box until I can clear my bench a little. You've got a lot going on!
SB
SB
Yes, lots of projects in boxes, I understand that as I have a bunch of those alsoJust printed off the 1:48 Bomber as well, but put it in a box until I can clear my bench a little. You've got a lot going on!
SB
Analyzer
Master Member
Sure thing!
Sorry, for some reason I thought it was a 1/72 Tie Bomber and was curious how the 1/72 resin one I had sized up.
It is clearly much larger and as I reread it, I see you stated 1/48
reading comprehension and all that
Ah yes, the other set of files are 1/72. I am testing this out to see if I can do a 1/24 when my Jupiter gets hereSorry, for some reason I thought it was a 1/72 Tie Bomber and was curious how the 1/72 resin one I had sized up.
It is clearly much larger and as I reread it, I see you stated 1/48
reading comprehension and all that
Your builds look great, man! I agree about the Archive X paints just "looking right" - it's not just the colors but the sheen of them as well.
Any advice as far as air pressure and mixing them for airbrushing? I just can't seem to get it right
Any advice as far as air pressure and mixing them for airbrushing? I just can't seem to get it right
Your builds look great, man! I agree about the Archive X paints just "looking right" - it's not just the colors but the sheen of them as well.
Any advice as far as air pressure and mixing them for airbrushing? I just can't seem to get it right
Thanks! And agreed, the sheen is a big part of it and why I don't use any type of gloss/flat coat on these paints, it just knocks the effect down too much for me.
I feel your struggle with the paint, I can tell you that you are not alone. I wish I had better news for you but I have been using these now for over a year and I have never been able to dial them in like I would want, but I do have a few tips that have really helped me. Likely you experienced what I have which is that it seems to dry in the tip of the airbrush no matter what you do.
First, if you are used to spraying something like Alclad or Tamiya, these will never be that
There is no way (in my experience) that you will just put down a ton of paint in one shot.But, here are my main tips:
- Shake them well, and I mean for like 2 or 3 minutes (it's something with the pigment is my best guess)
- I have never found the magic PSI or ratio that really makes a huge difference, other than I suspect you might be over-thinning them (they require less than you might think) and I usually keep it at 15 to 20 psi. I have found too much air or thinner makes them dry out even faster.
- A good paint retarder from AK or others goes a long way (I usually put 4 to 6 drops directly into the airbrush).
- Pre-mix it before you put it into your airbrush, and really, really mix it well.
- Only use their thinner, I have not had luck with anything else.
Not sure if you have the new version of their thinner with the built-in retarder, but I have some on order that will be here on Saturday, I will let you know if helps at all.
Also, they brush very, very nicely! I just mix them with a bit of water and they go down so much better than something like a Tamiya in that regard.
Rulebreaker
Well-Known Member
is it on purpose, that the X wing plaque is "MCP" instead of "MPC"?Okay, now I have started something here and I also really needed more kits/projects to work on
At first, I was lamenting the build quilty and detail of the first MPC X-Wing I built above, but the more I built it and especially after I completely finished and mounted it, the more I liked it. Yes, arguments can be made about the "Studio Scale", don't read too much into it
View attachment 1493255
Ha, good eyeis it on purpose, that the X wing plaque is "MCP" instead of "MPC"?
No, it was a misprint when I had those made. I have since replaced them with some much nicer ones made of aluminum as I never really liked the plastic ones.
Thanks for the tips! I've got a system kind of working now, lol.
I do have their new version thinner with the retarder, and I tried it with a couple drops of the AK retarder anyway and wow it did not like that at all. Fisheye city.
What I've come up with is basically an equal amount of drops of paint to thinner, and then I add 2-3 drops of the Mr Color leveling thinner and mix it in the cup. I spray it at about 18 and it works pretty well, but yeah it goes down in very light coats. Working good so far! Thanks again!
Similar threads
- Replies
- 4
- Views
- 1,026
- Replies
- 11
- Views
- 993
- Replies
- 28
- Views
- 2,420