MF-ESB Boba Fett helmet paint-up

superjedi

Sr Member
Hi all,
I'm beginning a new ESB Fett helmet commission for a member here. I've done many ESB and PP2 paint ups, but this is something new in a way because it's a type of helmet that I've never worked on before. In the Fett community, this is known as the MF helmet. The owner has asked me to do this in the screen-used style and I've included a couple of pics of the kit as I received it. I believe the owner bought it from someone else and some of the prep was already completed when it was sent to me.

It's a nice sturdy cast! The color variation is due to some putty/primer that was previously applied. At this stage, I'll be adding a bit of Bondo glazing putty to some low spots and small dings in the surface.


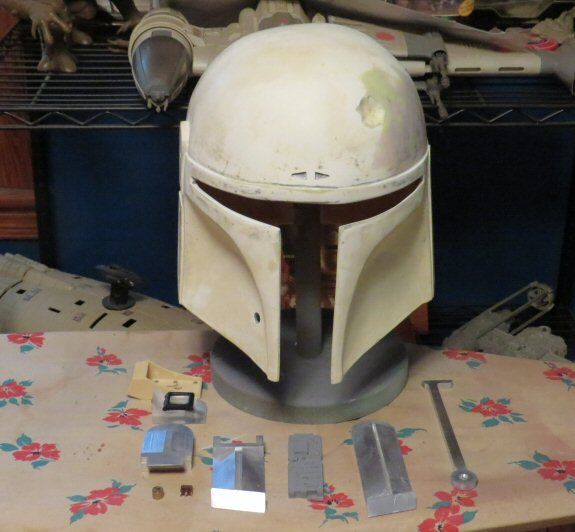
The accessories include a beautiful set of machined aluminum ear parts, a hollow aluminum RF stalk, a brass replica Borden connector, a Honeywell microswitch, a TerminalFettler RF topper, a resin MQ-1 circuit board, and a dark green visor (not shown).


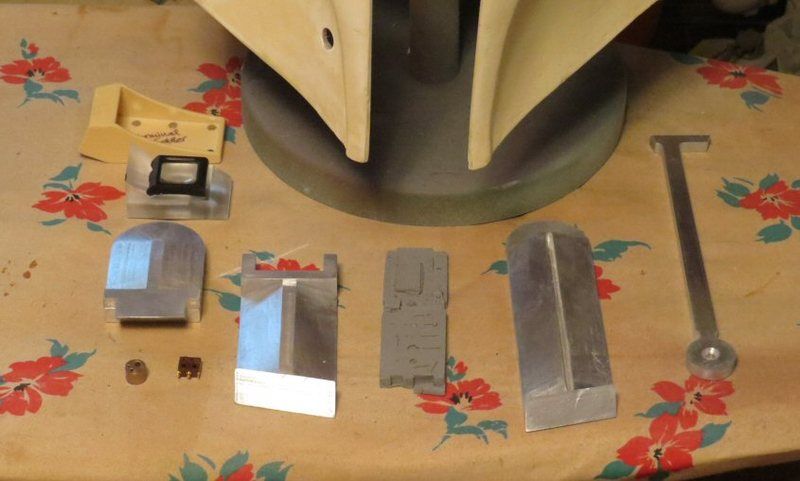
All the parts are laid out on my high tech staging stand. . . an ironing board. :)
Many more updates to come.
 
Can't wait to see the progress on this Eric, have loved watching your previous paint ups and now your doing my helmet it's all the more awesome.thanks again for taking this on.
 
You're welcome, Al.

Not much of an update today. I got the Bondo sanded from spot filling last night, but it's waaaay too humid here to spray
primer. Tomorrow should be cooler and drier, so I should have a nice "clean canvas" to show by afternoon.
 
Thanks guys!

OK, finally have something to show. :) I got the 2nd round of filler/sanding done and laid down another coat of primer.
Everything looked good at that point so I proceeded to lay down the first color coat: the beige on the rear panels.

I use my dwindling supply of Polly Scale acrylics (mostly) on these helmets, and the base color here is Concrete.


This will dry overnight, then I'll begin stenciling for the dark green areas.
 
Thanks, Al.

The rear panels are well underway now. I stenciled and masked for the dark green, and airbrushed it on yesterday.
Additional small details were added with a fine brush.


I always go back to tweak the edges of the color separations. The masking fluid is a very useful tool, but I can't always
get it to go into the smallest nooks and crannies around the edges. But it's pretty quick work to bring them to their
finished shapes.


I'm all set now to begin the topical gray and silver. I'll be working on the left panel first.
 
The first major section is done. I finished up the left rear panel a little while ago.
Here's how it came out.


The finer details were done using a combination of mechanical weathering using wire wool and a sharp
scribing tool, and topical application of silver. At the end of the project I'll apply some of the pale contrasting
gray to certain areas. There's not too much of it on this portion of the helmet, so this is really close to the
final appearance. The right panel is up next.
 
Glad you're liking the progress.

After about 3 sessions I finished the big silver area on the right panel. Now I have to let my eyes uncross
before I finish the other areas. :)


This area and the right mandible are pretty much tied for having the most tiny details.
 
The right panel is now complete. It took me less time to finish this area than the big scrape! :)


The next stage will involve masking off the rear panels and laying down the base color on the dome and cheeks.
 
Got the base color down on the dome and cheeks. The first weathering pass has also been applied. I mix a slightly lightened
shade of the base green and airbrush it on in cloudy, diffuse patterns to break up the starkness and give it a bit of an oxidized
appearance. When this is dry, I'll begin applying the gray and silver topical damage patterns.


I'll be starting the damage on the rear of the dome.
 
Really love what you have done so far Eric, I knew you were always going to do an outstanding job on this, keep it up buddy.
 
The dome damage is coming along. I got a couple of the areas on the back done.
I add the very fine scratches using a combination of scribing through the paint with a sharp tool
and using a liner brush with silver paint.


I'll continue around the dome toward the RF ear where the "stacked" damage is.
 
Trying to use the weekend as much as possible. :)

I got a couple more areas complete on the dome. First is the area just behind the RF ear.
A handful of physical scratches are scattered around this part of the helmet.


I also completed the first series of damage areas in front of the RF ear. I like to do these three areas together
as the space between them is important for the overall look. I love painting the cat scratch. It's one of my
favorite features of the ESB helmet.


I'll see if I have time to do any more work this afternoon.
 
Back
Top