In the run up to the new game Metro Exodus i felt the urge to start a new and somewhat different build.

In truth, after slogging through my Nuka Cola build and having my fill of the Fallout universe i decided i needed to keep the post apocalypse (because who doesn't love the post apocalypse) but move to a very different setting. The Moscow Metro tunnels following atomic annihilation seems like a world away from Fallout and required a more detailed, subdued and serious build.

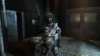
With this in mind i started to replay the newer Redux versions of Metro 2033 and Metro 2033 Last light. When i encountered the rangers i decided they would make a perfect platform for my build. [EDIT - i stuck with the Rangers but moved to a different Armour set]

Metro_LL_Ranger.jpg


The variation of equipment and real estate space to add embellishment made them the perfect candidate for a Metro build. While i had tossed around making an Artyom build the only image i have of him is box art and the wiki. I wanted to make this my own so the Rangers it was !

Thus i began researching the different equipment and load-out of the rangers and quickly decided if i was going to do such an obscure reference from a reasonably obscure game from an even more obscure book i would need to incorporate all the major iconic weapons and equipment.

Not only would this lend the build credibility but it also makes it far more realistic and more fun for me !

Below is the breakdown of the build list i have come up with so far.
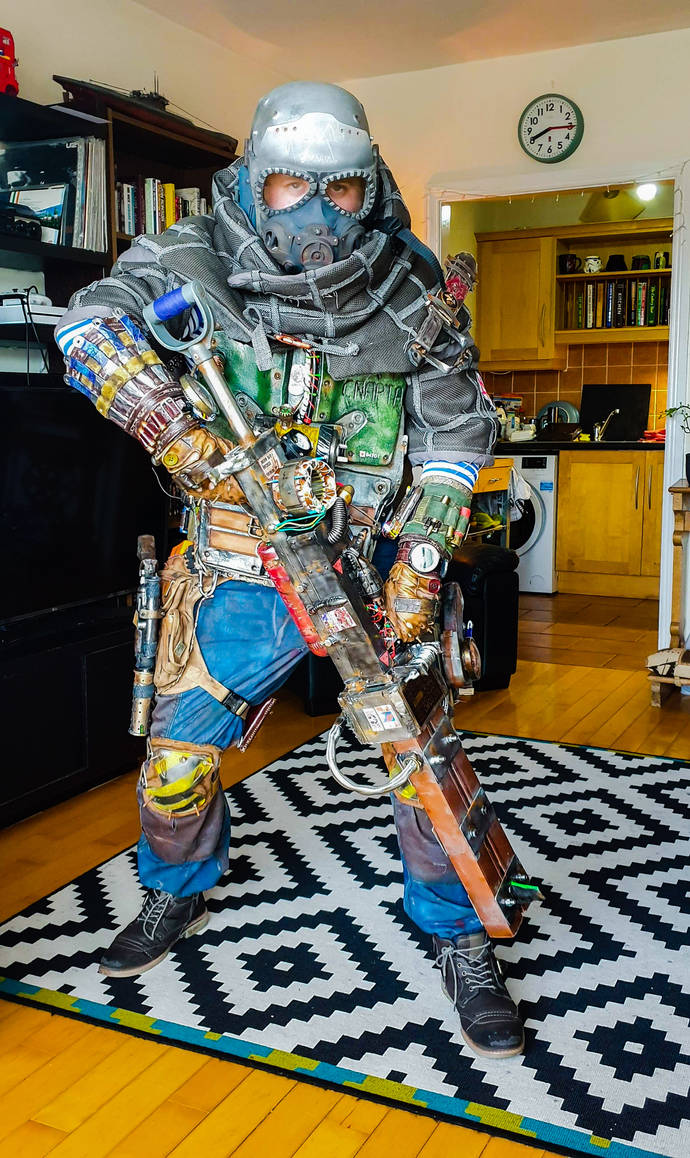
Base costume.

1. Blue BDUs (Modified heavily) [EDIT - was replaced]
2. Khaki body armour (Custom made to include pouches, armbands, pads and other embellishment) [EDIT - was replaced]
3. Armoured boots ( with attachment for extra ammo) [EDIT - was replaced]
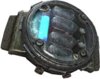
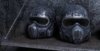
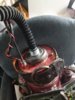
4. Spartan helmet, gas mask. [Had commissioned by a talented Russian Maker]
5. Night vision goggles (To attach to the Spartan helmet) [EDIT - was dropped, was too much going on on the helmet it didn't need more embellishment]
6. Hand held construction light with Edison bulb mounted to the chest. (This would effectively "Light my way" through the tunnels and add a nice source of light for the build) [Edit - Working on powering this at the moment}

Iconic Items

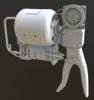
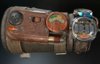
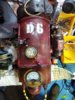
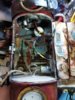
1. Universal Charger (non operational) - [Edit - Working with Harrison4257 and@slavinator on this project] [See the separate build log on this project !]
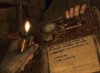
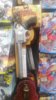
2. Artyoms journal with Postcards and bullet lighter. (Leather made) [Edit - Decided to go with the Metro Exodus Version]
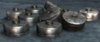
3. Gas mask Filters (Amazingly these 3D print quite rapidly) [EDIT - made this but incorporated it into the backpack]
4. Ammo pouches and extra magazines
5. Nixie watch [Edit - Still trying to figure this part out !]
6. Artyoms Bracer (bare bones) [Edit - Nearly completed this !]
download (4).jpg

Weapons

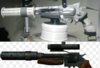
1.Trench Knife with leather Sheath [Edit - Completed]
2. Throwing knives mounted to forearms [Edit - Completed]
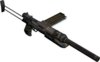
3. Duplet Shotgun (one point sling) [Edit - dropped to be replaced with a railgun]
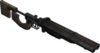
4. B***ard Gun slung on the back - [Edit - In progress]
5. Pipe Bombs [Edit - Completed]
6. Revolver (with mods) [Edit - Completed]

Overall it will be a highly detailed build that will try and replicate all the best parts of the Metro series. I hope to finish this off within 3-6 months depending on work and time commitments.

Updates will be regular as i have already completed a number of parts already. [Edit - still trying to post regularly !]

Hope you enjoy this Russian themed build, there will be plenty of random assortments and little one off pieces but i hope i can capture the feel of the Metro.
 

Attachments

  • Ranger..jpg
    Ranger..jpg
    6.1 KB · Views: 8,893
  • download.jpg
    download.jpg
    5.9 KB · Views: 1,107
  • download (2).jpg
    download (2).jpg
    7.9 KB · Views: 953
  • download (1).jpg
    download (1).jpg
    7.3 KB · Views: 543
  • download (4).jpg
    download (4).jpg
    8.5 KB · Views: 1,338
  • download (3).jpg
    download (3).jpg
    8.9 KB · Views: 574
  • download (5).jpg
    download (5).jpg
    9.1 KB · Views: 1,149
  • download (6).jpg
    download (6).jpg
    3.2 KB · Views: 1,001
  • download (7).jpg
    download (7).jpg
    4.7 KB · Views: 975
Last edited:
Hi Guys !

This is the first step in my Spartan ranger build from metro 2033. To begin this build i wanted to start with something exciting so i decided a Metro 44 revolver was teh way to go !

IMG_20190212_220248_850.jpg


I wanted to be reasonably accurate however i am aware that Metro weapons are made from scrap, so one weapon will always be different from the next even if they are based on the same designs. Also while the stock is quite iconic from these games i decided against adding it as i felt it would be too encumbering as i walked around a con. [EDIT - In hindsight this was a great call]

I began with a dollar store toy gun that looked like it needed some attention. I am a firm believer that dollar stores can solve most problems! While i could have mocked up a render and 3D printed it, this was a simpler way to get a similar effect. Its one of three weapons so doesn't need to be hero quality on its own as it will be in a holster most of the time.

I sawed off the barrel and began to fill in the mold lines and screw holes, adding some extra bolts and parts to make it look more home made. Once i had it cleaned up i sanded it clean and began working on the silencer and scope.

The silencer was made out of some PVC pipe with plug protectors at each end. I drilled some holes in it and added a piece of EVA foam which i had added a pattern too. The silencer has a small piece of pipe inside of it and that it run down the barrel of the revolver. This was hot-glued into place.

Next came the scope. I had a scope mount from an old rifle sight and attached it to the revolver. The scope is simply some PVC pipe with some 3D printed parts attached (all these parts come from the back of a Nuka Thirst Zapper, reuse, reduce recycle!) . The detail work is similar to the style i used on the silencer (Eva foam, lines cut in it and opened with a heat gun).

Once completed i added the handhold which was sculpted out of EVA foam and then held in place with epoxy.

I sanded the whole piece thoroughly and hit it with a gloss black. Once dry i used my airbrush to apply metallic lacquer to the revolver and the scope. The silencer was painted with a brass color and then made to look oxidized with some craft paints.

I added a number of browns to the handhold and the grip and followed that up with a black wash. I then added some detail paint working and weathering with a brush and its finished !

Next up will be a trench knife out of worbla !
 

Attachments

  • IMG_20190205_133637.jpg
    IMG_20190205_133637.jpg
    2.3 MB · Views: 488
  • IMG_20190212_220248_911.jpg
    IMG_20190212_220248_911.jpg
    44.1 KB · Views: 1,370
Last edited:
My apologies i have been fairly negligent in updating this build log even though i have been making some pretty good progress on the actual build!

I will endeavor to update this build log over the next few weeks with each new part of the build and hopefully by the tie i have the log updated i will be ready for Comic Con !

Lets get back into it ! As is common with a build you start with a great plan and eventually decide that you want to take it a completely different direction. i liked the look of the rangers from Last Light and thought they had a great feel, however once i started Exodus i just had to start a build with the re imagined Armour and weapons. This set me back a little but overall its been a nice move and i like the new look better than the old.

So once i decided to move by build (all i was changing was the carrier rig and clothing) i decided to base my ranger off the character "Idiot" a resident philosopher and all round good guy. While i was shouting for semi accuracy i also took a lot of liberties attempting to bring in plenty of the games signature equipment and items. Although these are mostly carried by Artyom my build is inspired and Artyom has all the cool gear anyway !

download.jpg


So with my new plan i was off ! Initially i decided to take on the chest rig it appears to be broken down into three key parts.

1. Leather jacket (This did not work out at all)
2. Armored chest plate
3. Spetznaz Sniper Cowl

For this post i will be focusing exclusively on the armored chest plate. I tried to do some research and couldn't find any real world equivalents which is surprising because the makers of the Metro Series tend to take real world objects as a base. Almost all of the items are inspired by real world objects which makes it a makers paradise. Great for hunting down bits and pieces and pulling it all together.

Thus i decided without a real world equivalent i would just have to make it from scratch with what limited pictures i could find. I used the above as a base idea and customized it with what materials i had available.

To begin this i made myself a giant duct ape template of my torso and drew out my pattern for the chest piece from it. You cant make out the top of the Armour as it is covered by the cowl so i just made it straight and didn't worry too much about it since it will be hidden. Once i had my template i made a mock up out of EVA foam. Once i was happy with the mock up i covered the foam in Thermoplastics and glued it all together. (And by glue i mean i just heated it all up, thermoplastic pieces simply bond together meaning no glue was used in the building of this piece ).

The respirator tube was made in the same fashion with extra detailing and some nuts and bolts. The hose is an original soviet era gas mask hose i found on eBay and seems to be a pretty good match to the picture. For the discerning amongst you i know i butchered the spelling of Sparta. Attempted to fix it but it just made it worse so i left it.

IMG_20190501_212554.jpgPSX_20190503_073255.jpg IMG_20190506_074727.jpgPSX_20190501_213603.jpg

Then as is so often the case I then made my first mistake ... of many. Instead of using a base to prime the worbla like plasti-dip or wood glue i cracked out a new paint i had never used before. This paint was oil based and clearly for metal railings. Needless to say this stunk my apartment out of it and took a week to touch dry. Was not impressed with it but it made the piece fairly rock solid by the end of it.

One it was finally dry (Nearly two weeks) i sprayed the chest piece with a nice gloss black and followed this up with a lacquer chrome. I have found nothing matches metal like a good coat of modelling lacquer through an airbrush. Gives a really nice metallic finish that i love. Once the laquer was dry i followed this up with a lacquer gloss clear coat and then a black wash to sink into the details.

Most of the paint work on this piece is basic metal weathering and the green portion on the upper half. To get a weathered chipped effect i used the hairspray method ( you lay down a layer of hairspray then airbrush over it then when dry go over it with a small brush and hot water, it reveals teh under layer) and the salt method (similar to the hairspray but you lay down salt and then brush it off after you apply the top coat to reveal the under coat).

Once i had this done i went at it with an array of rust mediums and weathered it up where it needed it. All weathering took a few hours with the airbrush but came out pretty good. I may still add some extra weathering with some oil paints later.

My second mistake came in not cutting out channels to run my belts to i was forced to attach then in a pretty shoddy manner. Overall its not as clean as it should be and its a departure from the picture but i think it looks pretty good nonetheless.

PSX_20190513_081131.jpg


And Voila ! By and large i think it looks pretty good for a Cosplay and retains that dirty metallic look while also being pretty tough and has some weight to it. I added a carbineer that i weathered and some copper wire. The hose disconnects and a small speaker is wired up inside that plays some pretty freaky tunnel sounds.

I will hopefully post up next week a break down of my back pack build.

Thanks !

[Note- Its got a distinct Bobba Fett feel off it !]
 
Last edited:
Having completed my chest rig i decided to get working on my back pack to round out my build. While this is not a strictly Metro design it is inspired by a world where you must scrounge for everything and create practical solutions to very real and deadly problems.

[Edit - i need better pictures for this]


I wanted my ranger to be able to communicate over long distances as well as too breath, while also retaining some level of personality in the little details. Any one could throw a back pack together and i decided that if you were in an underground hellscape riding out the apocalypse you would probably need a hefty oxygen tank. Since an oxygen tank and a set of radio equipment are pretty far apart and i do not have two backs to mount the equipment i decided to combine the too.

IMG_20190514_205951.jpg


[It helps if you do not think about the obvious practicalities of the design, where is the oxygen stored if there is a door in it etc]

So why not use an oxygen tank and while i am at it why not make it so i can access it and keep radio equipment in side. And thus i was off with an idea. Trying to track down a light weight air canister turned out to be harder than i though it would be so i opted for a more direct approach.

Streetwize Portawasher/Portable Power 8L Sprayer with xtra wash brush | Euro Car Parts

551770561.jpg


This washer made a brilliant base for my air tank, not only was it light weight and strong but it was also much easier to work with than steel.

Once it arrived i began chopping it to high hell and attaching accessories until i had the base of my design complete. Overall it was pretty straightforward and i used ratchet straps as webbing. in addition i added a volt meter to the bottom as extra detail and the antenna is simply part of the power washer attached to the top. The oxygen attachment on top came from a 3D printed gas mask filter i had lying around.

PSX_20190505_192813.jpg


Then came paint ! My favorite Part ! Similarly to the chest rig i covered this whole thing in metal paint and had too wait an age before i could get back at it. Once dry i chromed the whole piece.

However the paints reacted very badly and led to severe cracking and bloating. While initially horrified it turned out to look actually really cool and dynamic. I sealed all the cracks with a clear coat and applied the salt technique and the hairspray technique and added different shades of reds. I followed this up with dusting off the salty and airbrushing in the fine details.

Once i had all the fine paint work completed i sealed it again and added some weathering for good measure. I attached the upper nozzle that feeds into the chest piece and attached a belt i picked up at a thrift store.

IMG_20190514_080714.jpg


Then it was onto the internals. This was a real flying off the seat of my pants and it came together about as well as i could have hoped. The bottom drops out allowing me access to wire the volt meter and the top of the case has a computer motor and can be turned on and off as well as a light. The connector is for a phone/radio receiver [Edit - Still a work in progress]

IMG_20190513_165624.jpg


I still have some more work to do on the inside to add additional weathering but overall i am quite happy with it. It straps onto my back comfortably enough with the ratchet straps and overall its pretty light weight and looks pretty good. Lots of little details scattered around for those who care to look closely.

Next up will be back to my Trench Knife and Scabbard !

Thanks for following guys !
 

Attachments

  • IMG_20190513_180438.jpg
    IMG_20190513_180438.jpg
    6 MB · Views: 1,277
  • IMG_20190514_080714.jpg
    IMG_20190514_080714.jpg
    7.2 MB · Views: 335
  • IMG_20190513_165620.jpg
    IMG_20190513_165620.jpg
    5.7 MB · Views: 793
Daaamn thats a loadout and a half! And a fellow Irish :D I'm still gathering resources. Going to start with the helmet and the revolver, hopefully make a journal to document everything.
 

Your message may be considered spam for the following reasons:

If you wish to reply despite these issues, check the box below before replying.
Be aware that malicious compliance may result in more severe penalties.
Back
Top