Heroic Replicas
Active Member
Hello all!
Today, I'd like to share with you all a project I've been working on for a long time.
This is the Master Sword, from the Legend of Zelda. Specifically, this is modeled after the Skyward Sword (Wii) version of the Master Sword.

Actually, this is the second Master Sword that I've made. The first one I finished about two months ago. I made the mistake of painting that blade, and it's been abused a bit. It could probably be repaired by somebody more talented than me.

I've had the idea of making a sword since I got my current job at a steel fabrication shop, about December 2010. It look me several tries to develop a design that looked good and could be created with the tools I had available. I didn't want to take a pepakura approach, because my hand-sculpting skills are lacking.
I developed a few different models, and settled on the Skyward Sword near the end of 2011. I Modeled it in Solidworks:

I do CAD work for a wooden pattern maker. Once I finalized my design, I traded some CAD work for these molds for the hilt. They were milled out on his CNC router. This would allow me flexibility to make prototypes fairly quickly.

I cast the hilt halves with dyed two-part plastic. I made a mess!

Here are the halves.

I milled out the back with a Dremmel.

Then I glued the halves together in this freaky looking setup. I count seven clamps.

Two halves, now sanded. Not shown between here and primer: about 12 hours of white putty and more sanding.

Primer! On a Stick!

Blue! On a Stick! This picture shows the true color of the hilt the best.

Gold Leaf! This part I need more practice with. It sometimes looks messy, but I know the end result looks better than any paint I can find.

I cut out this blade at work on our plasma table. 5/16" Carbon Steel. I had it Blanchard ground and then engraved it, then clear coated it. My brother shaped the edges with a hand grinder. I then put on a clear coat. For the first sword, the hilt clasped over the blade, which caused problems when I went to paint it. For the second one, I designed the hilt to slide up the bottom of the blade. It got banged up when I ground down the rounded parts of the tang, and added the engraving, so I sanded it shiny again.

I sanded it for real this time, removing the clear coat. This is before and after a good wet sanding.

I even buffed it with some compound. Before on top, after below. Semi-reflective! Pudgy fingers!

I slid the hilt onto the blade. Here is a close-up on the engraving.

For the handle I did a 12-strand round plait, with a 4-2 under pattern. I think it looks pretty sharp. I cut the strands 3/8" thick from some scrap. If I had cut the strands straighter than they are, the braid could be tighter in spots. I used a steel pipe as the solid handle, and wrapped leather with epoxy around the full tang for a solid friction fit. Hot glue held some strands in place until I could finish the braid, then I went back and removed the hot glue.

Time for some manly stitching! I added two small bands to the leather handle to hide the seams. Die Hard is such a great movie.

From the other side. I'm really happy with how this looks.

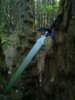
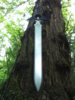
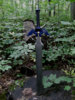
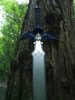
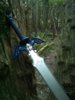
Lastly, I went to a wooded park nearby and took some fancy pictures. They are attached below.
I learned a lot in this project, and would like to hear your feedback and answer any questions.
Cheers!
Today, I'd like to share with you all a project I've been working on for a long time.
This is the Master Sword, from the Legend of Zelda. Specifically, this is modeled after the Skyward Sword (Wii) version of the Master Sword.
Actually, this is the second Master Sword that I've made. The first one I finished about two months ago. I made the mistake of painting that blade, and it's been abused a bit. It could probably be repaired by somebody more talented than me.
I've had the idea of making a sword since I got my current job at a steel fabrication shop, about December 2010. It look me several tries to develop a design that looked good and could be created with the tools I had available. I didn't want to take a pepakura approach, because my hand-sculpting skills are lacking.
I developed a few different models, and settled on the Skyward Sword near the end of 2011. I Modeled it in Solidworks:
I do CAD work for a wooden pattern maker. Once I finalized my design, I traded some CAD work for these molds for the hilt. They were milled out on his CNC router. This would allow me flexibility to make prototypes fairly quickly.
I cast the hilt halves with dyed two-part plastic. I made a mess!
Here are the halves.
I milled out the back with a Dremmel.
Then I glued the halves together in this freaky looking setup. I count seven clamps.
Two halves, now sanded. Not shown between here and primer: about 12 hours of white putty and more sanding.
Primer! On a Stick!
Blue! On a Stick! This picture shows the true color of the hilt the best.
Gold Leaf! This part I need more practice with. It sometimes looks messy, but I know the end result looks better than any paint I can find.
I cut out this blade at work on our plasma table. 5/16" Carbon Steel. I had it Blanchard ground and then engraved it, then clear coated it. My brother shaped the edges with a hand grinder. I then put on a clear coat. For the first sword, the hilt clasped over the blade, which caused problems when I went to paint it. For the second one, I designed the hilt to slide up the bottom of the blade. It got banged up when I ground down the rounded parts of the tang, and added the engraving, so I sanded it shiny again.
I sanded it for real this time, removing the clear coat. This is before and after a good wet sanding.
I even buffed it with some compound. Before on top, after below. Semi-reflective! Pudgy fingers!
I slid the hilt onto the blade. Here is a close-up on the engraving.
For the handle I did a 12-strand round plait, with a 4-2 under pattern. I think it looks pretty sharp. I cut the strands 3/8" thick from some scrap. If I had cut the strands straighter than they are, the braid could be tighter in spots. I used a steel pipe as the solid handle, and wrapped leather with epoxy around the full tang for a solid friction fit. Hot glue held some strands in place until I could finish the braid, then I went back and removed the hot glue.
Time for some manly stitching! I added two small bands to the leather handle to hide the seams. Die Hard is such a great movie.
From the other side. I'm really happy with how this looks.
Lastly, I went to a wooded park nearby and took some fancy pictures. They are attached below.
I learned a lot in this project, and would like to hear your feedback and answer any questions.
Cheers!
")
