Lost in Space B9 robot with lighting kit

gt350pony66

Master Member
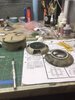
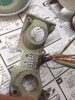
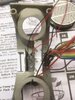
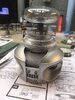
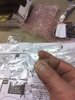
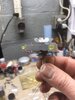
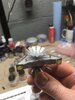
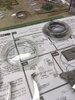
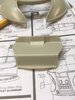
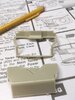
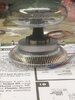
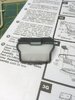
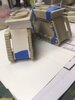
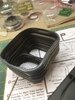
Well my friends, during the Covid 19 "stay home from work" time I'm just binge building. I gotta say I'm rather enjoying it. The Mobius 1/6 robot has been in the stash for nearly 2 years, so here we go. The steps for integrating the lighting during the build as well as the PE has been a challenge but watching some youtube has helped. The brain was a bit fiddly but I think I've got it. I'm hoping that's the worst of it. The lack of illustrations in the Tena instructions has been a hindrance but that's the challenge I reckon.
 

Attachments

  • B9A.jpeg
    B9A.jpeg
    62.2 KB · Views: 326
  • B9B.jpeg
    B9B.jpeg
    45.3 KB · Views: 356
  • B9C.jpeg
    B9C.jpeg
    42.7 KB · Views: 355
  • B9D.jpeg
    B9D.jpeg
    59.4 KB · Views: 339
  • B9E.jpeg
    B9E.jpeg
    72.5 KB · Views: 333
Hey. How about you simmer down with your productivity and stop making the rest of us look bad :lol:
LOL, I got a lot of time on me hands. The girl is still working a few days a week but she comes by and hangs out from Saturday evening till mid day Monday. obviously while she's here I don't get near the work bench...and why would I? ;) Otherwise, I ain't got nuthin to do :lol::lol::lol:
 
had to hack out this panel so I can slip in a piece of that light diffuser stuff, it took a bit but I got it. I managed to complete the head but can't do any light test till I set up the control board and attach the power supply. Hopefully tomorrow
 

Attachments

  • b9f.jpeg
    b9f.jpeg
    47.1 KB · Views: 210
  • b9g.jpeg
    b9g.jpeg
    52.7 KB · Views: 244
  • b9h.jpeg
    b9h.jpeg
    63.1 KB · Views: 286
It's turning out great, wish they had the one piece glass bubble when I built mine, too late now.....:) Not sure if anything I did might help,
but some of the pictures from my build can be found here, hope it give you some ideas, it was a fun build, love WIP pics.....
 
LOL, I got a lot of time on me hands. The girl is still working a few days a week but she comes by and hangs out from Saturday evening till mid day Monday. obviously while she's here I don't get near the work bench...and why would I? ;) Otherwise, I ain't got nuthin to do :lol::lol::lol:


Yeah, I feel that. I have my kiddo on my days off, and currently I'm waiting for the USPS to find my led's for my frankenstein build. So productivity is slow. I did however, buy the OLD revell 1:32 corsair model, which I plan to completely redo with scribed paneling and rivets, aftermarket everything. While the parts are actually for the 1:32 Tamiya kit, I'm sure I'll be able to make them fit.
 
ok, well...the mouth piece turned out well, cutting it out was tedious but the acrylic sheet cooperated. I masked off the leg accordions and shot the inside with black so future lighting won't come through. I thought I was being pretty clever by cutting ultra thin evergreen sheet to veneer the track housing seams...then of course I REALLY fracked up the silver body parts. The satin clear I used on the J2's was fine, but it crinkled on the robot o_O Same paint, same clear...only thing I can figure is I didn't let it dry long enough. Soooo, gotta get some easy-off oven cleaner and strip it off and do it again, ARGH
 

Attachments

  • b9r1.jpeg
    b9r1.jpeg
    58 KB · Views: 201
  • b9r2.jpeg
    b9r2.jpeg
    35.5 KB · Views: 199
  • b9r3.jpeg
    b9r3.jpeg
    67.1 KB · Views: 194
Say dude, where are those pics of yours? I'd like to see your build before I do something else stupid :lol:

The best place to look for the pictures are at Bob May's home page in the Picture Page,, Pictures Page, It's at the middle of the page under " Teslabe's B9 Robot Model Build", I'm sure HobbyTalk has long since taken the photos down. The videos of the build can be found in my youtube channel "teslabe7701", click on the video option at the top of the menu to open all the videos and be sure and scroll down, they are old videos.
 
Took a good part of the day to get it scraped, sanded and reshot but I managed to save it. While it was soaking in oven cleaner I got some LED"s wired and stuck in place. Also made some lighting separators to prevent bleed through. couple more days...
 

Attachments

  • b9a1.jpeg
    b9a1.jpeg
    65.7 KB · Views: 243
  • b9a2.jpeg
    b9a2.jpeg
    69.7 KB · Views: 229
  • b9a3.jpeg
    b9a3.jpeg
    62.7 KB · Views: 251
  • b9a4.jpeg
    b9a4.jpeg
    62.9 KB · Views: 371
But, I widh I had thought to string some FO up into those red and yellow do-dads...woulda been pretty easy and looked cool
 
That silver color is pretty nice. What paint is that?
Well, I had been using a valejo acrylic silver on the J2's and it worked fine...but it crinkled on this. I think either I had thinned it too much or not let it dry long enough, or both. Believe it or not, what I reshot with was Testors 1451 aluminum buffing metalizer only I didn't buff it. I did two lighter coats and let it go and didn't buff it, just wiped it good later. Worked out well...thank God
 
Back
Top