Lion King Musical - Lioness

Temperance

Well-Known Member
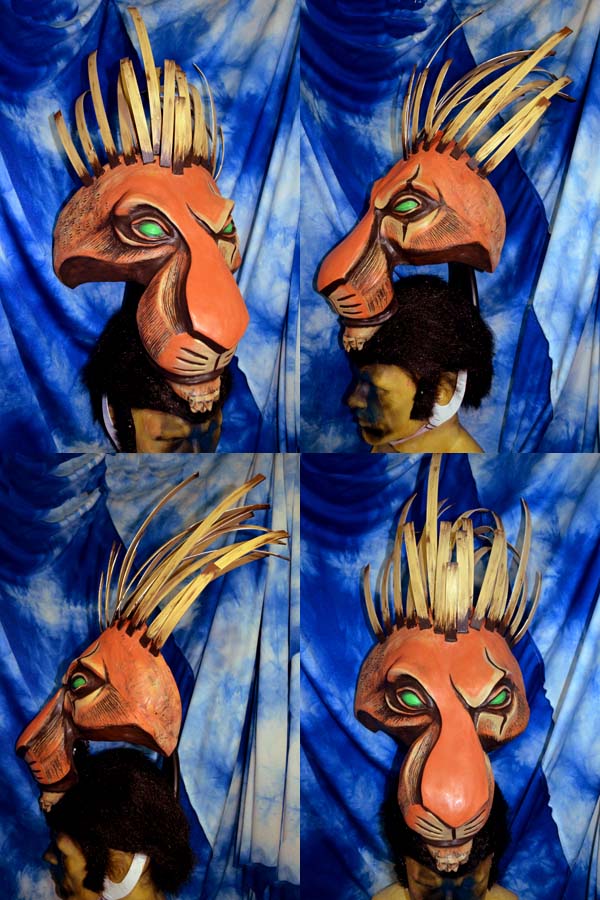
I've started sculpting a headdress for a Lion King Musical Lioness.... I still need to do some smoothing and add the markings, but I was mostly concerned at getting the shape down first.
65108_900.jpg


There are two different kinds of lioness heads in the show (well 3 if you count Nala), the singers and the dancers. The singer heads are a full head which rests on the actor's head like an african headdress.
This is a dancer head, it's smaller than the singer heads as it needs to be light and easy to move in for dancing. The costumes are slightly different as well for the same reason.
The Dancer heads also do not "cry" like the singer heads do (I was awful tempted to add the cry feature, but I would like to go for accuracy at this point.

More progress to come. I have thousands of beads bought on ebay making their way through the mail for the corset (FFFfffff! there are literally THOUSANDS of beads on those corsets... I'm going to be busy for a long while sewing those on!). I also purchased some silk for the drape on the back of the neck. Yes, 100% silk.... darn broadway, you couldn't go with a cheaper fabric huh?
 
Thanks, Booster. I have lots of great photos and ref, but more are always appreciated.

More sculpting for my lioness headpiece.
Clay smoothed down and scalloping and texture added:
66105_original.jpg


66355_original.jpg


Mold was made with rubber latex. It's a lot slower process than silicone, you paint thin layers of rubber latex onto the piece over several days. When the latex mold was thick enough, I made a hard case in plastercloth to hold the shape:
66566_original.jpg


Resin was poured into the mold and rolled around to make a hollow headpiece. In order to strengthen the ears, I added some rigid expanding foam:
66994_original.jpg

Finish headpiece removed from the mold:
67122_original.jpg


In order to clean up some of the mis-cast errors, I used bondo to fill pocks, then sanded down the fills to a smooth finish:
67350_original.jpg


The head was added to a headdress. The headdress was made with twisted 16 gauge wire, and covered with twine to look more natural. I installed some strips of sheetfoam to the inside of the headbase for comfort:
67620_original.jpg
 
Talk about out of the box! This is Fantastic! Way cool to see something VERY out of the norm. Cant wait to see the rest!
 
Aggghhhhh! My fingers!
I spent all weekend sewing beads onto my collar for my Lioness costume. There's a good 16 hours of work there. Most of the beads were approximately 4mm-6mm long... so you can see why it would take some time to bead the whole thing!
All of the beads are stone or wood (no plastic!).

The collar itself was drafted from a duct tape pattern. I used Buckram as a base for stiffness, and covered it with a layer of silk so the buckram wouldn't show through. Once I had my collar I began beading from the middle, and worked outwards so I could match the pattern on each side.

After 7 hours of beading....
67927_original.jpg

68175_original.jpg


After 10 hours of beading....
68479_original.jpg


Completed! At around 16 hours T_T
68816_original.jpg


The collar was a nice prep for the corset, which I also have to bead. It is significantly LARGER... however I will be using somewhat larger beads as well.
 
The collar was only the appetizer for the main course! The corset!
I worked on the corset through the month of December and a little in to January. I am afraid I did not calculate the time worked on it, so I can't say how many hours exactly I worked on it. BUT! I worked on the corset pretty much every day: 30 minutes during my lunch break during the week, and an average of 6-8 hours on the weekends... plus many more powerhouse hours over my Christmas holiday. Each row of beads took about 30 minutes to apply... so you can do the math ^_^;

Progress.....
I covered an existing corset I had with the same silk as the collar, then added a flap of fabric and some snaps to hide the front closures. The musical corsets appear to only have a back closure. Since I don't have a professional dresser to put me in my costume each time, I chose this method to make it easier to get on and off as required.

I started with the front middle row, then added beads to each side for balance.
69021_original.jpg


69174_original.jpg


69385_original.jpg


69755_original.jpg


69965_original.jpg


As you can see, towards the end, I was nearly out of beads... so you can see the lower spine area has a real mish-mash of beads. I figured it was safe since the back is almost entirely covered with the silk drape.
70279_original.jpg


Some fun facts:
-There are OVER 4600 beads to the collar and corset combined!
-I watched 3 seasons of Community, 1 season of Life, 1 season of Numb3rs, 1 episode of Bones during the making of this corset
-My cats are still finding stray beads that escaped a the corset and rolled away
 
Lioness is so nearly done! I can see the finish line!

The head was painted (sorry, no progress pics.... I never think to take them when I'm painting T_T)
72024_original.jpg


I started with a base coloring: the head was airbrushed in dark brown, then a light goldenrod coat was added over top, then a mid-brown coat on top of that. Once I had my base, I airbrushed highlights in yellow and shadows in dark black-brown.
I used a small brush to paint the detailed divits in the head, then drybrushed a little around the eyes and nose. Black was added last in key points: eyes, lips and nose area.

The flowing silk down the back of the head was laid flat and ironed, then painted with a 1" flat brush.
71387_original.jpg


The silk was then carefully folded and sewn. Snaps were added to the silk and the inside of the corset so the silk would hold when the headdress was folded up into the corset.
71442_original.jpg


I hand stitched a thread through the other end of the silk to gather it. This gathered silk was then glued to the inside of the lioness head.
71883_original.jpg


The unitard was painted with a flat 1" brush similar to the silk. I used a flesh tone spandex for the unitard.
72378_original.jpg


Here's a quick test photo to see how everything fits together! I just need to add hand loops for the headdress silk! So nearly done! Yay!
72485_original.jpg
 
I posted in the showcase thread as well, but I just wanted to ask where you wore it? It's such an amazing piece and I'm curious for the reactions.

That scar mask is just wow...
 
Hi! I have been stalking for a while and finally have to ask some questions. This costume is phenomenal! We are directing Lion King Jr. with two middle schools in California and I would love to know exactly how you fashioned the head piece to the mask. What is the bar that goes from the back of the mask to the headband and how does it attach? This is my first post so if I am asking too many details I apologize. I just want to make these costumes as safe of the kids as possible.

Your post was an inspiration for to finally make an attempt at sculpting and mold making. I was pretty happy with the results, for a first timer, but definitely learned some tough lessons regarding cracked clay under a mold and NOT brushing on the second layer of latex too hard as it wrinkles the bottom layer. Grrrr.
 
Your work is simply stunning - I'm so inspired!!
We are doing Lion King Jr at my school in Edinburgh and I am doing all of the props and costumes. Have made Pumba, Timon and Zazu puppets so far - got to get going on masks next. My neck pieces and corsets will not be exquisitely beaded like yours!!
 
Back
Top