Link's extremely battle worn Hylian shield (work in progress)

MikeX

Member
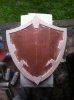
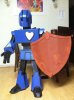
So I have been asked to build a Hylian shield that might look like the aftermath of finishing the game. I'm taking some artistic liberty since they weren't specific with which shield they wanted and doing a variant of the shield from Ocarina of Time.

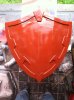
I'm going to be building it mainly out of foam based backer board and Bondo. A little hot glue, a couple wooden dowels, and probably painting it with spray paint. I didn't do a primary sketch, so I will have to skip that step. I know a lot of you are way more experienced than me but for the sake of WIP that might help some one else, or so you guys might better see something I missed, I'll show every step I can.
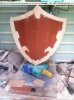
Here is the first step. Just what I've done tonight

First cuts and my reference pics.
photo1 (5).jpg

I didn't use a template this time. So I cut one side and folded it over to make my second half cut. So that it would be symmetrical . I make fold cuts by only cutting half way through. the paper on the uncut side will help hold things together till later steps.
photo2 (3).jpg

I made two more fold cuts so it will have a nice curve.
photo3 (1).jpg

Since I didn't do a primary sketch or a template, here is my full cut spread. You guys have my permission to use it to make templates for your own builds.
photo5.jpg

Here is the base of my build put together. I haven't glues anything yet because I am going to do that right before I start doing the first Bondo stage.
photo4.jpg


Ok, I am going to go take a nap for a bit then start slopping on the Bondo when I wake up. I'll try to update again tonight.
 
Hooray for more Zelda props! Looks like you have a nice start. How are you planning to make the arm braces for the back?
 
This one wont have any. It is dedicated as a wall hanging piece. And since this process finishes with such a light prop, It will probably just get some 3M stick on hooks.
If I was going to add braces (and I thought about it), I would put screws in it before going on to the next step. With the points facing the back so that the bolt part will be braced in by the bondo layers. That way I could use some wing nuts to clamp on the braces. Then I would just dremel off the ends of the screws.
 
Second day on this build.

I start by bending the folds all the way so the cut is wide open. Then draw a bead of hot glue down the whole cut. This helps it stay together because the paper on the back is not strong enough to hold anything once I start sanding.
photo1 (6).jpg

The glue will also dry and hold the angle of the bends that I want. Just have to hold it in place long enough for it to cool.
Here you see the left side is done.
photo2 (4).jpg

I uploaded a couple videos to youtube of me working the next couple steps.
First the bondo. (step by step annotations on both, no talking)
Repeated that, till the whole thing was covered.

Then Sanding (dremel is used so feel free to mute it)
Then repeated the bondo, then sanding, then bondo etc...

In the bondo vid I talk about not getting stuff stuck in your putty.
That's because it will do stuff like get caught on your paddle(?) and gouge big streaks in what would other wise be nice and level surface.
Like this
photo3 (2).jpg
That's ok though. Just sand down any ridges then fill it in.

First layer of sanded down bondo
photo4 (1).jpg

And after a few more layers
photo2 (5).jpg

You cant see much of a difference since the bondo color never seems to blend evenly.
So a good thing to do is hit it with an even color using sandable primer.
photo4 (2).jpg

It makes it easier to tell the difference between divots and dark spots.
I learned this when I saw Volpins Needler build. Before that, I was using alternating layers of black and white spray paint so that I could see the high points while sanding down. A process that was quite messy and was actually adding time to my build.
When you sand past the primer the bondo turns really light any ways and it works the same way.

Here is the shield with one of the final layers (at this stage) of bondo. You can see the color contrast and how much easier it is to see
photo5 (1).jpg
(these last few pics seem to have loaded up side ways. I'm not really sure what happened there but, meh. It's not really directionally important.)

Here's the Primer I use.
photo3 (3).jpg

Here is a close up showing how much easier it is to see the divots when its an even color
photo6.jpg

I let that all dry and air out a bit before bringing them inside the house.
Then brought them in and used hot glue to pin the pieces of foam board that make up the edges.
photo1 (8).jpg

I'm using foam board for the edge detail as filler. This gives me an even level and keeps it from getting to heavy.
I will be covering this with bondo tomorrow. Its dark out and I have no lights in my work shop.
 
Last edited by a moderator:
Third day.

I covered the sides in Bondo in sections about this size. Doing the next part on the opposite side of the shield. That way I didn't spread newly mixed Bondo over half cured Bondo. Which would end up screwing up both parts. Plus It gives sections enough time to cure so I have a part to grip while I'm spreading the next batch.
IMG_0769.JPG

What do you guys do to get excess cured Bondo off your paddles between applications? I use spray paint tops to scrape it off and as a little container to throw it away. Is there a better way?
IMG_0775.JPG

I dont know if you can see it in this picture but one of the problems with using foam board, is all the loose bits of foam that flake off the edges you cut, It will get caught up in the Bondo while you're spreading it and cause gouges.
IMG_0774.JPG

Thats ok though because the first run through of the bondo, sand, repeat... is never really pretty and will be smoothed out anyways.
IMG_0784.JPG

To get straight lines when sanding edges, I just wrap my sand paper around on of my putty knife... paddle... Bondo spreader... what ever it's called.
IMG_0786.JPG

First run through sanded and clean up a bit.
IMG_0787.JPG

I'm going to skip past the next few sanding steps because I think you all got the jest of it.
Here is the full body with primer. It is still wet and shiny and you can see some sanding still needs to be done. All the low spots are filled now, so I can give it a quick sanding tomorrow. But I have to stop sanding and let it dry and air out long enough to bring inside to start the next set of details
I wont be polishing this project up as much as I normally would. I think all the battle damage I am going to do to it will just make that wasted effort.
IMG_0790.JPG

But first, NERD BREAK with my robot friend.
IMG_0793.JPG

Ok, back to work. Sketched out the emblem bits and figured out where I want them.
IMG_0794.JPG

Cut out everything and placed it so I could trace it on to the shield. Everything is a bit thinner than when it will be done. I have to account for the edging tape when I paint.
IMG_0795.JPG

Last step for tonight is pinning four triangles I cut out of the foam board (for those of you who are going to use the cut spread from the previous post to make a template of your own, add four 2inch triangles.). I also put down a line off hot glue where I want the High points of the lightning ridges to be.
IMG_0796.JPG
 

Attachments

  • IMG_0784.JPG
    IMG_0784.JPG
    1.1 MB · Views: 171
  • IMG_0787.JPG
    IMG_0787.JPG
    792.1 KB · Views: 163
  • IMG_0790.JPG
    IMG_0790.JPG
    934.1 KB · Views: 158
  • IMG_0793.JPG
    IMG_0793.JPG
    945.7 KB · Views: 166
This thing is really coming along. I have a image in my head when I read your title so I'm interested to see where it ends up. Keep doing work.
 
Thank you for the encouragement.
I have to admit, this build is going so fast it almost seems to be building its self.

As for the damage. That is going to be my favorite part of this build. I plan on having fire damage, acid damage, Scratches, and arrows stuck in it.
 
Day 4 the Sand-oning

Here is where you can see why I spaced the triangles apart when I pinned the blanks
IMG_0797.JPG

all the layed down the Bondo for the details. It is not a clean process
IMG_0799.JPG

Takes a few goes of sanding and filling before it starts to take a good shape. Here is the first run
IMG_0800.JPG

A bit cleaner after second run through with sanding and filling. Here is a pic of more of the shield.
IMG_0801.JPG

For the triangle details, I used my dremels cutting wheel to lightly score a line
IMG_0802.JPG

I used a piece of paper on my putty knife to even out the hashing from the cutting wheel.
IMG_0803.JPG

Finished with the details. Took this chance to sand some of the body that I couldnt get to yesterday.
IMG_0804.JPG

That is it for the body fill. Took all my will power not to give it a real good work over and smooth look. But since that will all be covered...
IMG_0805.JPG

Tomorrow is painting day. Then I get to start the fun part of giving it battle damage.
 
Day 5. Day five? Where did my week go?!
I am making this post to distract my self while the paint dries enough to handle.

I am doing the paint backwards a bit. But I want to make sure my lines are clean and I have been having some issues with with bleed through when taping off negative space. From overlapping tape.
I started by giving it a quick white under coat to give the colors a bit more strength. Then a streak of red where the bird will be. I did this last night so that the paint would cure enough to tape off and do the next color this morning.
IMG_0807.JPG

Here is the bird taped off
IMG_0808.JPG

I said in a previous post that I had done the details thinner to account for the tape here is an example of why.
to make the stencil I cut out my drawing and put it on a large piece of painters tape. Cut around the edges so there would be a small outline of tape so that the whole thing could stick to the shield with minimal tape overlapping. I have been having issues with paint bleeding into the little space caused by overlapping.
IMG_0809.JPG


BLARG!!! When I woke up this morning I discovered one of the kids knocked the shield off my desk. Damaging the top point.
IMG_0811.JPG

It is ok. I have mentally prepared my self for these things. Kids will be Kids.
Plus It is better to find weak points now instead of on its way to be delivered.
Tore it up with my dremel and re-bondo'd it. Gave it some extra on the back to add some strength.
Whenever I have to do this, I give it cross cuts so the fill will make little bracers. I dont know if this actually makes a difference but it makes me feel better.
IMG_0812.JPG

Here is the coat of blue. You can see the fixed up top point.
IMG_0813.JPG

The paint I am using. (notice the cheep black paint? I am only using that for some light hazing. any thing more will cause spider webbing.)
blue (satin), white (flat), back (cheep), primer (sandable!). I have no idea where I put the red...
IMG_0814.JPG

So here is where I am right now. I have to go out and get some metalic grey or what ever. I am going to start some of the damage before I do the metal bits, that way the nicks, slashes, and gashes all have an even color in side the cuts. to make it look more like damaged metal and not damaged stuff with a metal coating.
IMG_0815.JPG

Besides my comment in the "introduce your self" section, This thread is my first post. Feel free to let me know if I am overdoing it with all the pics and details. Or let me know if I am not doing enough. I have no clue.
 
And I realize the wings should be a bit more in the full spread position. I think if I try to fix it... no, I know if I try to fix it I will just end up wrecking the whole thing. I know my limitations
 
Day 5 part deux: electric boogalloo

Damage started.
This was not an easy task. I am not used to breaking things on purpose. Just cut big chunks out of it. After standing there with my dremel running for a good five minutes, talking myself into it.
Instead of doing the oil under the paint damage trick, I wanted it to have divots so I chewed into it in the lower left with my dremel. Since that is bare foam, I later brushed white elmers glue over it to seal it up. Or the spray paint later will soak into those spots causing more damage than I want.
IMG_0817.JPG

I made the gashes all wider than I want my final result, Filled them back in with bondo and dremeled it again. So they will have even edges and and to close off any exposed foam.
IMG_0818.JPG

So this is what it looks like right now. I am about to start taping it off for tomorrows paint.
I cut the whole upper left corner off and dabbed globs of bondo on. later this will be painted to look like that corner melted (from lava? cause... it's fire proof but not lava proof).
IMG_0820.JPG

So close to the finish line now!!....


____________________________________

Side build. These are fire and ice arrows that will be sticking out of the shield.
I don't think there's much to explain so I will just post a couple pics.

Supplies
IMG_0822.JPG

I used super glue to pin the dowels into groups of three. Painted 'em black. The glue melted my paint brush...
IMG_0823.JPG

Split the feathers wrapped the dowels in embroidery thread. I used elmers glue to smooth down/hide the string ends
IMG_0824.JPG

IMG_0826.JPG


Nerd break!
IMG_0825.JPG

Alright, going to tape off the shield and take a nap
 
This is looking awesome! There arent enough battle damaged Hylian shields out there, all the one's i've seen are way too clean and shiny.
Also, kudos on your bravery for the damage cuts, i dot think I'd be able to do anything that drastic, but it turned out great!

Just wondering, are you thinking about making the fire/ice arrows look like they've melted/frozen onto the shield?


Sent from my iPhone using Tapatalk
 
I'm thinking about just a little scorching and maybe just a little spritz of white to show "freezer burn". but I think anything to big will make the shield a bit busy.
But a shield that just has ice arrows and related damage sounds like a fin build.
 
Really nice work on this. and the painting and effects are looking awesome. may I ask what the weight of the shield Is like?
 
I was going to ask why you fixed the damage your kids did to the shield when it's going to be roughed up anyway, lol. Maybe you should give it to them and let them have at it to simulate real damage??

Seriously though, it's coming along well! I like the paint job and the arrows embedded will give the shield a nice touch.
 
\, all the one's i've seen are way too clean and shiny.


I must admit that it is getting a clear coat. I dont think its clean. So I hope it is still to par on your expectations

- - - Updated - - -

That's not bad. I was thinking a lot more. and those arrow's are awesome as well..
The weight is based off of my girlfriends assumptions, She wouldn't let me say "If I grasp it with just my fingers, I can hold it up, from one end, with one hand.
 
That's not bad. I was thinking a lot more. and those arrow's are awesome as well..
Oh, I am thinking of doing run of arrows because... I like them and I have the whole bag of feathers left. By bag I mean like twelve arrows or so. But really... The arrows were more fun than I was expecting
 
Back
Top