fuelish
Sr Member
What I wanted to do was build something easily recognised as a light saber with out looking like one from the movies. I knew I was looking for a pommel, grip, cooling array, and emitter.
I trolled thru the Dollar store looking for basic cylinder shapes that would meet my need, hoping for something with interesting detail. I also wanted some greeblies to stick on for extra "oomph"
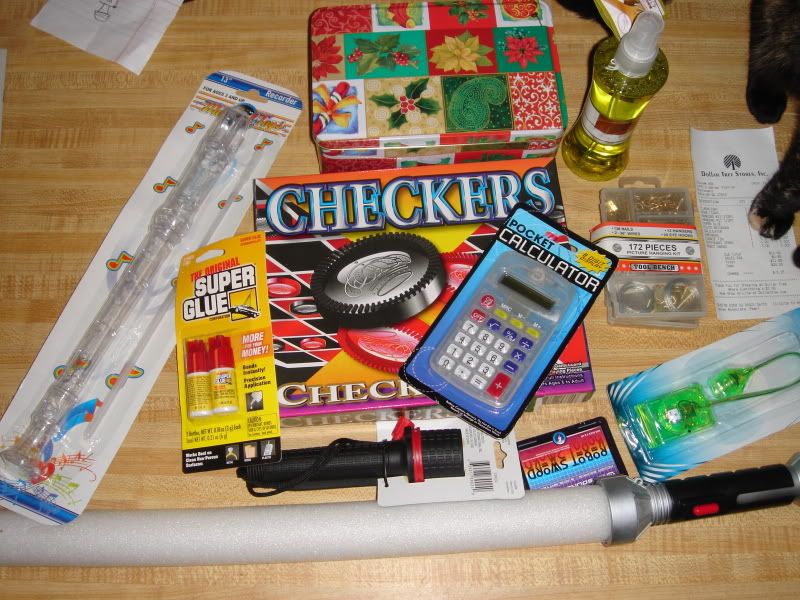
Here is the pile of stuff. I did not use the book light(I got it because I had planned to do a lit blade), the tin box(In case I needed a special shape, I could cut and fold this), the calculator(For the button shapes)
The cylinder shapes I picked because they had great shape or detail. The potpouri spray bottle became the grip(Great curve, and it felt like a grip). The recorder was used as part of the emitter and the cooling array, the checkers were also part of the cooling array(I bought this without seeing the contents, fingers crossed). The flashlight I got for the great checkered texture( Several people liked the flashlight) and used part of it for the emitter. The space sword was picked because it had lights and sound effects. I ended up not using that part of the sword and after I took it apart found that it had a translucent plastic tube running down the foam, that would have been a perfect lit blade, but mine was cracked, oh, well. But the ends of it turned around and nested made a great pommel. The picture hanger kits(Another popular item) were for detailing. The kitty was also not used, but did contribute to construction(Not)
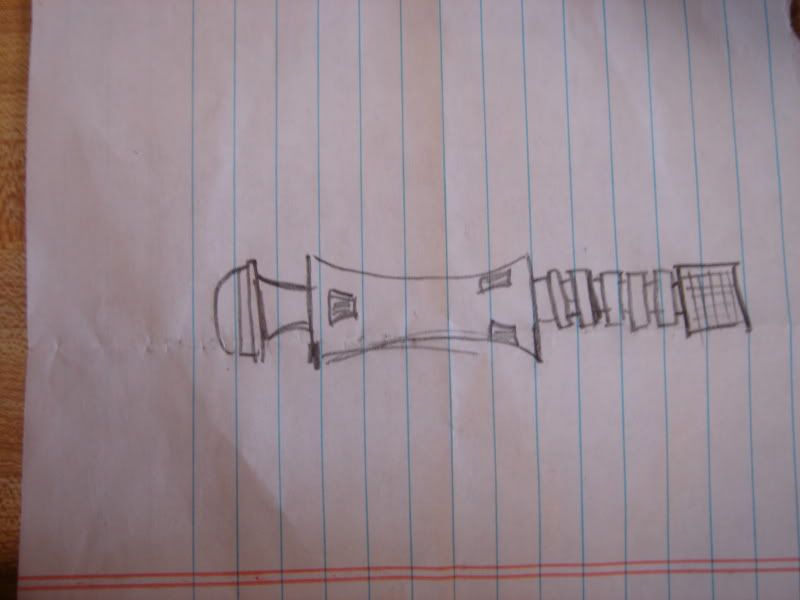
This is my superdetailed blueprint. Seriously, whenever you work on something like this you want to draw out what you want to do for reference, even if you change it all. Directors storyboard, we doodle.
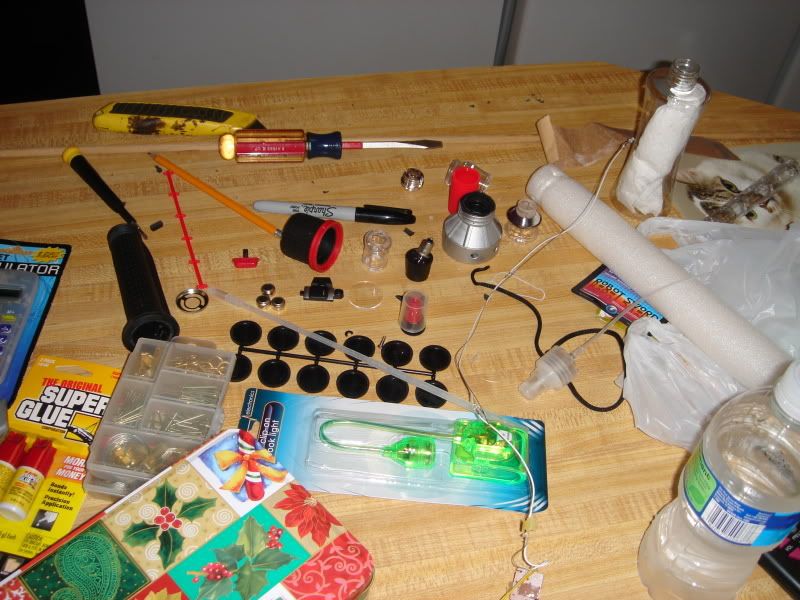
Now take everything apart. You want to see what the parts look like with no reference. This makes it easier to see what they can be. You can see that I even cut apart some items to separate their components. Then I could start laying them out to get a better idea of how they corresponded to my "blueprint", to see how it looked. Easy to change the layout now, before the glue springs in to action.
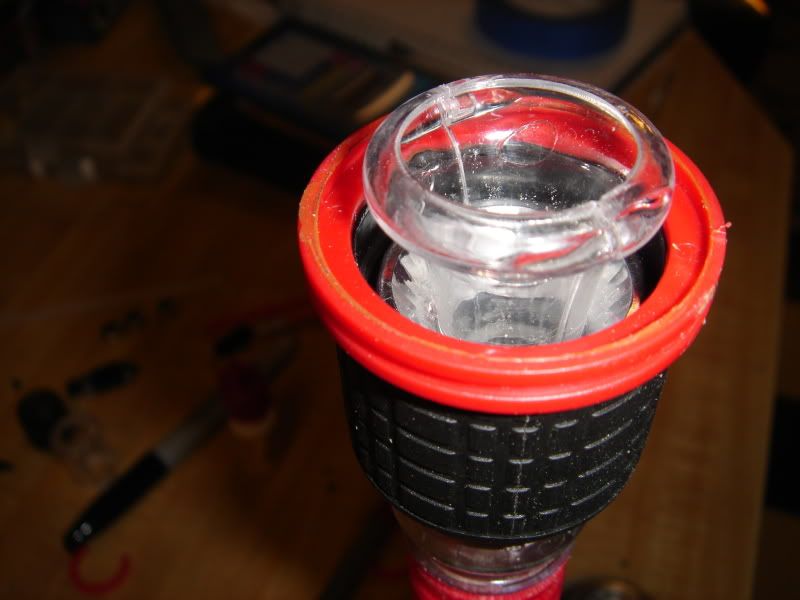
This is the emitter. It is made from the end of the recorder, the flashlight cap(reversed), and another bulbed section of the recorder(hard to see it here) They look very different out of context.
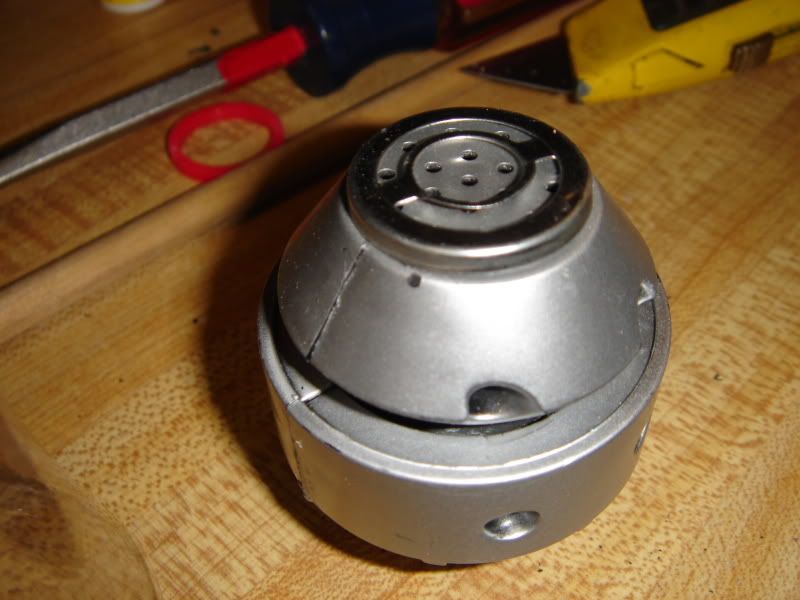
This is the two ends of the space sword, reversed, and nested into one another. Again the parts out of context look very different.
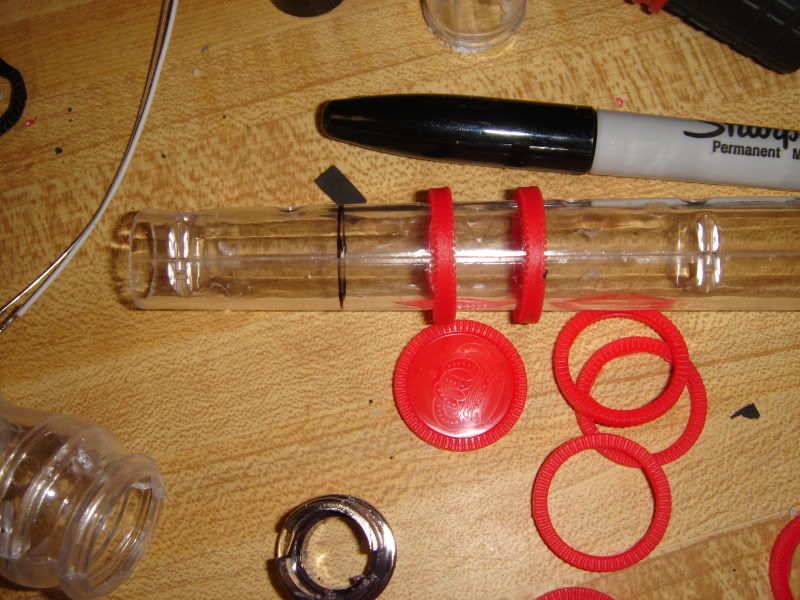
Here we have the cooling array being assembled. This is using the main section of the recorder and the checkers with the centers popped out of them. I confess to getting real lucky here. The checkers were super thin in the middle and I popped them out using a socket(the kind you put on a ratchet) that just fit in the rim. Then I lucked out a second time, they were just flexible enough and the recorder was close enough dia. that the pieces would fit together. If they had not fit I would have used some movie magic, slotted them so they could expand and hid the gap in all the pictures I took.
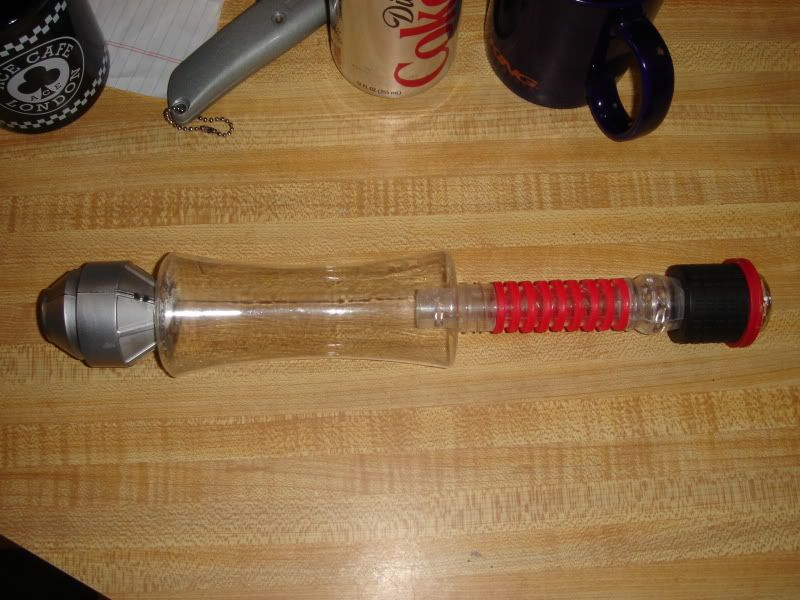
What is this piece of see-thru plastic junk? Must be time for some greeblies and paint.
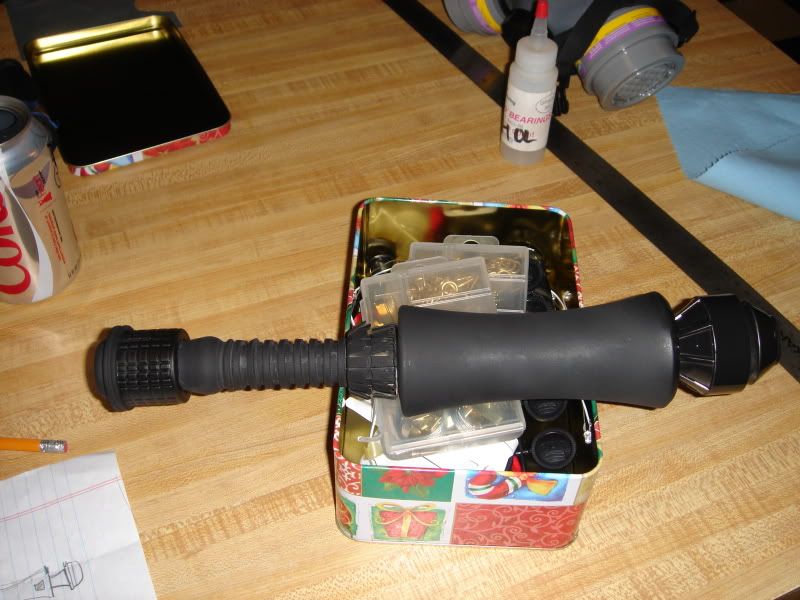
Now it looks much better with some paint and more detail pieces(About fifty picture hangers). But we need to break it up.
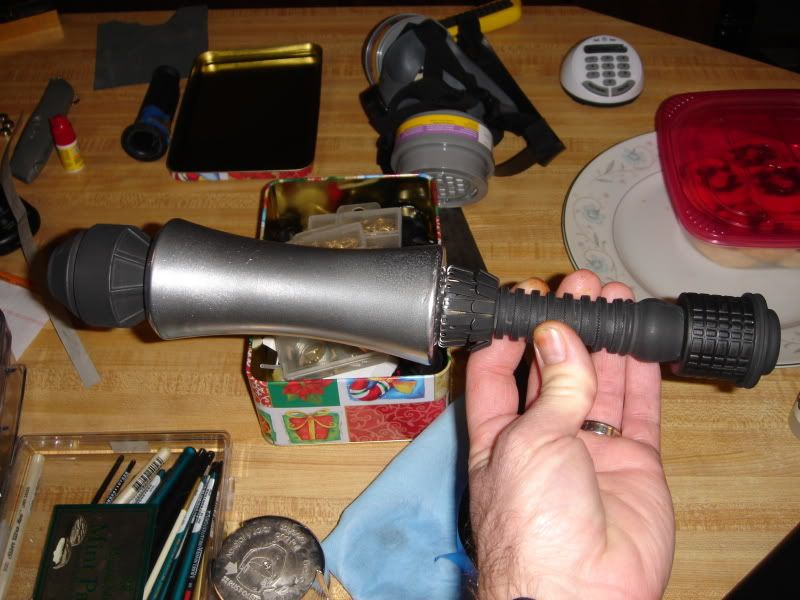
By adding a second color, I have made it look like it is made of multiple pieces. This is Krylon chrome, it works pretty good. But still to plain.
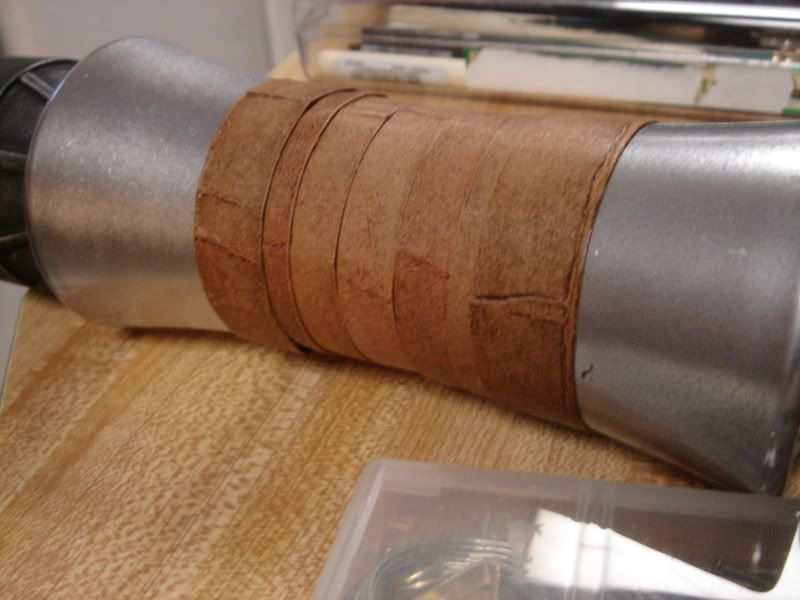
I really needed something to break up the grip. I had wanted to put in some finning, but it was looking like to much work. So I fell back on what all grips need, grip tape. I did this by using the cardboard, from the checker board. I cut in to strips, then wrinkled it up and coated it with brown shoe polish. Almost instant leather.
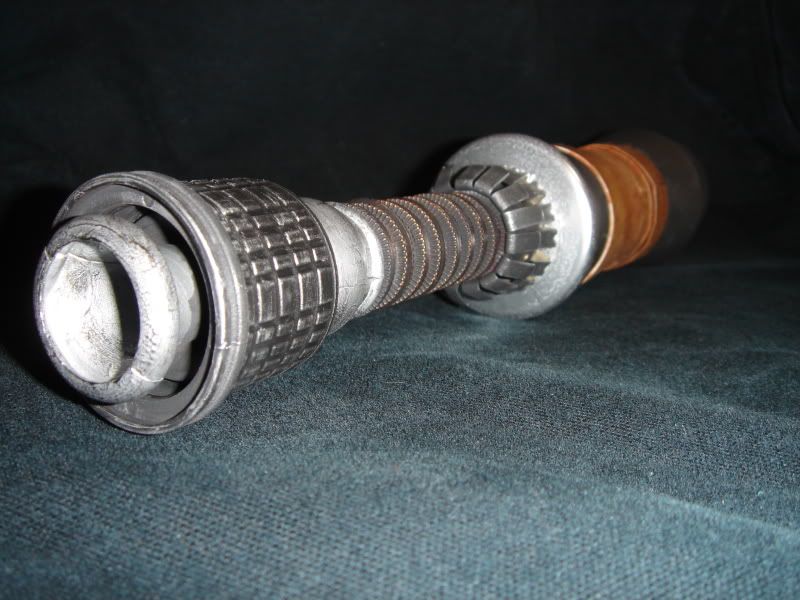
Finally, drybrushing. If you don't know, this is one of the great techniques for pulling detail out of a model. You load your brush with a highlight color then brush most of it out(I brush on to old newspaper) until the brush is almost dry. Then brush across you masterpiece, highlighting all of the raised detail. Here I have used a chrome on the emitter checkers and copper on the cooling array. This is great for creating the worn look of a much used tool. If you screw up you can dry brush the base color and start over.
There is another technique using thinned paint to "wash" in the recessed detail. You thin you paint, wipe it on with a brush and then remove most of it with a cloth. it makes the recessed areas pop out. You need to be careful because the extra thinner can cause problems with the paint already applied I did not use this because my base color was pretty dark.
After all my prattling on you may think that I am experienced at the scratchbuild/propbuild.
NO.
This is (I beleive) the first scratchbuild I have ever done. I have built models, but I have not even finished a model kit in years. I have done some repaints but that consisted of a couple of Nerf guns.
I posted all this for the folks that read this site but have never really built any thing. Do it. Go do it right now. Run to the dollar store, dig some junk out of the garage, riffle thru the neighbors trash. Then stick it together and paint it up. Chuck
P.S. and an edit. When you shoot your creation, pick a neutral background. You want the focus to be on your masterpiece not the vintage formica(seen in many of my progress photos) or the toilet(a very popular background, good lighting in the guest bathroom I guess). Go to a fabric store and buy a yard, or two, of dark fabric. Or you can do what I did and use your jacket.(The cats had been sleeping on my felt back ground, making it a mottled grey)
I trolled thru the Dollar store looking for basic cylinder shapes that would meet my need, hoping for something with interesting detail. I also wanted some greeblies to stick on for extra "oomph"

Here is the pile of stuff. I did not use the book light(I got it because I had planned to do a lit blade), the tin box(In case I needed a special shape, I could cut and fold this), the calculator(For the button shapes)
The cylinder shapes I picked because they had great shape or detail. The potpouri spray bottle became the grip(Great curve, and it felt like a grip). The recorder was used as part of the emitter and the cooling array, the checkers were also part of the cooling array(I bought this without seeing the contents, fingers crossed). The flashlight I got for the great checkered texture( Several people liked the flashlight) and used part of it for the emitter. The space sword was picked because it had lights and sound effects. I ended up not using that part of the sword and after I took it apart found that it had a translucent plastic tube running down the foam, that would have been a perfect lit blade, but mine was cracked, oh, well. But the ends of it turned around and nested made a great pommel. The picture hanger kits(Another popular item) were for detailing. The kitty was also not used, but did contribute to construction(Not)

This is my superdetailed blueprint. Seriously, whenever you work on something like this you want to draw out what you want to do for reference, even if you change it all. Directors storyboard, we doodle.

Now take everything apart. You want to see what the parts look like with no reference. This makes it easier to see what they can be. You can see that I even cut apart some items to separate their components. Then I could start laying them out to get a better idea of how they corresponded to my "blueprint", to see how it looked. Easy to change the layout now, before the glue springs in to action.

This is the emitter. It is made from the end of the recorder, the flashlight cap(reversed), and another bulbed section of the recorder(hard to see it here) They look very different out of context.

This is the two ends of the space sword, reversed, and nested into one another. Again the parts out of context look very different.

Here we have the cooling array being assembled. This is using the main section of the recorder and the checkers with the centers popped out of them. I confess to getting real lucky here. The checkers were super thin in the middle and I popped them out using a socket(the kind you put on a ratchet) that just fit in the rim. Then I lucked out a second time, they were just flexible enough and the recorder was close enough dia. that the pieces would fit together. If they had not fit I would have used some movie magic, slotted them so they could expand and hid the gap in all the pictures I took.

What is this piece of see-thru plastic junk? Must be time for some greeblies and paint.

Now it looks much better with some paint and more detail pieces(About fifty picture hangers). But we need to break it up.

By adding a second color, I have made it look like it is made of multiple pieces. This is Krylon chrome, it works pretty good. But still to plain.

I really needed something to break up the grip. I had wanted to put in some finning, but it was looking like to much work. So I fell back on what all grips need, grip tape. I did this by using the cardboard, from the checker board. I cut in to strips, then wrinkled it up and coated it with brown shoe polish. Almost instant leather.

Finally, drybrushing. If you don't know, this is one of the great techniques for pulling detail out of a model. You load your brush with a highlight color then brush most of it out(I brush on to old newspaper) until the brush is almost dry. Then brush across you masterpiece, highlighting all of the raised detail. Here I have used a chrome on the emitter checkers and copper on the cooling array. This is great for creating the worn look of a much used tool. If you screw up you can dry brush the base color and start over.
There is another technique using thinned paint to "wash" in the recessed detail. You thin you paint, wipe it on with a brush and then remove most of it with a cloth. it makes the recessed areas pop out. You need to be careful because the extra thinner can cause problems with the paint already applied I did not use this because my base color was pretty dark.
After all my prattling on you may think that I am experienced at the scratchbuild/propbuild.
NO.
This is (I beleive) the first scratchbuild I have ever done. I have built models, but I have not even finished a model kit in years. I have done some repaints but that consisted of a couple of Nerf guns.
I posted all this for the folks that read this site but have never really built any thing. Do it. Go do it right now. Run to the dollar store, dig some junk out of the garage, riffle thru the neighbors trash. Then stick it together and paint it up. Chuck
P.S. and an edit. When you shoot your creation, pick a neutral background. You want the focus to be on your masterpiece not the vintage formica(seen in many of my progress photos) or the toilet(a very popular background, good lighting in the guest bathroom I guess). Go to a fabric store and buy a yard, or two, of dark fabric. Or you can do what I did and use your jacket.(The cats had been sleeping on my felt back ground, making it a mottled grey)
Last edited:
