Legacy Millenium Falcon customization

Solos blaster

Sr Member
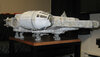
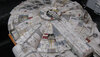
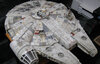
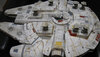
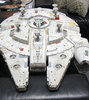
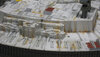
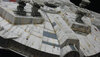
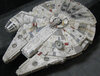
I'm finally getting one after all these years and I plan to do a bit of customizing it. I've built plenty of props but haven't really built a model for probably 25 years when i was a young teen. To be fair, it's in a bit of rough shape and needs some good cleaning before I start customizing it.


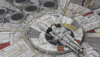
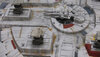
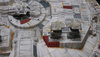
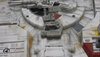
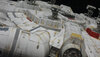
I want to add more interior lights and have it painted to reflect the studio model. I plan to keep the cockpit knowing it's oversized but I want to have Han, Chewie, Leia, and Threepio in the cockpit for the display.

For painting, I'll probably *cough* beg *cough*, or try to commission it, but taking a break from props I want to take a shot at installing the fiber optics and am trying to research into it before it arrives.

Am I taking on too much and should I attempt it or commission it out to a more experienced modeler lol?

Looking for honest opinions and tips here from you pro builders here.

Any specific drill or which drill bit to use for the interior, like the cockpit and navicomputer?

A decent air brush and compressor combo for painting? I don't have one.

Are there fiber optic kits that can be purchased for projects like this or is it all based on how many lights you're installing?

Any favorite colors for the LED strip and or methods to make it look better?

Thanks for all your advice and brutal honesty on this humble noob.
 
I did the same thing. No you aren't "Am I taking on too much and should I attempt it or commission it out to a more experienced modeler lol?"
Build AND paint it all your self. It will look sweet. A Muscle Falcon, for lack of better description. Dissassemble it. Oh and this is just my opinion so take it for what it's worth . You really do not need to add any light etc. more work with not a great pay off. just say'n.

You will need to cut it downing the lower cargo bays. Cut it flush with the hull, sand the edges were you cut it, and drop the cut off bays into the new openings. they will slide right in glue it up with gorilla glue thick. Cut the upper turret gun restraint flush with the hull, push them up through the new openings and glue. look just like hull plate factory. get rid of the top mandible rocket things, cut some small styrene pieces to cover the holes,

Oh and I left all the wireing intact just removed them and put them all back in when re assembling the "model".

I'll try and snap some photos just so you can see what I mean.

It's a really fun project. your main tool is a deep razor saw. You will also need to cut the internal speaker housing down. I also glued all the removable top panels and gutted out the interior.

Don't sell your self short.

Best regards,
e
 
Here's some photos. These are were I cut it. I wasn't to concerned about the neatness of the cuts, just filled it and "rusted it out". I used Tamiya weathering pastels to do the grime and rust. Tamiya and Testers rattle cans for the rest. When you spray dull coat it will defuse the pastels so they look like air brush. Saves lots of mess and set up time. Also cut down the gun turrets + landing gear.

Just an fiy. I wasn't after any accuracy as far as getting the over all hight right ect, just trying to get it a whole lot less toy looking. And getting the proportions closer to what it should be.

There are some sweet conversions of this that look WAY better, as they corrected all the discrepancies, cockpit size ect.

I just did the major things that bugged me and used it as a painting test for Tamiya weathering etc. before I worked on another accurate Falcon model.

Hope this helps.
Best regards,
e
 

Attachments

  • IMG_3742.jpg
    IMG_3742.jpg
    990.2 KB · Views: 287
  • IMG_3743.jpg
    IMG_3743.jpg
    720.7 KB · Views: 254
  • IMG_3744.jpg
    IMG_3744.jpg
    856.7 KB · Views: 248
  • IMG_3745.jpg
    IMG_3745.jpg
    767.7 KB · Views: 224
  • IMG_3746.jpg
    IMG_3746.jpg
    707.2 KB · Views: 274
  • IMG_3747.jpg
    IMG_3747.jpg
    675.6 KB · Views: 263
  • IMG_3748.jpg
    IMG_3748.jpg
    1 MB · Views: 241
  • IMG_3749.jpg
    IMG_3749.jpg
    804 KB · Views: 255
  • IMG_3750.jpg
    IMG_3750.jpg
    832.8 KB · Views: 256
  • IMG_3751.jpg
    IMG_3751.jpg
    1.1 MB · Views: 249
  • IMG_3752.jpg
    IMG_3752.jpg
    815.3 KB · Views: 225
  • IMG_3753.jpg
    IMG_3753.jpg
    862.2 KB · Views: 190
  • IMG_3754.jpg
    IMG_3754.jpg
    1 MB · Views: 221
  • IMG_3755.jpg
    IMG_3755.jpg
    1.9 MB · Views: 261
  • IMG_3756.jpg
    IMG_3756.jpg
    1,002.9 KB · Views: 203
  • IMG_3757.jpg
    IMG_3757.jpg
    1 MB · Views: 200
  • IMG_3758.jpg
    IMG_3758.jpg
    1,011 KB · Views: 196
  • IMG_3759.jpg
    IMG_3759.jpg
    905.1 KB · Views: 330
Thanks for the tips I really appreciate it. Those are amazing pictures by the way great job of removing the front missile launchers/buttons and filling/blending job. I'm pretty sure I'm going to do that too.

For sure, I want to do:
a more accurate top cannon and not the toy firing version.
Add material to the landing gear so they aren't so hollow.
A more accurately sized dish.
Repaint.

I still want to do some interior lighting, at least do the cockpit and maybe a better LED strip to the engines.

If I'm feeling really froggy but REALLY unlikely:
add more to the interior like one of the cutaway models or images.


I don't know just how accurate I want to make the outside yet. I didn't even realize how oversized the cockpit was until I started looking at custom versions and now I can't unsee it lol. But I do want to maintain that functionality for sure so I'm over it. I guess I need to figure out how detailed I'm going for and then for from there.

Last bit. Anyone know if TS hobbies or any other stand maker makes an "in flight" stand for this version or one already made will fit it?

Thanks again.
 
So...other Legacy Falcon customizers....did you go with a 2nd bottom turret on top or go with something different off shapeways or the Deagostini turrets or what? Same with the round dish. Is there a specific one I should be looking to buy? This one doesn't come with it.

My Falcon should be arriving tomorrow I can start clean up, and whitening(top is yellowed a bit), but I'm trying to finalize a list of parts.
 
I bought a couple of guns from the first Hasbro Falcon (which are sized better) and put them on.

I did enlarge my dish a bit, but just did it by hand. It helps balance out the over sized cockpit.
 
I bought a couple of guns from the first Hasbro Falcon (which are sized better) and put them on.

I did enlarge my dish a bit, but just did it by hand. It helps balance out the over sized cockpit.

When you say the first, do you mean the vintage/POTF2 falcon?

So I got it(WIP pics forthcoming) and have been looking at parts supplement it.

I think I'm finally decided on what I want to do with it. I guess if it makes any sense I'm looking for the "happy medium" with it. I'm not sure I'll be going "all in" when it comes to chopping off the bottom to make it look exactly like the 32" studio scale model, but make it closer.

By that I mean a new paint job, better scaled quad cannons and the mounts, (I think even the turret windows as too), as well as a larger dish. I tossed around the idea of completely gutting the interior and making it look more like the deago but I feel like it isn't worth the amount of work I'd end up doing.

I do plan to add some lighting just to the cockpit(maybe try to upscale some of the custom deago interior cockpit panels too), and the navicomputer.

Pics to follow once I get her disassembled and begin de-yellowing the top of it.
 
Is the Legacy Falcon the Hasbro Legacy Falcon.....????....I don't know...all I know is the one I got was missing the cockpit top and the cockpit is wayyy too big to scale, so I scartch built the cocokput down to scale.......not that accurate, but close enough for me...good luck with your customization...!!


Your message may be considered spam for the following reasons:

If you wish to reply despite these issues, check the box below before replying.
Be aware that malicious compliance may result in more severe penalties.
Back
Top