oota goota
Sr Member
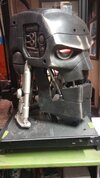
a quick google has revealed another clip of a really nicely made ABC head:
I am sooooo jealous ha ha
I am sooooo jealous ha ha
")
That artwork originally in Starlord magazine reminded me of the 50/60s Trigan Empire strip. I think it was testiment to Pat Mills bringing the whole ABC warriors team into collaboration with other iconic brit characters such as Nemesis, Flesh and of course JD himself.. I really loved the mega city visuals in 95 Dredd it started so well with Block wars then took a nose dive.. Rose for the Finks why kill them all off Drokk!.. Then down in flames.Hey Mottrex yeah agreed I've seen a ABC film head converted to a hammerstein style and there were some 1/9th scale maquettes around a few years ago.
It's testimony to the artwork I think that loonies like me (and others) are still obsessing over these robots so many years later
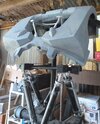
It's certainly a cool design inspired by his Origins story fighting The Volgs was it?Yeah I'm a big fan of the original comic series too as well as the film prop. I do like the interpretation the artist made of the robot from the original series and what the fabricators did was amazing. So the robot is not exactly hammerstein but like an alternate universe version of him I guess
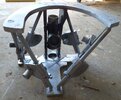
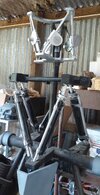
Maybe some sort of corrigated hosing to cover the piston ends, it is hydraulics after all..Update time! Only 10 months have elapsed since my last build post which is like a blink of an eye in this glacial project
I have finally built the basic structure for the guts of the ABC. I had to make a few compromises in order to keep weight down but make it stable to hold the neck and head assembly. So I ended using flat ali-bar for imitation air rams that move the torso up and down. I'm not that happy with how the ends of the rams look but I'm hoping to disguise them somehow.
Now that the guts frame is done i can see that my chest piece is sitting slightly high (40mm or so) so I'll be lowering it at some stage.
Next up will be the struts that hold up the neck plate thing below the head. I'll probably make the neck base aswell. If anyone has some good measurements let me know!
View attachment 1800152
View attachment 1800153
wow those images are huge!
sorry to hear you've had hard times War Pig it's good to see you on this thread again.Wow! Happy to see this project is still alive! I’ve been MIA for quite some time; it’s time for me to put the bad stuff happening aside and get back into things that are fun and enjoyable.
Yeah, time flies!
. And after that it's on to the hands ha ha OMG then I'll find lots of pipes and hoses to bulk out the beast and then...finally... it'll be time to paint :O