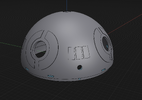
Jedi Training Remote - Floating With Lights - Resin 3D Print Build (UPDATE: 2nd build on page 3!)

They aren't. I've done a lot of research on this prop. It even states that it's 15cm officially.
I've always found the MR to be too big. They also used the wrong versions of some of the model parts to base it on. that Might be the reason it ended up slightly larger than the real prop.
 
Great thread and great work. Anybody know what this part is from? I dont see it in any of the kits i have researched.

1722905825420.png
 
Great thread and great work. Anybody know what this part is from? I dont see it in any of the kits i have researched.

View attachment 1847639
Hi,

The nub and recessed circle are part of the original Plastruct hemispheres, likely a product of the injection molding process. The propmaker likely drilled four small holes to make it look more interesting.
I added this detail to my 3D model.
 
Last year I wanted to make a second training remote, that had the correct diameter as mentioned in the previous posts, as well as make it lighter so it floated a bit higher off the base.

I actually bought a second floating globe to repurpose, this time a floating moon on a more stylish base than the cheap looking black plastic I used for the first one (I 3D printed a more discreet base enclosure for that base eventually).

The moon has a magnet that I can repurpose for the training remote to make it float, as well as built in lights powered by an inductive coil receiver, so that saves me a little bit of work. I liked this moon as a decorative piece though, so it was a bit of a shame to destroy it to repurpose the magnet and lights.

1000022503.jpg
 
This past week I finally got around to 3D printing a new training remote.

As I have gotten a resin 3D printer with a larger build volume since I built the first training remote, I was able do print the sphere in larger sections, and managed to make two hemispheres instead of eight smaller sections I had to glue together and gap fill and sand.

I made the walls thinner on this sphere to make it lighter (so it can hopefully hover a bit higher on the base), and opted to leave the "styrene" pieces on the 3D model, which saved me from printing them separately and post processing them (cleaning, curing, sanding).

Fresh from the printer

1000022333.jpg


Look at the massive amount of supports. I err on the side of too many as I'd rather use a bit more resin than have a failed or warped print. Apologies to those of you with trypophobia (myself included)

1000022335.jpg


All the greeblies on one build plate, fresh from the printer.

1000022341.jpg


Cleaned off and ready for post curing in the UV light chamber.

1000022346.jpg
 
I have the same printing setup! I made my own custom shell model, and it wound up being so heavy that it levitated but not by much. Wound up putting it on a stand. It was inspired by your original post. I wound up having to integrate a support ring/locking system around the equator so the pieces would properly sphere. Just a suggestion. Let me know if you want the STLs to look at, but it looks like you've got it.
IMG_4313.jpegScreenshot 2024-12-16 at 6.04.10 PM.png
 
With both the hemispheres printed I had to insert the magnet and see how it floated, and I have to say I'm happy with it. It floats a bit higher than the first one, and the base looks a bit classier.

1000022505.jpg


Check out the detail on that nub on top (as mentioned in this post), it's not the original Plastruct hemispheres, but it's pretty close!

1000022379.jpg


Size comparison with the first training remote.

1000022402.jpg


When gluing in the magnet I actually used Milliput to have some working time to adjust it so that the training remote rotated very straight on an imaginary vertical axis. I even used a laser level, but that was a bit overkill. I found better results fine tuning while watching the nub on top against a busy background, to see if it moved horizontally at all. I fine tuned it so the nub on top looked like it didn't move from side to side at all.
Again with the first training remote by its side for comparison.

1000022420.jpg


With the magnet and lights plus coil glued in place I masked off the lights and sprayed the inside white so it will reflect more light and what light that comes out will hopefully seem brighter. I also glued in some small shims to help with alignment when gluing the hemispheres together.

1000022446.jpg


I then was ready to glue the hemispheres together. I used super glue as I was impatient. I in fact was so impatient I even used it as a gap filling medium, adding a thick bead along the equator and curing it with activator spray. All the while thinking "this is probably what they would have done at ILM back in the seventies", to justify being so nonchalant.

1000022447.jpg


Afterwards I sanded it smooth.

1000022449.jpg


Then came the fun part where the prop really comes to life, gluing on the greeblies.

1000022480.jpg


It's starting to look like something.

1000022482.jpg


I sanded some clear plastic I had laying around to make it opaque, then cut out circles to put behind the commander's hatches.

1000022484.jpg


1000022485.jpg


1000022486.jpg


Next up was gluing on the "styrene" pieces along the equator (I had decreased them in size by 1mm horizontally and 0,5mm vertically from the first training remote as I thought they were a hair too big), and at last give it a unifying coat of primer. In this case I used Citadel Wraithbone on a rattle can, as I had it on hand.
Note the tissue paper stuffed in the commander's hatches to mask out the opaque "windows".
1000022497.jpg


Again a comparison with the first training remote.

1000022499.jpg


1000022500.jpg


And this is as far as I've come at the moment. Next up is an airbrush coat of Reefer White, and painting the rest of the details and weathering it!
 
Last edited:
I have the same printing setup! I made my own custom shell model, and it wound up being so heavy that it levitated but not by much. Wound up putting it on a stand. It was inspired by your original post. I wound up having to integrate a support ring/locking system around the equator so the pieces would properly sphere. Just a suggestion. Let me know if you want the STLs to look at, but it looks like you've got it.
View attachment 1888962View attachment 1888960

A recessed ring type thing so the hemispheres lock into each other is definitely a good idea. If I ever do a third one I will probably add that feature. Seeing as this one has been pretty fast to print and assemble (days instead of weeks) a third one isn't completely off the table. But it's hard to justify when I have a lot of other projects I want to get to...
 
I'm impressed with your finishing work. I've been meaning to make another one since I rushed the assembly/painting on the first one because the prototyping for the parts took so long I was burnt out. Seems you've inspired me a second time.
 
And then I had a little hour to paint some more, so I did the reddish brown around where the chrome truck rims go, and the black on the round greeblies above (and below) the triple styrene pieces.

1000022690.jpg


What's left now is:
  • Grey on the "styrene" rectangles
  • Glue on opaque plastic behind the chrome truck rims
  • Orangey weathering around the details on top
  • Tracing around details with a mechanical pencil
  • All over weathering with diluted inks
 
Last night I found an hour to paint the grey details, I used Citadel Dawnstone grey paint thinned with Citadel Lahmian Medium to create a smooth flowing translucent grey. I had to have a couple of attempts to get it looking even, but still keep a bit of translucency while also getting the correct value of grey on the details. The key was using a large brush that could cover the piece in one or two smooth strokes.

1000022721.jpg


The grey on the equator pieces was thinned a bit more than the triple "styrene" pieces.
I also did a very thin coat of very light blueish grey (Citadel Fenrisian Grey) on the equator pieces, as the original seemed to have a blueish tint on these.
 
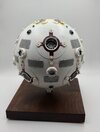
Jedi Training Remote #2 is finished!
I found an hour this afternoon to do the weathering.
I'm very happy with the end result and I'm looking forward to have it displayed in the hobby room.

1000022742.jpg


1000022741.jpg


1000022740.jpg
1000022739.jpg


Some work in progress pictures during the weathering.
As on the first one I used Liquitex Burnt Umber acrylic ink thinned with acrylic medium and water to do most of the weathering. I applied it with a large brush and wiped it off with a paper towel. The mixture wasn't as diluted this time, so it became a tad too much and I had to remove some of the weathering using isopropyl alcohol on a paper towel, being careful not to remove the underlying paint as well. This training remote is more heavily weathered than the first one, and I was afraid it would be too much, but it looks to be about the same amount as the original prop was weathered (check out the original pictures posted elsewhere in this thread, you can see really rough tide marks from the diluted paint they applied).

1000022744.jpg


1000022728.jpg


1000022729.jpg
 
Back
Top