Jabba's Gatekeeper Droid WIP- Studio 49

Studio 49

Sr Member
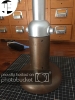
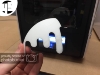
So a month and a bit ago I finally purchased my own 3D Printer so to run it through it's paces I decided I could finally build something that I had 3D modelled long ago and had just sat on the hard drive, the TT 8L:Y7 Gatekeeper Droid or as it's most common known as Jabba's Gatekeeper Droid! For some reason I alway sound this droid really humorous and decided what the heck, why not build one! Then I can put it on the wall in the work shop ;) That and I've only seen 2-3 other examples of these being built,


So that's enough talk, lets get into it
First up here's the promo video I made for it almost 2 years ago when I finished the CAD model, this'll give some great context as to scale and function


Now with that in mind, onto the WIP for the build thus far :)
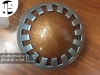
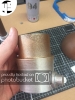
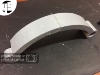
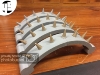
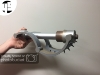
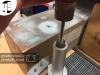
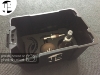
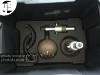
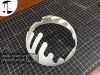
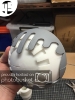
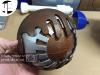
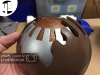
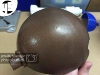
First up was getting all the printing started and glue the parts together as I went
1_zpstczshtrm.jpg


2A_zpss6r5xpl3.jpg


2B_zpsgwe1opui.jpg


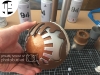
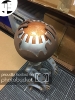
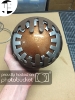
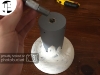
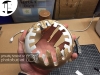
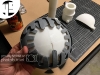
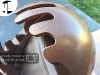
I couldn't help but throw some brass on it even without smoothing the surface ;)
3A_zpsh9hun0lc.jpg


3B_zpsbh3yybfe.jpg


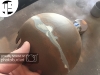
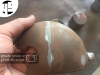
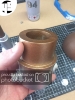
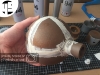
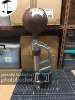
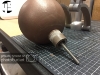
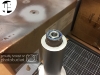
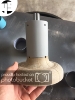
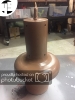
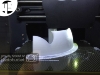
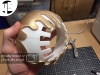
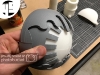
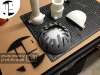
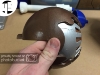
I then continued on to start priming and filling followed of course by a dry test fit
4A_zpsioffgscf.jpg


4B_zpsqxmoig1a.jpg


4C_zpskuno7szg.jpg


Attachments

  • 1_zpstczshtrm.jpg
    1_zpstczshtrm.jpg
    248.6 KB · Views: 144
  • 2A_zpss6r5xpl3.jpg
    2A_zpss6r5xpl3.jpg
    174.2 KB · Views: 145
  • 2B_zpsgwe1opui.jpg
    2B_zpsgwe1opui.jpg
    514 KB · Views: 158
  • 3A_zpsh9hun0lc.jpg
    3A_zpsh9hun0lc.jpg
    308.9 KB · Views: 144
  • 3B_zpsbh3yybfe.jpg
    3B_zpsbh3yybfe.jpg
    283.4 KB · Views: 138
  • 4A_zpsioffgscf.jpg
    4A_zpsioffgscf.jpg
    238.2 KB · Views: 132
  • 4B_zpsqxmoig1a.jpg
    4B_zpsqxmoig1a.jpg
    188.7 KB · Views: 130
  • 4C_zpskuno7szg.jpg
    4C_zpskuno7szg.jpg
    180.8 KB · Views: 146
  • 5A_zpstnjtsrw7.jpg
    5A_zpstnjtsrw7.jpg
    251.5 KB · Views: 142
  • 5B_zpsvsgdwd9r.jpg
    5B_zpsvsgdwd9r.jpg
    240.5 KB · Views: 145
  • 6A_zpsqjpozzvm.jpg
    6A_zpsqjpozzvm.jpg
    280.1 KB · Views: 160
  • 6B_zpszlppkjgd.jpg
    6B_zpszlppkjgd.jpg
    280.1 KB · Views: 150
  • 6C_zpsnsx9qiss.jpg
    6C_zpsnsx9qiss.jpg
    327 KB · Views: 174
  • 7A_zpscqxjj6vx.jpg
    7A_zpscqxjj6vx.jpg
    393.1 KB · Views: 175
  • 7B_zps1b7mrcgj.jpg
    7B_zps1b7mrcgj.jpg
    392.3 KB · Views: 174
  • 7C_zpsn9g4r1cs.jpg
    7C_zpsn9g4r1cs.jpg
    322.1 KB · Views: 180
  • 7D_zpsguf0nxwl.jpg
    7D_zpsguf0nxwl.jpg
    406.3 KB · Views: 168
Last edited by a moderator:
Wow! This is amazing!

Your stuff always impresses. This would be a great piece to have. Can't wait to see it finished.

Tried finding it on shapeways but it won't come up. :unsure
 
Last edited:
Looking great! Any plans on updating the spiked curved hinge sections to make them more screen-accurate? Or adding lights in the eyeball?
 
Wow! This is amazing!
Your stuff always impresses. This would be a great piece to have. Can't wait to see it finished.
Tried finding it on shapeways but it won't come up. :unsure
Thanks mate for the kind words. What can I say, I just love building stuff! :D
As for Shapeways, the video is 2 years old actually so in that time I took it down form Shapeways since because of the size it was in the region of 4 figures with the prices they set, and no one would ever buy one of these for that so I just took it down. Unfortunately it just wasn't viable for Shapeways like my smaller products


Looking great! Any plans on updating the spiked curved hinge sections to make them more screen-accurate? Or adding lights in the eyeball?
With the eyeball, I had thought it would be cool if I could get a wireless camera into the eye and have that feed to a screen so it was an actual functional droid!
As for the spikes, yeah it's something I'm very open too although at this stage I'll likely just go with what I've got just to get him done (since I unfortunately don't have time to do any big remodelling because of my commitments to my Formal studies) :)
 
marvelous job!! i always enjoy watching studio 49's creations!!

good job buddy!!


Sent from my iPhone using Tapatalk
 
Me likey!;)....looks really good, excellent work. Your 3D printer looks like it creates very smooth work, I've seen some that look very ordinary, what brand is it? would you recommend it?
 
That is really cool. Awesome job so far.

marvelous job!! i always enjoy watching studio 49's creations!!
good job buddy!!
Thank you mate! I'm just thankful others are interested in what I'm building :D


Me likey!;)....looks really good, excellent work. Your 3D printer looks like it creates very smooth work, I've seen some that look very ordinary, what brand is it? would you recommend it?
Why thank you man!
As for the printer I'm using the UP Mini 2. They're an Australian company who make really nice printers. So with the one I have came in at $990 AUD with GST (got free shipping and had it within the week since it just had to ship domestically). Don't let the 120x120mm build volume fool you either, I've printed thing three to five times the this guy like wearable buckets, all you have to do is split the parts up ;)

As for the quality of the print they're really nice, the majority of the pics that you're seeing are on the fine setting which I use for detail parts (you can change the layer thickness as well)


http://store.3dprintingsystems.com/up-mini2-3d-printer
2.jpg
 
I had a chance to give the Gatekeeper a quick lick of paint so I took it
Starting to come along quite nicely now I must say


8A_zpsegqfhrto.jpg


8B_zpsna5dep5r.jpg


8C_zpsfyheakvh.jpg
 
Made some more progress on the Gatekeeper in the past few days, amazing what you can get done when you get onto the University break
In terms of overall progress It's pretty well all painting and assembly now so on the home straight apart from the rearmost mounting part and the spiked arches on the side which I've yet to print (just waiting to get my 3D Printer back from the technician)


First up I spent quite a bit of time on the centre most layers of the eye and managed to get them pretty well perfect to what I wanted
8A_zpskekqg9t0.jpg


Next up I got the mouse sander out and rounded off the joins between the spherical parts just for appearances sake
8B_zpslrbqg4vx.jpg


8B_zpslrbqg4vx.jpg


8C_zps2uww8rqz.jpg


Then I had a crack at weathering up the sliding neck piece (I'm going to ad some more brown to it an then it'll be where I want it)
9A_zpsyunxtaqg.jpg


9B_zps9n7n1cd1.jpg


Then came time for the part I'd been waiting for since I started the project! I got to glue and assembled the eyeball and it looks spectacular (even with filler in the joins still)
Everything has been glued in place and once teh filler is dry I'll sand him back and then give him a few coats of brown and weather him up so it looks like a singular spherical piece
10A_zpsej6wrnhk.jpg


10B_zpsoftkuiml.jpg


10C_zpstwglpubl.jpg


And with the "stalk" section of the droid almost al painted up I did another extension/fitting test and it's working an absolute treat
 

Attachments

  • 8A_zpskekqg9t0.jpg
    8A_zpskekqg9t0.jpg
    416.3 KB · Views: 103
  • 8A_zpskekqg9t0.jpg
    8A_zpskekqg9t0.jpg
    416.3 KB · Views: 110
  • 8B_zpslrbqg4vx.jpg
    8B_zpslrbqg4vx.jpg
    298.5 KB · Views: 117
  • 8B_zpslrbqg4vx.jpg
    8B_zpslrbqg4vx.jpg
    298.5 KB · Views: 122
  • 8B_zpslrbqg4vx.jpg
    8B_zpslrbqg4vx.jpg
    298.5 KB · Views: 112
  • 8C_zps2uww8rqz.jpg
    8C_zps2uww8rqz.jpg
    321.8 KB · Views: 123
  • 8B_zpslrbqg4vx.jpg
    8B_zpslrbqg4vx.jpg
    298.5 KB · Views: 101
  • 8C_zps2uww8rqz.jpg
    8C_zps2uww8rqz.jpg
    321.8 KB · Views: 111
  • 9A_zpsyunxtaqg.jpg
    9A_zpsyunxtaqg.jpg
    390.5 KB · Views: 114
  • 9B_zps9n7n1cd1.jpg
    9B_zps9n7n1cd1.jpg
    363.2 KB · Views: 93
  • 9A_zpsyunxtaqg.jpg
    9A_zpsyunxtaqg.jpg
    390.5 KB · Views: 125
  • 10A_zpsej6wrnhk.jpg
    10A_zpsej6wrnhk.jpg
    391.3 KB · Views: 106
  • 10B_zpsoftkuiml.jpg
    10B_zpsoftkuiml.jpg
    375.5 KB · Views: 113
  • 9B_zps9n7n1cd1.jpg
    9B_zps9n7n1cd1.jpg
    363.2 KB · Views: 108
  • 10A_zpsej6wrnhk.jpg
    10A_zpsej6wrnhk.jpg
    391.3 KB · Views: 107
  • 10C_zpstwglpubl.jpg
    10C_zpstwglpubl.jpg
    435.2 KB · Views: 102
  • 10B_zpsoftkuiml.jpg
    10B_zpsoftkuiml.jpg
    375.5 KB · Views: 117
  • 10C_zpstwglpubl.jpg
    10C_zpstwglpubl.jpg
    435.2 KB · Views: 118
Last edited by a moderator:
So the Gatekeeper is now complete as of Brisbane Supanova this past weekend (one of our states biggest conventions). I got him done just in time for the panel i was hosting with the 501st on Props, Droids and Vehicle building so I figured it was high time I updated the WIP for him
This'll cover everything up until the pictures of the final droid since I want to take some nice pictures of him


First up was working on the spiked arches basic assembly

12A_zpsrl74nm01.jpg


12B_zpss10yq0tx.jpg


First test fit

13A_zpsx9dujxmo.jpg


13B_zps2qcj71ej.jpg


Then came the fun part, I got to have a play with the mechanisms I'd designed!

11_zpsxuy262fk.jpg


13C_zpslu7wmvxy.jpg


The next huge problem I faced was the structural integrity of the armature that held the eye in place

I did dome brain storming and by found and awesome way of ensuring it was stable and could be broken down for transport

So what I came up with was embedding a bolt into the eye and then an hexagonal coupler into the arm (think of it like an extended nut)

And the result was a super sturdy set up
doppeldaumen1.gif


14A_zpsijmebulk.jpg


14B_zpsbzamm6xw.jpg


14C_zpsxmdheqyk.jpg


Next up was printing and painting up the main base of the droid for vertical display or wall mounting

I made this in much the same way as I did the eye with filling, sanding and painting it in the same rusty type appearance (refer back to those posts if you want details)

15A_zpsyn7qccz9.jpg


15B_zpssrydrlkk.jpg


15C_zpsr2cr3rss.jpg


15D_zpsky69fbjm.jpg


15E_zpsy4b3ytsu.jpg


Next up was crating a storage box to get him the the convention for the panel this past weekend, and this entire set up cost a ma a whole 20 bucks ;;)

$10 for the box and then $10 for the foam. This foam padding I use looks fancy but it's stupid easy and cheap to do yourself to protect your valuable props/costumes. I just by those foam exercise mats from Kmart, trace the props onto the foam, cut out the appropriate holes for the item and then repeat that process a number of times, Then you just glue the foam layers together and hey presto custom foam padding
doppeldaumen1.gif


16A_zpsvoyjlg3m.jpg


16B_zpscingglg2.jpg


Attachments

  • 12A_zpsrl74nm01.jpg
    12A_zpsrl74nm01.jpg
    446.2 KB · Views: 118
  • 12B_zpss10yq0tx.jpg
    12B_zpss10yq0tx.jpg
    418.7 KB · Views: 118
  • 13A_zpsx9dujxmo.jpg
    13A_zpsx9dujxmo.jpg
    445.7 KB · Views: 124
  • 13B_zps2qcj71ej.jpg
    13B_zps2qcj71ej.jpg
    445.3 KB · Views: 113
  • 11_zpsxuy262fk.jpg
    11_zpsxuy262fk.jpg
    242.5 KB · Views: 107
  • 13C_zpslu7wmvxy.jpg
    13C_zpslu7wmvxy.jpg
    386.5 KB · Views: 114
  • doppeldaumen1.gif
    doppeldaumen1.gif
    316 bytes · Views: 136
  • 14A_zpsijmebulk.jpg
    14A_zpsijmebulk.jpg
    430.4 KB · Views: 109
  • 14B_zpsbzamm6xw.jpg
    14B_zpsbzamm6xw.jpg
    311.2 KB · Views: 111
  • 14C_zpsxmdheqyk.jpg
    14C_zpsxmdheqyk.jpg
    357.8 KB · Views: 93
  • 15A_zpsyn7qccz9.jpg
    15A_zpsyn7qccz9.jpg
    333.5 KB · Views: 108
  • 15B_zpssrydrlkk.jpg
    15B_zpssrydrlkk.jpg
    283.9 KB · Views: 107
  • 15C_zpsr2cr3rss.jpg
    15C_zpsr2cr3rss.jpg
    323.7 KB · Views: 107
  • 15D_zpsky69fbjm.jpg
    15D_zpsky69fbjm.jpg
    454.9 KB · Views: 112
  • doppeldaumen1.gif
    doppeldaumen1.gif
    316 bytes · Views: 104
  • 15E_zpsy4b3ytsu.jpg
    15E_zpsy4b3ytsu.jpg
    395.9 KB · Views: 99
  • 16A_zpsvoyjlg3m.jpg
    16A_zpsvoyjlg3m.jpg
    486.4 KB · Views: 114
  • 16B_zpscingglg2.jpg
    16B_zpscingglg2.jpg
    355.5 KB · Views: 117
Last edited by a moderator:
I finally had the chance to take some nice photos of my Gatekeeper Droid. I'm extremely happy with how it came out in the end, it's better than I possibly could have envisioned. And yes this Droid is fully functional with the head being able to extend outwards and in again. The same goes for the spiked arches with them being able to run up and down along the neck of the Droid. I also made a video today of the completed droid in action tomorrow
doppeldaumen1.gif


1_zpszv4wt1xv.jpg


2_zpsc10pk7ya.jpg


Photo%202-12-16%2012%2019%2025%20pm_zpsdfjtbwcr.jpg


Photo%202-12-16%2012%2019%2030%20pm_zpsvotdnjzq.jpg


Photo%202-12-16%2012%2019%2044%20pm_zpsvcocbon2.jpg


Photo%202-12-16%2012%2019%2059%20pm_zpsbygacldp.jpg


Photo%202-12-16%2012%2022%2037%20pm_zpsfnammf7y.jpg


Photo%202-12-16%2012%2022%2055%20pm_zps3nyzun2n.jpg


Photo%202-12-16%2012%2023%2013%20pm_zpsmvtvtkai.jpg
 
As promised here's the finished Gatekeeper Droid in action ;)
I'm extremely happy with how it came out in the end, it's better than I possibly could have envisioned. One day I may do a some kits for a proper run but not until I get a bigger printer

 
Last edited by a moderator:
Back
Top