Iron Man Mark IV - Pepakura, Fiberglass, Arduino and servomotors.

Gio Sigghi

New Member
Good morning to everybody! Thi is only a bite of my huge work that took the last two years, I am very proud to introduce you my IM Mk4 suit based on the famous Pep by robo3687.
I am gonna finish it (details on arm, molding with care, sanding and painting) for the first of November.

I enlarged the project with the automation of the helmet, as is possible to see a couple of videos of the partial result here (already with vocal recognition)


and here (just for showing that is wearable)


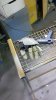
Vocal rec is made with the Easy VR shield, and I am using two Arduino board (the Mega and the Arduino micro fitted into the helmet).
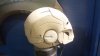
This is my 5th helmet and the most complete and detailed in the end.

Sorry but I can type a good english but I can't pronunciate it very well, so the audio is only for italian speeking guys.

Enjoy a couple of pictures until I finish the whole work and load a complete and more interesting album :)
My aim is to introduce step by step also flaps, guns, wings and cool stuff that usually we seen on the magnificent suit already finished ;)
Thank you so much for paying attention, and good luck to everybody who loves prop making ;)

Gio


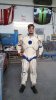
This is the most complete and finished view at the moment I type


10645091_10204700062804135_3438355846865977203_n.jpg


And then other pics

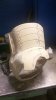
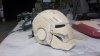
I started in 2012 doing an oversized helmet, then I improved my skills in scaling and cutting and pasting paper.

545303_4268623236488_2029271810_n.jpg


Then it took almost a whole year to complete a first attempt on MKVI suit, disliked it, and restarted a new chest. Downgrade to the lethal palladium fueled MKV.
As you see, sometimes I prefered to coat the papercraft with a hand of resin in order to make it stronger.
12779_4722089492861_1088348594_n.jpg


901698_10200986422845457_758413961_o.jpg


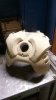
And then a more completed papercraft. Meanwhile parts were completed, I started to fiberglass first items, and cover with some putty.

163382_10200640734443463_421035569_n.jpg


and I kept going on until this moment, when only gloves were missing.

1174559_10201753431940205_969878757_n.jpg
 
Last edited by a moderator:
Hi George, hi to everyone.

Bad luck, I am quite stuck due to job and I had a tedious problem with both the arduino boards, I am working hard to solve.
Since last time, I only cut off wings and sanded something more, a patient work to increase the level of detail on the chest.

And I bought a kg of liquid latex in order to brush it on my evazote joints of the arms, but I had no time to try yet.

I upload some pics!

182938_10201638504587093_2001285159_n.jpg


Here, back and chest are locked to guides and covered with several layers of resin, before a proper and actual process of fiberglassing.

1005765_10201640089546716_1856888792_n.jpg


I preferred to cover the outer part of the back with a single layer of fiberglass (the tissue and flexible one, not the mat) in order to sand it away in a second time.

1538825_10202858971738009_1529360106_n.jpg


Then I proceeded in cutting away and reinforcing parts who completely lost their shape.

1526155_10202858972658032_71882232_n.jpg


Then, the aim was to reduce in a significant way the number of parts, linking with some screws small pieces, in order to obtain two macro half-upper boby.
During all the time, I continued to apply some putty especially in the inner space to consolidate.

1551637_10202918549547417_1277969826_n.jpg


I did the same kind of work with abs.

1560709_10202931445109798_1908715783_n.jpg


and with some pic for comparison, I tried to obtain a more realistic shape of the borders, making them bigger than papercraft.

Best regards,
Gio
 
Last edited:
Thank you dear italian friend! (I live in Modena) Is not easy to find the right measures and build without altering the most correct shape. Stay tuned for the incoming work...
 
Hi! Just some new pics :)


Legs were fiberglassed and linked in a proper way with some metal plates.
Time to create some stuff for the knee joint.

1236852_10201889842030372_720410890_n.jpg


and a second view: please note that I did practice some 6mm diameter holes in the fiberglass and through metal plates, in order to fiber glass it again from the inside and reinforce the knee.
Of course, all is quite heavy.

525749_10201889843110399_2102243843_n.jpg


after taping surfaces, I fiberglassed it one more.

1240452_10201889848750540_304046732_n.jpg
 
Last edited:
After legs I merged the abs (front, rear and side sections) with some tape and I destroyed the borders, then I fiberglassed the inner part.
Is heavy, is uncomfortable, and I can't move hips.
Anyway with some corrections I am satisfied.
Pics are following soon.
 
Last edited:
Tight triangular-shaped polyhurethane reinforcement, waiting for the temporary fiberglass external layer.

1209382_10201839663935951_530380952_n.jpg


I show you the modded middle part: all the parts are grouped in a single section, borders are filled with putty and ready for the main fiberglass process.

1230034_10201912620879829_1009837467_n.jpg


second step is done

1002536_10201917226154958_1609191268_n.jpg
 
Last edited:
This is a picture from september 2013, belts were then crossed and were ok in the end.

1187298_10201967718537236_1055563876_n.jpg


And this is the first shoe, only fiberglassed and cut for a preliminar study (actually I don't like it very much, but it works)

1209356_10201960735162656_1116977701_n.jpg


As you can see, each shoe is splitted in everal pieces and just at last minute is fiberglassed for applying putty.
Here, the lower parts has been linked with a strong insert of rubber and screwed into fiberglass.

1233326_10201960734642643_91797672_n.jpg


Then I filled with some betaseal, if you know. Is the glue used for sealing car glasses. It becomes very hard and flexible, a good idea. (This picture is most recent than the previous one).

10959439_10205859312104643_7234979606046703909_n.jpg


And jumping in the time... after putty, appling details and sanding.

10407444_10205865656743255_916330888834422859_n.jpg


10986511_10205865666543500_2018188792480737498_n.jpg


10922830_10205865662703404_916222065178142822_n.jpg


10959430_10205865662623402_5674412134995495741_n.jpg
 
Last edited:
Prepare youselves for a crane of pictures of the finished mark IV, There is some update to do...

I am so proud.
 
A silly answer would be that there is anything difficult, when you own a matter... the truth is that if you are a complete newbie in electronics and writing some code, even the easyVr is diffcult.

Despite that, there is a plenty of examples and wiring schematics for starting. The hard challenge in the end is to build a strong package for the cstume, that is functional and SAFE.
Is an articulated route,but is possible.
 
20150311_222019.jpg20150907_195111.jpg20150902_165006.jpg20150902_164719.jpg20150901_201001.jpg20150901_200904.jpg20150701_183710.jpg20150907_201806.jpg20150920_175022.jpg20150921_221935.jpg20150923_130221.jpg20150923_184614.jpg20150923_184622.jpg20150923_184742.jpg20150923_184849.jpg
 

Attachments

  • 20150901_200735.jpg
    20150901_200735.jpg
    126 KB · Views: 146
  • 20150807_215041.jpg
    20150807_215041.jpg
    129.9 KB · Views: 148
  • 20150923_220748.jpg
    20150923_220748.jpg
    151.9 KB · Views: 167
  • 20150915_161514.jpg
    20150915_161514.jpg
    157.2 KB · Views: 167
  • 20150915_161459.jpg
    20150915_161459.jpg
    160.8 KB · Views: 181
  • 20151005_212433.jpg
    20151005_212433.jpg
    315.2 KB · Views: 145
  • 20151005_212234.jpg
    20151005_212234.jpg
    249.2 KB · Views: 165
  • 20150929_142504.jpg
    20150929_142504.jpg
    218.8 KB · Views: 148
  • 20150927_182232.jpg
    20150927_182232.jpg
    334 KB · Views: 145
Back
Top