joshslayton
Well-Known Member
oh great, just what this forum needs another iron man thread. well anyways back in haloween 2011 i made a warmachine costume. after getting an awesome feed back i decided to make a iron man mark 6 to mach the warmachine. but this build will be a little different Technic then what other people make their iron man suit. so heres how it will be built, first the armor will be made out of foam then coated in liquid plastic then molded and cast in plastic. so heres my progress
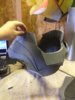
i first worked on the forearms


then the biceps


both arms are done time for a test fi

fits and looks good
then off the the shoulders


the shoulders will need a little heat treating or fibreglass resin to get the curv i want but thats in the future
now time for the chest and back

i cut out this piece out cuz it wasnt looking for good so ill put that detail back somehow

i added this neck flap

i also added this detail as its on the original armor

i also closed up the armor a little so so it will hide my body when im wearing it

next is the abs

i only made the back of the abs cuz the front flap wasnt getting the curve i wanted out of foam so i thought make it out of pepakura fiberglass
heres the cod peice

and heres the cod piece with the abs dud and the chest


time for a test fit i put the armor on my brother to see how it looks


this is why i need a manikin
for more check out http://facebook.com/slaydogprops
Well im back with some smooth cast 65d plastic to coat some armor. I started with coated some armor parts with pva glue 3 coates

Then it was off to plastic. I first coated the bicep to get a feel of what i was doing

A little runny i hope to get better
So then i started sanding and filling


Still needs some sanding and filling and detail work
Heres the helmet


Fibreglassed

First pass of bondo


While that was drying i started on the other armor peices coating them in plastic

I love watching smooth cast dry
Got both of the chest and back coated

Like and share my facebook page
Facebook.com/slaydogprops
So as it turned out this "plasctic coating" idea turned out to be A failure

The reason being that bondo, primer etc cant stick to it well. Just a note to do t coat all your armor if your not sure it will work.
So i decided to just make the whole suit made out of plain ole eva foam with some modified pieces. I will be doing some experiments with plastic coating but in the mean time these parts go in the in the "prototype" closet

Ive rebuilt all the pieces that were ruined before

The chest was a different template so its waayy more accurate than the last one

I rebuilt the abb plate being way more accurate

Heres the neck piece

Ive made the hand plate in 2 piece so i can make it pivot on my arm

Heres some of the helmet progress pictures


Facebook.com/slaydogprops
i first worked on the forearms
then the biceps
both arms are done time for a test fi
fits and looks good
then off the the shoulders
the shoulders will need a little heat treating or fibreglass resin to get the curv i want but thats in the future
now time for the chest and back
i cut out this piece out cuz it wasnt looking for good so ill put that detail back somehow
i added this neck flap
i also added this detail as its on the original armor
i also closed up the armor a little so so it will hide my body when im wearing it
next is the abs
i only made the back of the abs cuz the front flap wasnt getting the curve i wanted out of foam so i thought make it out of pepakura fiberglass
heres the cod peice
and heres the cod piece with the abs dud and the chest
time for a test fit i put the armor on my brother to see how it looks
this is why i need a manikin
for more check out http://facebook.com/slaydogprops
Well im back with some smooth cast 65d plastic to coat some armor. I started with coated some armor parts with pva glue 3 coates
Then it was off to plastic. I first coated the bicep to get a feel of what i was doing
A little runny i hope to get better
So then i started sanding and filling
Still needs some sanding and filling and detail work
Heres the helmet
Fibreglassed
First pass of bondo
While that was drying i started on the other armor peices coating them in plastic
I love watching smooth cast dry
Got both of the chest and back coated
Like and share my facebook page
Facebook.com/slaydogprops
So as it turned out this "plasctic coating" idea turned out to be A failure
The reason being that bondo, primer etc cant stick to it well. Just a note to do t coat all your armor if your not sure it will work.
So i decided to just make the whole suit made out of plain ole eva foam with some modified pieces. I will be doing some experiments with plastic coating but in the mean time these parts go in the in the "prototype" closet
Ive rebuilt all the pieces that were ruined before
The chest was a different template so its waayy more accurate than the last one
I rebuilt the abb plate being way more accurate
Heres the neck piece
Ive made the hand plate in 2 piece so i can make it pivot on my arm
Heres some of the helmet progress pictures
Facebook.com/slaydogprops
Attachments
Last edited:


