First off, I must give props to XRobot on his eye build here, https://www.youtube.com/watch?v=SHcH60giVys&list=PL1AF6F24238DB27EA - It is an absolutely brilliant design and frankly I would not have thought of it myself without his video on it.
I built one based off of his, overall happy with how it came out for my first one.


It was not without some issues though, first the self inflicted ones. The film I used was not self adhesive, so I had some trouble with bubbling and that was completely my fault. The second issue was the tulle, I could not fine ANY in any store or my wife's collection that had a nice even pattern like the one in his videos. That and kept shifting so it was not flat to the lens and was flexing, making a non-uniform shape. Those two things drove me nuts, but it still came out decent. One design problem with the tulle as well. The light penetrates the tool and appears bright on the inside of the helmet, blocking your view to a degree.
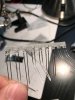
With that I spent the week thinking through the design and how I could change not only use of a different material from the tulle, but the way it is lighted to avoid hot spots. After some work, I present Mark II version of the lighted eye. Left side of the pic is the new eye (right eye in helm) and right side of the pic is the old one.


A handful changes went into this one, first one was the material used for the grid. Replacement window screen, one side spray painted white. While it cuts out a little more vision, it is less annoying to my eye since the LED light does not penetrate the screen. I held it on with some 3D printed clips on the ends.

I built one based off of his, overall happy with how it came out for my first one.
It was not without some issues though, first the self inflicted ones. The film I used was not self adhesive, so I had some trouble with bubbling and that was completely my fault. The second issue was the tulle, I could not fine ANY in any store or my wife's collection that had a nice even pattern like the one in his videos. That and kept shifting so it was not flat to the lens and was flexing, making a non-uniform shape. Those two things drove me nuts, but it still came out decent. One design problem with the tulle as well. The light penetrates the tool and appears bright on the inside of the helmet, blocking your view to a degree.
With that I spent the week thinking through the design and how I could change not only use of a different material from the tulle, but the way it is lighted to avoid hot spots. After some work, I present Mark II version of the lighted eye. Left side of the pic is the new eye (right eye in helm) and right side of the pic is the old one.
A handful changes went into this one, first one was the material used for the grid. Replacement window screen, one side spray painted white. While it cuts out a little more vision, it is less annoying to my eye since the LED light does not penetrate the screen. I held it on with some 3D printed clips on the ends.