Iron Man Faceplate with Interior WIP (VashDstampede's Kit) PIC HEAVY

FSURobbie

Well-Known Member
Hey folks,

So this will be my first build thread here on the RPF and I'm looking for some feedback on some parts I'm having to source to add to the build. First things first though, my progress. I know there are tons of build threads for Vash's famous kit, so I apologize in advance, but I plan on doing some new things with it that will hopefully warrant a new thread. So...

The kit, re Vash's sale thread:

September-faceplates.jpg


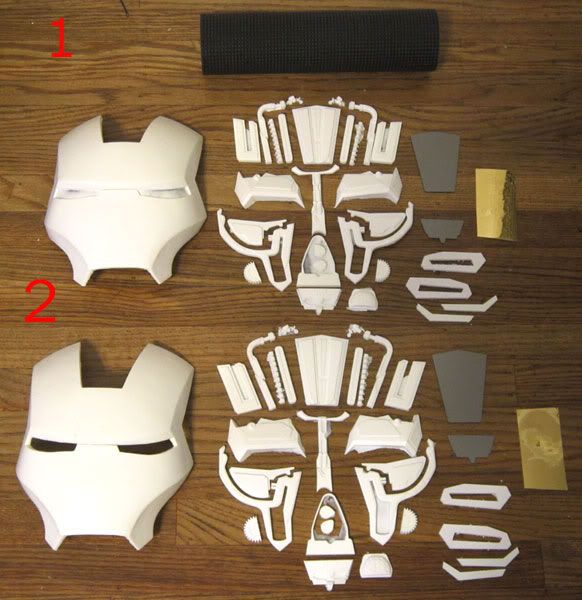
So, taking the kit as is, I've spent a good amount of time trimming and sanding pieces.

The faceplate I'm investing some time in, but I don't have pics of my additions yet. Basically I've built up the inner edges to make them thicker using Tamiya Body Putty, especially at the top where you can see in the actual prop that there is a flat, sloped area that exists outside of the inner workings area.

8145392600_1ee3e8801b.jpg


I also have to fill some low areas and I'm fixing the screws to make them more screen accurate. I will try and get pics of the updated faceplate tonight.

As far as the inner parts, they have taken a bit of time to heat up and mold to the faceplate as well, but nothing major aside from a few sensitive fingertips due to the boiling water. :p The biggest change I've made is to the large piece that sits above the eye. The shape seen on the prop varies a bit from Vash's piece so I shaved down the piece and cut into it to create the proper shape, and sanded it all down to smooth it out:

8145390706_4240688481_z.jpg


I will try and get pics of my tweaked faceplate up tonight.

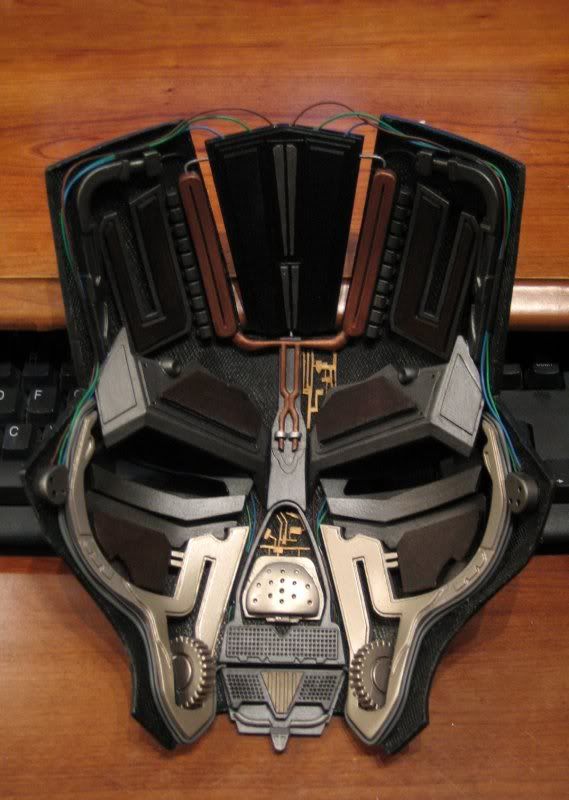
Ok, back to the question I mentioned at the beginning. I've been trying to track down appropriate wiring and looking closely at the wires I swear it looks to me like the color wires alternate between color and white. For instance, the green wire seems to turn over on itself and is white on the other side before turning to green again when it turns back over. See here:

8145391754_cf9bb18df8_z.jpg


I have some wires I harvested from a USB cable that are perfect but I'm debating whether it's my eyes fooling me or not. Do you folks think the cables are just a solid color or do you agree that they seem to alternate between color and white like it looks to me that they do? Here's a sample pic of the USB innards:

8145389725_6e23d5a910.jpg


Thoughts on the cables?

Thanks in advance folks, more coming soon, including some stuff no one has done with Vash's kit before. :love
 
Last edited:
So, no thoughts on the wires folks? Eh, no worries, I'm going ahead with what I have. I plan on grunging them up a bit so that should make them look a bit better.

Ok, updates!

This is coming much later than intended but I seriously underestimated the curing time on that body putty. Have to say, I'm not a fan. I bought it simply because none of my local hobby shops had any two part epoxy stuff like Milliput in stock and I was impatient and did not want to wait for shipping so I bit the bullet. About a week and a half later and multiple coats of body putty I've realized it would have been better to have just ordered the Milliput and waited it out. But I digress. Pics!

So here's the helmet, after the initial round of body putty. As you may recall, I had decided to even out a few small bumps in the body as well as thicken up the interior walls:

8179165916_00f51990ae.jpg


8179128345_883afd7106.jpg


8179133041_50ebd3536c.jpg


Body putty reeks by the way. :p

I also mentioned tackling the screws and trying to flesh them out a bit from the simple line they came with out of the box. Here's what I had after my first go round (redid the things 3 times, sucks being anal retentive when you work on projects like this):

8179133187_268da20bbb.jpg


So, at this point I decided to sand everything down and coat it with black acrylic paint to see if I was missing anything. Another few rounds of body putty/sanding (yay!) and I got it to what I deemed acceptable levels. I then took a fine grit (1000) sand paper and smoothed it all out one last time before putting down real primer. I actually kind of liked the way it looked here, reminded me of cast iron, but it had to be covered. I also used my Dremel to clean up the screw additions and inset them in the mask a bit rather than having them flush with the mask proper:

8179129445_f892d83c77.jpg


8179129203_2ed0f1f23f.jpg


8179129667_781323a0e4.jpg


8179129823_9a1fd9da7f.jpg


So at this point it was time for primer and after 3 or 4 coats it's looking pretty good and ready for final paints:

8179161246_b2ebe3c180.jpg


8179128817_e6bf266992.jpg


8179161082_0d37ede1c1.jpg


Now the lid is ready for final paints on the outside and inside. I have painted all the inner greeblies with a metallic charcoal dust and plan on weathering them just a bit. I also plan on painting the interior of the mask the same, then gluing down the matting and painting it as well. I don't want the black mat to stand out from the rest of the mask as in the prop it appears whatever the texture of it is the material itself is still colored the same as the rest of the prop.

I also mentioned doing a few things a little differently. Here's two examples: The first are a couple of images of an old leather belt I held onto for who knows why. Turns out it was the perfect color and texture so I cut it up and made real leather pieces to glue to the prop.

8179131959_195e3b7b1f.jpg


8179162994_a3aeb51d5f.jpg


Close up of texture/color with good lighting:

8179130117_391d77d5e9.jpg


I also took a little bit of an artistic license with the HUD you can see drawn on the prop. My guess is that they used transparency paper and I did the same. I mocked up HUD elements that looked roughly the same as far as object/placement/color and then Ironman-ified them. Then I printed them out on transparency paper and will glue them between the eye piece and the greeblies that go on top to create the proper overlap of the blue circle over the piece behind it as seen in the actual prop.

8179160768_362e8181a8.jpg


I have plans for one more addition, but it's still in the process so I'm not going to share it just yet. So that's my progress. Ready to paint the helmet, glue down parts and paint/weather them.

Thanks for reading folks, I welcome any feedback and/or thoughts thus far.
 
Last edited:
As for the wires. I used the wires from inside an Ethernet cable. Btut your USB wires look pretty good.

IMG_7751.jpg


Dsc03933-1.jpg
 
Last edited:
Minor update. I wasn't able to work on the mask at all last night but I did make some progress. First, I'm going to replace the mat that came with the kit with a bath scrubber per BigTurc's build. Apparently he beat me to the leather pieces punch as well! :lol

Oh well, I'm still grateful for his thread because I was trying to find a more screen accurate material to use on the inside of the mask and his thread held the answer. I had planned on using the netting that holds cheese wheels but I think his solution is easier and cheaper.

I also decided to tackle the golden prongs in the U shaped piece at the top of the mask. Rather than trying to pull metal pieces off of circuit boards I figured I would just make my own prongs so I broke out my ruler. I measured the piece and the open space is 1.75" long and in the screen used prop there are 10 golden prongs within that space.

8182249494_da2c15dc40.jpg


That figured out, 1.75 divided by 19 (got to include the 9 spaces between the prongs) and I came out with 3/32's of an inch wide for each prong.

The prongs also need to be an 1/8 of an inch high to stand level with the piece and then they fold over and have about 1/4 of an inch in length to overlap over the edge of the piece. I took a piece of plastic from a package I had laying around the house and measured out my prongs on a Post It note. Not the most professional, but it works.

I then traced them onto the clear plastic using an exacto knife to score the plastic. At that point I used scissors to cut the prongs and bent them by hand along the score lines. I then bent them again, alternating every other prong, away from one another so that when I go to paint them the sides will get gold paint as well.

8182166121_0484a321f4.jpg


8182165967_dabe988c4b.jpg


8182203126_4335e1d518.jpg


8182165645_2f014e17f9.jpg


Now all I have to do is paint them and cut them free and glue them down once I get the mask assembled. Hopefully I can get back to the mask tonight.

I have some concerns because I'm worried the metallic grey paint I chose for the greeblies may be too dark in comparison to the prop. I might post some sample shots to get some feedback from all you silent readers.

Thanks folks.
 
Alright folks, I need some feedback from the experts. Last night after about and hour of fighting with it I finally got the bath scrubber mesh successfully installed in my mask. After that I cleaned off the mask and put a few coats of silver on the front of the mask using a can of Krylon Silver I picked up at Wal-Mart.

Unfortunately what I found was really grainy looking paint. I hoped it was just a problem of holding the can too far away with the first coat so the subsequent coats I went in closer and while it helped somewhat the paint is still very rough and granular and the mask in no way looks like metal but rather a piece of plastic with shoddy spraypaint on it.

Here's what I've got:

8187169941_a9c1d82081.jpg


8187169797_ea91e0e8f0.jpg


8187169661_ccb83ff6d8.jpg


Is there any way to salvage this paint job? I planned on adding a clear coat after marking up the front with white and yellow paint pens but I doubt that would fix this. I'm afraid adding more coats is just going to pile more silver paint on top of an already rough job.

This has been pretty disheartening. It seems like every step forward I make with the mask I end up needing to take two steps back. This is a simple thing, what am I doing wrong folks?

I used Testors spray lacquer on the greeblies and didn't have a problem like this. Would a silver spray lacquer give me better results that the Krylon can? If so, what's the best way to go about that? Sand down the current coat, reprimer and start over or strip it down?

If I strip it down, what chemical should I use and will it hurt the body putty?

ARGH!

Help! :cry:cry:cry
 
Re: HELP NEEDED! Iron Man Faceplate with Interior WIP (VashDstampede's Kit) PIC HEAVY

Just sand it and try again. No chemicals needed. You may get better results with a different brand too. It isn't that big of a deal though. I think I painted my helmet faceplate five times before I was happy with the finish!

5 coats!? Sheesh, guess I need to adjust my expectations some...:lol

What type of paint did you use? I'm going to take your advice and sand it down when I get home and try again. If I get the same results I may just go and by another can and see how the Testor's works out. I had great results with it on the greeblies.
 
Re: HELP NEEDED! Iron Man Faceplate with Interior WIP (VashDstampede's Kit) PIC HEAVY

The faceplate in my avatar was painted with Rustoleum, but I've had good results with Krylon, Valspar, and Duplicolor. Grainy texture like that is usually from spraying too far away, as the paint slightly dries before hitting the surface. Also be sure of the proper temperature range (both ambient and surface) as well as humidity. Warm the can in a bucket of hot water for 10 minutes or so before application, and shake the can a good amount before and during application. Most importantly, painting doesn't take a lot of effort, so don't get discouraged if it doesn't go right the first time (or second, or third... :lol) :thumbsup
 
Re: HELP NEEDED! Iron Man Faceplate with Interior WIP (VashDstampede's Kit) PIC HEAVY

Most importantly, painting doesn't take a lot of effort, so don't get discouraged if it doesn't go right the first time (or second, or third... :lol) :thumbsup

Agreed, but my wife starts to grumble. :lol

After 5 coats last night I have decided to try another paint. With each coating I got better results, but the end piece was still far too grainy and didn't look metallic at all. I was spraying from about 6" away but it has been cooler lately so maybe the temperature was affecting things as well.

I'm going to pick up some Duplicolor Chrome I saw at the local car shop and give it a try this evening. Thanks for the advice and moral support!
 
In Which He Takes 2 Steps Back & 1 Step Forward or The Winds of Change are a Blowin'

So I'm back with some updates, finally. Long post, buckle up.

I've been making steady progress but didn't want to post because a lot of the progress has been regaining lost ground. To make a long story short, investing in the Duplicolor Chrome was brilliant as it's perfect. Goes on smooth and looked like metal immediately. No cheap spray paint for me in the future, not worth the hassle.

The problem was that after the 4th or 5th coat (making a total of about 10 including the failed attempts with the cheapo paint) I had a perfect looking faceplate drying outside. I let it sit for an hour and went to check on it to discover that a random gust of wind had blown it off the pedestal I had it on and knocked it face down into dirt, pine needles and acorns. There was damage on the sides as well, but the worst was right on the forehead

FANTASTIC!

8243681739_a7fa81bc1e_z.jpg


At this point I nearly had a nervous breakdown. Probably a bit of an emotional overreaction but I was so tired of sanding and spraying this thing that at that point the thought of having to take it back to square one almost cost me my sanity.

I took a few days, let the ruined paint dry, and sanded again. By hand. I sanded for three days to get through all the paint that my multiple coats had built up (and which the debris had easily pushed through). Around day 4 I finally got all marks related to the fall sanded out and then I took the trusty Dremel and cleaned the paint out of the screws as well. This might have been the one positive as I reworked the screws a bit and they actually look better now that they did pre-winds of insanity.

I primed 'er back up and the mask looks good to go, no signs it ever fell (or was painted, for that matter :cry). At this point I unfortunately had enough time to reflect on the mesh I had installed on the inside using a bath sponge. It went in messily as the stuff was so kinky it fought staying down, even with spray adhesive, and it ended up looking rather unattractive. I originally planned to stick with it because most of it would be covered by greeblies and I was just plain lazy but in for a penny, in for a pound. I already had to redo the entire outside, what the hell, let's redo the inside as well.

Here's what it looked like initially:

8244750888_e381239216_z.jpg


All the yellowish areas are where there was heavy amounts of spray adhesive due to a dirty nozzle. This was the biggest factor that pushed me to redo the thing. After pulling all the netting out and sanding the adhesive out (that was fun) I was back to the starting line, more or less, and decided to look for a new mesh as the bath mesh was still significantly bigger that what was seen in the prop.

Hitting up a fabric shop I found some mesh they use on the underside of women's dresses that was perfect. Here's a pic of all three materials I've run through (the black mat that came with the kit, the bath sponge in the middle, and my new fabric on the bottom):

8243681501_0e7789f3df_z.jpg


Hard to see, but here's a shot of the material next to a close to life size photo of the prop for size comparison:

8244749364_610d1afb25_z.jpg


It's really fine but on the mask it looks pretty good, much closer to matching the prop than the much larger bath sponge material. Plus, it's a sheet of fabric, so no kinkiness! I'm going to try installing this mesh with Modge Podge instead. Less mess (the spray adhesive really was a nightmare) and should give me a little more control. I haven't gotten that far though because at this point I realized, hey, those side walls don't look anything like the prop!

Giving up on body putty after the fun I had with that I actually tracked down a local vendor who sold Green Stuff. I've read a lot about it and man, what a breath of fresh air, it was ridiculously easy to work with and in about an hour I had it perfect. I sculpted up the sides of the mask with a pic of the prop beside me and I think I got the look pretty spot on.

8244752344_d338abc055_z.jpg


8243684409_c0e50e7a0b_z.jpg


8243684235_bb2fc1090d_z.jpg


And with some sanding/cleaning up:

8243684085_1e6e9c29fa_z.jpg


I still need to sand and trim it a bit, but I'm pretty pleased, I think it really adds a lot to the mask already. Once I finish cleaning up the GS I'm going to prime the inside as well, then chrome the front and inside edges. After that dries I'll install my mesh, then paint over it and use some Rub and Buff to make the mesh stand out a bit. Then I'll start gluing the greeblies in.

I feel a bit silly, this kit probably shouldn't take anywhere near as long as it is taking me, but I have to admit, in retrospect I'm glad the mask fell as I'm much happier with the current state of the interior of the mask than I was with the former.

Thanks for reading this far, and for bearing with the slowest build of such a straightforward kit ever.

Feedback welcome as always.
 
Last edited:
I've had the "random gust of wind knocking over your freshly painted item" happen to me before too... Can definitely relate on that one! But you've turned that into a positive, so good on you :thumbsup

Your final product will be all that much better because of it
 
It's scary how Doom/Vader-like the inside of that mask looks when you've tricked it out like that. Loving the attention to detail in this build, keep up the great work!
 
Thanks folks, I appreciate the support. I think once I get the mask itself squared away the greeblies should go fairly quickly. At least I hope so, if my luck thus far is any indication they probably wont... :p
 
That is going to be a very nice build! But I fear, that all the rattle can chromes won't really hold up to handling, as they tend to never dry completely...

Here's my mirrachrome finish:

iron_man_faceplate10.jpg


and with a satin clearcoat:

iron_man_faceplate11.jpg
 
That is going to be a very nice build! But I fear, that all the rattle can chromes won't really hold up to handling, as they tend to never dry completely...

Thanks, that means a lot as your build is pretty amazing.

As far as the paint, that's a terrifying thought! Do you have any suggestions then? I definitely don't want to deal with finger prints in the paint for the millionth time...
 
Back
Top