Blade Hawkins
New Member
This is my first post, and before I get started, I'd like to express my awe for this forum. I'm amazed at the talent, tenacity and skill involved in the research and execution of so many great props. I've been lurking for a while, and used the collected knowledge of this forum to assemble a New Hope DL44 with Field Marshal parts on a Denix. I'm pleased with the way it turned out, though it's unremarkable in that I did minimal defrarbing on the Denix. I can always return to that later.
Now, on to the subject of this post. I've decided to tackle a long rifle inspired by Luke's A New Hope Slugthrower. There is little information and few good images on the screen used prop, that's why i'm going for "inspired by." Here's a link to an RPF thread that seems to contain the bulk of what is known about the prop:
STAR WARS IV Lukes tuscan raider rifle
The discussion includes a publicity still of Luke holding the rifle, some screen captures from the film and descriptions of an auction listing and article on the prop. Comparing the publicity shot to the auction rifle, it is clear that some details and more than a few greebles were removed from the prop between the film and auction. To my eye, the auction prop no longer passes muster as a believable weapon. It may have worked for the small amount of screen time the prop received in ANH, but I hope to achieve something a bit more plausible as an in universe weapon when handled.
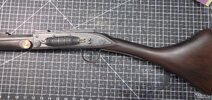
Like the DL44, the ANH rifle borrowed heavily from historical tech, in this case, the Jezail. The Jezail was a muzzleloading matchlock, snaphance or flintlock long rifle that was used in Afghanistan and Southeast Asia and Middle East. Here are some examples:


I'm sure this is nothing new to many on this forum, but I wanted to include some images that I'm using to fill in the gaps in available research for the ANH rifle.
I'm starting with the assumption that though the prop rifle was based on a muzzleloader, the in universe slug thrower was not a muzzle loader. It's described by cannon and legends sources as propelling a solid slug, but I'm not aware of any source that describes the source of energy that throws the slug. It makes sense, to me at least, that the slugthrower would be some kind of hybrid between a blaster and traditional rifle. So, I'm assuming the energy comes from a more fantastic source such as a power cell that provides for multiple shots with the projectiles loaded one at a time.
I'm also assuming that the slug thrower would have been as common among the moisture farmers of Tatoine, as bolt action 22s or single barrel shotguns were to farm boys in America. And come to think of it, Luke carrying his rifle on his speeder is like the rifle in the gun rack common in the rear window of pick up trucks in days past. Hopefully this background will make sense as I progress with the build.
I started by developing a template for the stock. I scaled off of the rifle in the publicity still, but wanted to insure that the architecture was in human scale, so I incorporated proportions from a scale print for a French Trade Gun that was used by Native Americans/First Nations People from the mid 1600s to mid 1700s.

I Glued two layers of 1x12 poplar together to build up the thickness required. Then I transferred the pattern to the wood cutting it out with a jigsaw.


I don't have access to a milling machine or 3d printer, so I'm using aluminum for the barrel, receiver and lock panels. Without specialized metal tools, I'll be limited to woodworking tools, but I should be able to adapt. I wanted the barrel to be slim, but I wanted it to have a bit of a profile, so I found a piece of 1 1/4" aluminum tubing that slid over my 3/4" barrel. I rigged a jig and used my belt sander to mill the larger tube into an octagonal section.

I used a table saw and router to inlet the barrel channel.


With the barrel inlet, I reduced the barrel channel depth to a bit less than half barrel depth. These rifles were long and slim.


As I said earlier, the in universe rifle is not a muzzleloader, so I'm planning a kind of hybrid between the muzzleloader stock architecture and a more modern looking receiver that could plausibly house the technology. I cut an aluminum breach block, and lock plates that blend the idea of a flintlock with the updated tech.


I'll work up some greebles to add to add to the lock plates. I'm trying out some turnbuckles above, plus I've ordered some reed cylinders and knurled knobs from The Blaster Factory. I still need to remove a lot of wood, and add things like a trigger mechanism, trigger guard and sights. As mentioned above, I hope to come up with something that fits in the SW universe, could plausibly be carried by a farm boy or Tuscan Raider, something inspired by Luke's rifle.
Now, on to the subject of this post. I've decided to tackle a long rifle inspired by Luke's A New Hope Slugthrower. There is little information and few good images on the screen used prop, that's why i'm going for "inspired by." Here's a link to an RPF thread that seems to contain the bulk of what is known about the prop:
STAR WARS IV Lukes tuscan raider rifle
The discussion includes a publicity still of Luke holding the rifle, some screen captures from the film and descriptions of an auction listing and article on the prop. Comparing the publicity shot to the auction rifle, it is clear that some details and more than a few greebles were removed from the prop between the film and auction. To my eye, the auction prop no longer passes muster as a believable weapon. It may have worked for the small amount of screen time the prop received in ANH, but I hope to achieve something a bit more plausible as an in universe weapon when handled.
Like the DL44, the ANH rifle borrowed heavily from historical tech, in this case, the Jezail. The Jezail was a muzzleloading matchlock, snaphance or flintlock long rifle that was used in Afghanistan and Southeast Asia and Middle East. Here are some examples:
I'm sure this is nothing new to many on this forum, but I wanted to include some images that I'm using to fill in the gaps in available research for the ANH rifle.
I'm starting with the assumption that though the prop rifle was based on a muzzleloader, the in universe slug thrower was not a muzzle loader. It's described by cannon and legends sources as propelling a solid slug, but I'm not aware of any source that describes the source of energy that throws the slug. It makes sense, to me at least, that the slugthrower would be some kind of hybrid between a blaster and traditional rifle. So, I'm assuming the energy comes from a more fantastic source such as a power cell that provides for multiple shots with the projectiles loaded one at a time.
I'm also assuming that the slug thrower would have been as common among the moisture farmers of Tatoine, as bolt action 22s or single barrel shotguns were to farm boys in America. And come to think of it, Luke carrying his rifle on his speeder is like the rifle in the gun rack common in the rear window of pick up trucks in days past. Hopefully this background will make sense as I progress with the build.
I started by developing a template for the stock. I scaled off of the rifle in the publicity still, but wanted to insure that the architecture was in human scale, so I incorporated proportions from a scale print for a French Trade Gun that was used by Native Americans/First Nations People from the mid 1600s to mid 1700s.
I Glued two layers of 1x12 poplar together to build up the thickness required. Then I transferred the pattern to the wood cutting it out with a jigsaw.
I don't have access to a milling machine or 3d printer, so I'm using aluminum for the barrel, receiver and lock panels. Without specialized metal tools, I'll be limited to woodworking tools, but I should be able to adapt. I wanted the barrel to be slim, but I wanted it to have a bit of a profile, so I found a piece of 1 1/4" aluminum tubing that slid over my 3/4" barrel. I rigged a jig and used my belt sander to mill the larger tube into an octagonal section.
I used a table saw and router to inlet the barrel channel.
With the barrel inlet, I reduced the barrel channel depth to a bit less than half barrel depth. These rifles were long and slim.
As I said earlier, the in universe rifle is not a muzzleloader, so I'm planning a kind of hybrid between the muzzleloader stock architecture and a more modern looking receiver that could plausibly house the technology. I cut an aluminum breach block, and lock plates that blend the idea of a flintlock with the updated tech.
I'll work up some greebles to add to add to the lock plates. I'm trying out some turnbuckles above, plus I've ordered some reed cylinders and knurled knobs from The Blaster Factory. I still need to remove a lot of wood, and add things like a trigger mechanism, trigger guard and sights. As mentioned above, I hope to come up with something that fits in the SW universe, could plausibly be carried by a farm boy or Tuscan Raider, something inspired by Luke's rifle.
")