Dmitriy311
New Member
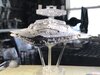
review of Bandai&Zvezda(Revell) - I did this review when I purchased an ISD Bandai. I'm of the same opinion as Invar.

I'm concerned with the issue of side trenches and their low height. It's a detail that I can't ignore and I don't know how long it will take me to solve that matter.


Which filesHas anybody tried downloading one of those accurate SD STLs and scaling it to 2' (or however long the Zvezda is), and then just printing the trench pieces with holes already in them for FO? That way you'd save a TON of scratch-building work...
SB
I have not yet received my model so I cannot analyze its parts in depth. And I don't know the complications that I could find to use this system.
The traditional lighting system with large bundles of fiber optics strikes me as a bit cumbersome.
What is your opinion?
I would love to know how you get the right trench height while also dealing with the engine cavity. Raising the height is no problem, clearly. But if you do that, the engine cavity will be too short.
That doesn't really answer my question as the primer has covered up any mods you've done to it and I don't really know what process you used to get it to match the trench height.
Ah, okay. I don't think I'd want to do that because the asymmetry would bother me. I'd want to add it to the center of the engine bay, so I'm going to have to experiment with cutting the cavity in half and trying to add in the vertical height that way.