Jasper hams
New Member
I'm a new member and i want to share some of my past projects.
First is my Skyward Sword flavor Hylian Shield:
A great thing about this project is there is this nice definitive easy image to pull all info from. The depth of the convex form was a little harder but with a little 'research' playing the game and a mock-up in Maya i got the measurements.

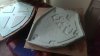
In hindsight i way over complicated this MDF/Styrofoam layer system.

The upside of it being that when i sanded down it was easy to tell where i needed to stop.

Fill, Sand, Repeat.

Fill, Sand, Repeat.

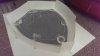
I wanted a nice tapered Triforce so with some more foam and filler i made a single prototype.

From this i made a silicone block mold, which happened to be the first time i used silicone so it was also a bit of a test. hard to screw up though so it came out perfectly.

Polyurethane casts came out awesomely as well, also the first time i had used polyurethane liquid plastics.

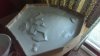
At this point the base shape was looking nice and smooth with a layer of primer to highlight any imperfections.

First is my Skyward Sword flavor Hylian Shield:
A great thing about this project is there is this nice definitive easy image to pull all info from. The depth of the convex form was a little harder but with a little 'research' playing the game and a mock-up in Maya i got the measurements.
In hindsight i way over complicated this MDF/Styrofoam layer system.
The upside of it being that when i sanded down it was easy to tell where i needed to stop.
Fill, Sand, Repeat.
Fill, Sand, Repeat.
I wanted a nice tapered Triforce so with some more foam and filler i made a single prototype.
From this i made a silicone block mold, which happened to be the first time i used silicone so it was also a bit of a test. hard to screw up though so it came out perfectly.
Polyurethane casts came out awesomely as well, also the first time i had used polyurethane liquid plastics.
At this point the base shape was looking nice and smooth with a layer of primer to highlight any imperfections.