Heroic Hardware Saber Build

image.jpg
image.jpg
image.jpg
image.jpg

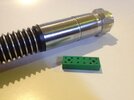
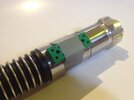
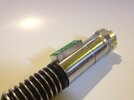
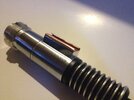
From the top: Neck and wind vane painted, with the emitter of PVC, CPVC, and a fender washer. Next: The emitter and windvane with HVAC tape attached. After that: The rings with HVAC tape applied. And finally: The nipple detail.

Now what's left is probably the most difficult details, the pommel and activation box. I have an idea for the activation box, but I'm having trouble sourcing some copper sheet. We'll see...
 
Last edited:
This looks spectacular.

One question I have - What did you do to seal off the top of the corrugated hose? I know the neck is there, but they are different diameters by a lot!

If it helps, the real prop had brass rails, and you can cut up some 1/8 square brass channel,

I think there is british right angle 1/8 that looks better than the US version, ours is rounded on the corner, which is why I cut up square stock.

Here's my cast, 3rd gen, and sadly a recast but I cleaned it up
TomROTJProjects.jpg
 
Normally I would use epoxy putty to seal the top of the corrugated hose and establish the proper angle. In this case, it's just the end of the hose and the interior PVC support that's visible. On the this rare occasion it worked out surprisingly well.
 
But what to do for the arrows? I could fabricate the from from plastic, but they're so small and gluing them on would be a hassle. Then I considered some sort of sticker.
image.jpg

Duh! Though they were surprisingly difficult to find. I went to three different stores before finding them!
image.jpg

The current version and an abandoned earlier attempt. Note the Lego activation box.
 
I was pondering how to fabricate the cicuit card holder on the activation box. Then I remembered the Kobalt clip stand in I'd fashioned earlier.
image.jpg

It's basically a C-channel made from aluminum sheet. The dimensions will be different and I'll be using copper sheet, but it's the same skill set.
 
Last edited:
Impressive work Tan Djarka !
It's a real challenge to make a fully handmade lightsaber with junk parts.
I have admired your work for many years now and the visual result of your work is getting better and better.
What technique do you use to form the c-channel ?
 
I remember I used to use aluminum flashing and bend peices individually to make the channel for the clamp card. I would then glue the peices to square rod that was about 1/4 inch to simulate the sidebars on the graflex.
 
I fabricated the C-channel with a hammer and hand seaming tool (typically used for HVAC duct work, I think). It's what I also use for Graflex style clamps.
 
image.jpg
The pommel and PVC ring the cubes will be cut from, one side beveled.
image.jpg
The cubes.
image.jpg

The completed pommel. Next to all the HVAC tape, the aluminum looks out of place.
image.jpg

Going chrome for the elite edition look.
 
image.jpeg
image.jpeg
image.jpeg
image.jpeg

The bends on the copper bit ended up a little wonky, so I'll redo it
 

Attachments

  • image.jpeg
    image.jpeg
    1.7 MB · Views: 64
  • image.jpeg
    image.jpeg
    1.6 MB · Views: 58
  • image.jpeg
    image.jpeg
    1.8 MB · Views: 56
  • image.jpeg
    image.jpeg
    1.8 MB · Views: 69

Your message may be considered spam for the following reasons:

If you wish to reply despite these issues, check the box below before replying.
Be aware that malicious compliance may result in more severe penalties.
Back
Top