Help me to learn more better good soldering...and english

Maelstrom

Sr Member
Why can I never get the solder to go where I want? Why does it always stay on the tip of my soldering iron?

Can someone out there point me in the right direction? Some tips? Some online videos?

I'm the kinda guy that can usually figure something out on my own with enough thought, but every once in a while something just digs in and I get frustrated. You should have seen me trying to the feel for the Space Jump on Super Metroid.

If someone shows me how to do something I've learned it for life so any online vids would be awesome!

Thanks peoples:thumbsup
 
There are several types of solder and they can melt at different temperatures, likewise with soldering irons. Check to see if your soldering iron gets hot enough to melt the solder you're using. Silver solder needs a high temperature to melt.

Flux helps solder flow to the areas you want.

What are you trying to solder? Electronics? Brass? Copper? Copper pipes?

The tip of your soldering iron needs to be clean and tinned.


Why can I never get the solder to go where I want? Why does it always stay on the tip of my soldering iron?

Can someone out there point me in the right direction? Some tips? Some online videos?

I'm the kinda guy that can usually figure something out on my own with enough thought, but every once in a while something just digs in and I get frustrated. You should have seen me trying to the feel for the Space Jump on Super Metroid.

If someone shows me how to do something I've learned it for life so any online vids would be awesome!

Thanks peoples:thumbsup
 
You apply solder to the part(s) you are soldering not the tip of the iron beyond tinning that iron that is... The irons job is to heat the part you are soldering so it can melt the solder, not to melt the solder directly...

Flux and practice is your friend...

Read this website, it's a decent overview...
 
Soldering small electronics such as leds and what not.

Exoray is there a link in your post I'm missing or did you mean the rpf?

I've read about the heating of the component that your soldering I guess I just always assumed that on a LED for example I would damage the part before it got hot enough to melt the solder.
 
You apply solder to the part(s) you are soldering not the tip of the iron beyond tinning that iron that is... The irons job is to heat the part you are soldering so it can melt the solder, not to melt the solder directly.

Correct, you should never attempt to apply solder to the tip of the soldering iron and THEN to your parts. Apply a small amount of solder to the tip of the soldering iron which is to ensure good thermal conductivity only.

Another tip is clean, clean, clean... Flux is used to help solder flow and to clean the contacts of the pieces to be soldered but it never hurts to clean the surfaces to be soldered before even starting. Use a quality isopropyl alcohol (Caution: Highly flamable so ensure the surfaces are dry before soldering and keep away from open flame).

You can also make things a bit more simple by using Solder Paste which is powdered solder in a flux carrier and can be dispensed via a syringe. It's normally used for soldering surface mount microcircuits. It's nice in that you can be more precise in where you apply the flux/solder.

Lastly, practice before working on something you can't replace. Practice gives you a chance to get your procedures down pat and to get the temperature of your soldering iron right. Too much heat destroys components, circuit boards, pads/eyelets and breaks down the solder making a weak joint. Too cold and your solder won't melt or you wind up with cold joints that are weak or will result in intermittent/random operation of the circuit.
 
Last edited:
You apply solder to the part(s) you are soldering not the tip of the iron beyond tinning that iron that is... The irons job is to heat the part you are soldering so it can melt the solder, not to melt the solder directly...

Flux and practice is your friend...

Listen to Exoray!! He's a Master at Soldering!!!

FB
 
I can't add much to what's already been said, but I LOVE the title to this thread! :lol:lol:lol
 
Okay...after some study on the provided links (thanks everybody!!!!) I think I can get this done.

Now...the next question which hopefully I can get answered in this thread w/o having to clutter the boards with a new one.

Whole reason I really started this was from getting one of jmtwos Iron-Man "paper-weights" from his JY thread.

I'm looking at using about eight LEDs and would like to power from a 9 volt battery. The 9 volt by itself wiring in series will power 3 of them so I assume that I will have to wire parallel.

Now if wiring parallel should I use 2 AAs providing total of 3 volts instead?

If I'm looking at it right wiring in parallel using 9 volts with a 33 ohm resistor should work, correct?

Please be gentle answering...take it easy on a newb. J/K everybodys been a great help to me in this thread so if I can get just a little more help you would all be #1 A-OK Joe's in my book!:thumbsup
 
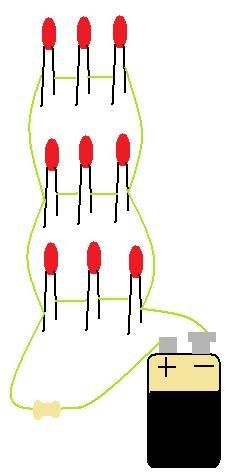
How about using nine LEDs and building three sets, each with three LEDs in series. These three sets would be connected in parallel. As for the resistor, I'd go a bit higher, maybe somewhere in the 50-100 ohm range depending on the specs for the LEDs you're using.
 
So...once again forgive my ignorance but would the wiring in your scenario look (just for simplification sake) something like this?

ledseriesparallel.jpg


Bow down to my mad Paint Skillz!!:lol
 
Last edited:
i used to build printed circut boards on a previous job. so i would say im pretty handy with an iron.

a bit of advice not listed above would be to use a hot iron (not trying to be funny), hotter it is the easier it is. a lot of cheap low power irons are useless.

place the tip of the iron on the job first to put some heat onto it then add the solder, i only use solder that has flux inside it.

if you are soldering 2 parts together then it is best to "tin" these before you join them. you basically melt solder on to both parts then when you put them together with the iron the pre tinned parts melt together.

-z
 
Last edited by a moderator:
I'd like to add a bit of soldering advice, which might help out a lot of folks. I've been messing about with electronics since I was a kid (so long ago, Radio Shack still sold radio components), and have run my own plumbing/HVAC business for years- a lot of soldering and brazing of all types.

If you are doing electronics, avoid using the solder pastes- MOST of them are an acid base, and while your soldering will go real nice with them, it will eat your electronics for breakfast. For electronics, look for a Resin Core solder- this has a safe-for-electronics flux inside the solder, in the amount you need, all nice and neat. Acid core solder, or using the solid solder and a paste flux, is better for something you're going to be flushing out, like a water line- if left on the joint, it will eat copper pipe just as bad as it would wire leads.

Doing a LOT of heating system repairs over the years, I've always kept both resin core solder and an iron in my tool box, so I could repair the occasional control box connection that had burned a component, or blown a trace, saving hundreds of dollars and a lot of time, but I always kept that stuff in an entirely separate tool box than what I kept my pipe soldering equipment in.
Keeps the help from mixing things up!
 
Back
Top