Hawkeye (Age of Ultron) - Duster/Vest - WIP

andveryginger

Well-Known Member
RPF PREMIUM MEMBER
So while Tasha is getting a fully new suit, it looks like Hawkeye is just... freshening his up a bit with a new duster, undershirt, and a few new toys:

AoU_HE_set_rs.jpg AoU_HE_sans_vest.jpg

Because I had too much time on my hands immediately following DragonCon, I started collecting reference images in October of last year. Doing so showed me a few changes to his previous-issue equipment.

The quiver has had a bit of a redesign, as have his boots, doing away with the zipper up the back:

AoU_HE_boots_quiver.jpg


Other images also show what looks like a holster for additional arrowheads attached to each boot. I've yet to find a good, clear image of those, however.

His pants also appear to be made from a different material -- not as much texture, more of a matte/leather look.

As far as construction goes, I still consider myself intermediate, and attempts to fully draft my own patterns have given me mixed results; I've had much better success modifying patterns for use. For the duster/vest, I started looking around and found a possibility in another fandom: Simplicity 5386.

5386line_rs.jpg

With a little adjustment, moving some seams, changing the shape of the collar, etc., I was able to come up with something a little closer to what I was seeing in the pics:

colored_5386line_rs.jpg

And then I came across this screen cap while I was browsing today:

avengers-age-of-ultron-hawkeye_neckline_back.jpg

::headdesk:: This neckline only reaffirms my love/hate feelings toward professional costume designers. Needless to say, I'm working on some new sketches for the vest. In the interim, I started messing around with the undershirt pattern, based off of Kwik Sew 3817:

AoU_HE_baselayer_3817_rs.jpg

The one thing about the neckline image is that it showed me there were two strips of trim on the shoulder, so I've incorporated that into the sketches and modifications; the arm and wrist guards will be added later, as an additional layer. Given that I'm working this a bit in advance, I know it won't be 100% screen accurate, but it'll be as close as the reference images allow.

For the base layer, I searched high and low for a nice, textured maroon and found nothing I was willing to work with. In the end, I found a "high performance spandex" in maroon from Spandex World that has a good weight to it and matches the cordura as well as anything else. For the vest, I chose the "Port"-colored 1000D cordura from Rocky Woods, layering it with some yardage from my own Black Widow stash -- the textures are very similar, and doing so brings a bit of cohesion to the pair. I'll use a tailoring fusible to give the spandex more body and heft against the cordura.

fabric_pron_rs_adj.jpg

(Apologies for the mediocre picture. The Olfa mat always does weird things to my camera's color perception. It does, at least, show the close coordination between the spandex and the cordura!)

And all of this because I refuse to do too much on my own until I tone back up and lose some of my insulation! DH and I are hoping for a dry run at ComicPalooza in May, but we'll see. Engineering Tasha's suit is going to be an undertaking on its own... even with the oddball collar, this will be easy by comparison.

I think.
 
Off to a great start! That Simplicity pattern is a very good base. I use it for a lot of things. Another really good one is McCalls 4546 (if you can get your hands on it - I think it's out of print and can be tricky to find).

Looking forward to more...

Cheers!
 
...and they just confirmed Renner for ComicPalooza in Houston, over Memorial Day weekend.

Guess that means I gotta get my @#$% together.

::headdesk::
 
Apologies for the long absence... real life has been a bit of a bear lately. Finally able to focus back on the fun stuff!

To answer your question, widescreen, I am essentially making a long sleeve compression top, basing it off the Kwik Sew pattern I showed above. The color was too specific and there were too many details I wanted to include, so pulling an off-the-rack design wasn't really an option.

Patterning out the vest took about two days with the Simplicity pattern as a base. I threw together a quick muslin and, using Sharpies and some art tape, drew lines all over it:

lines_wip.jpg

It actually needed more modification than I first thought, as the front panel seam wasn't quite where I'd pictured it. Still worked out okay, though. By the end of last week, I managed to finish the alterations to the undershirt pattern and piece together the duster pattern, too:

patterns_wip.jpg

We've now entered the phase where I'm shopping around for boots. DH isn't too enthused about spending good money on them, but, for me, shoes are the second most important thing about a costume -- especially at DragonCon. So we'll see what we end up with. I could find a decent, relatively inexpensive choice, were it not for the fact the man wears a 12 - 13.

More later, once I've finished patterning out Tasha's suit...
 
Just a quickie update, adding a reference pic others might find interesting.

AoU_shot_reference.jpg

Currently sitting here with the pattern pieces, trying to work out order of operations... and trying not to let that angled side seam I see in this image force me into redoing the front and side panels. For the fourth time.

There are some days when being a perfectionist is not a good thing!
 
Real life keeps rearing its ugly head, and keeps drawing me out of the sewing room. Augh!

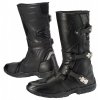
We found a pair of boots -- Cortech Accelerator XC. They're not completely screen accurate, of course, but given our time constraints, I felt they were a decent enough option. I ordered the 12.5 and the 13 for DH; he ended up choosing the 12.5. Even better, he says that they're pretty comfy. We're working RTX this weekend, and he's going to wear them for a short shift or two, starting to break them in and see how they do.

cortech_accelerator_xc_boots_black_zoom.jpg

On construction, I'm definitely going slower than I'd like, given all the @#$% going on offline. Still, I managed to get a few things done today.

Since I'm using the same spandex for the overlay panels as I'm using for my Black Widow suit, I'm lining the pieces with interfacing. This serves two purposes: radically reducing the amount of stretch, and giving me an edge that, when folded and top stitched, will provide the same visual interest as having the edges finished with a tape of some kind, as I never found anything I liked well enough. So today was spent cutting and fusing interfacing.

And, as an aside, if you can afford it (financially or time-wise), skip the Pellon stuff at the local fabric store. Thanks to a tip some time ago from the lovely folks over at Williams Studio, I found the gorgeous stuff over at Fashion Sewing Supply. I've been using the ProSHEER Elegance Medium. It stabilizes the fabric well without changing the hand too much. And, unlike the Pellon stuff, it comes in 60" widths. Very handy!

Once that was done, I started construction of the duster panels. Because I've made so many alterations to the pattern, the old directions don't apply. The first steps in the new process include adding the zipper pocket overlay and installing the zippered pocket... Let us just say that installing a zippered pocket in cordura is not the highlight of my century. It's fussy and doesn't like to crease (heat is sooo my friend -- just have to keep from burning the fingers!), and finding a fabric out of my stash appropriate to use to turn the pocket proved futile. I'm still using what I have, but it's certainly ramped up the difficulty level.

In the end, I got one pocket done before it got late and I had to call it a night:

zippered_pocket_wip_rs.jpg

It's a bit off center, and the opening ended up larger than necessary, but considering this is only the second time I've attempted this, I'm okay with it. The front panel overlay will lap over it slightly, once all is said and done, too. This will cover the zigzag edge; to the right, that edge will be caught in the side front seam.

I'm hoping to get the other pocket done tomorrow, and go on to the next step -- getting the edges finished on the front panel overlays and adding them to the mix. All the details and half-steps in construction mean slow and steady will have to win the race. I'm hoping to get Clint done early next week so I can turn my attention over to Tasha and all my props!
 
It's been a busy weekend at Casa Ginger -- or rather, outside of Casa Ginger: DH and I travelled to Austin to work Rooster Teeth Expo (RTX). It was a blast and, while I didn't get to see much beyond the exhibitors' space, the attendees were pretty awesome. And so was the update of Descent folks are working on and the new Rainbow Six: Siege.

To make up for a little of my lost time, I've been busting my ***** in the sewing room, trying to get Hawkeye close enough to finished so I can switch over to Widow.

I'll apologize in advance for the moderately crappy (or wholly crappy) cell phone pics, but the good camera has gone AWOL for the moment.

front_wip_rs.jpgfront_close_wip_rs.jpg

Some of the visual oddness here is because the dressform is turned away slightly, but the front panels ended up a bit off. Unfortunately, I can't fix it without taking the whole thing apart. So -- lesson learned: Check alignment before proceeding to application of shoulder overlays. Still, looks halfway decent for what's going to end up being a quasi-speedy build.

back_fuzzy_wip_rs.jpggodet_wip_rs.jpg

The back vent overlay needs to be pressed again, but turned out okay. The material I wanted to use for the godet is a textured lycra from Rose City Textiles (Fabricline) that is barely opaque. It does not, however, come in black; because of the high nylon and lycra content, it also wouldn't dye well. The available "obsidian navy" had a bit too much blue in it, so I opted for the gray. I haven't been able to get the top stitching around it quite as neat as I would have liked, despite tracing my stitching lines and despite taking my time. I should have stabilized the overlay material a little better, which could have helped quite a bit.

Getting the shoulder overlays on was quite a PITA. Because of the cordura, I'm using my 30+ year old Kenmore for the job. She's done beautifully, but maneuvering the bulk of the cordura as I needed to, to top stitch the overlays was a nightmare. I need more practice and a long arm machine, if I ever attempt this again. Even my Abigail Whistler jacket wasn't this unruly under the needle!

So now all that remains is to attach the collar; stitch up the side seams; and finish the arms and hem. I've patterned out the armguards to my own specs. They seem fairly straightforward (hahahahaha), and so I'm hoping to get DH to paint the hardware (could only find the right stuff in plastic, ergo, a coat of silver is needed), while I switch gears for a bit.

Hoping to start cutting on Widow tomorrow. I still have some EL wire to set up, too.
 
Last edited:
andveryginger, really enjoying your thread - you work a lot like I do :) I also have issues with top stitching and what's really helped me in that regard is what's called a "stitch in the ditch" foot. They're made for quilters (hence the name) but that guide is not only helpful down a seam line, but for following a chalk line.

1396462982974-2031707110.jpeg

I got mine on eBay for only a few $.

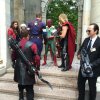
I will also be seeing Renner - at Wizard World Chicago - so I'm busy doing repairs to my Fem!Hawkeye vest and getting my quiver build in shape for 8/22.

1396462982974-2031707110.jpeg
 
Last edited by a moderator:
Lunaris -- yes, they do work brilliantly! I have one for my newer, computerized machine. Unfortunately, that one doesn't work on the old, heavy duty Kenmore I'm using. Going to have to rectify that soon, but couldn't get one here soon enough. The zipper foot worked fairly well for stitching in the ditch on the collar, though. =D

I was incredibly bummed that we ended up missing him at his ComicPalooza appearance. The schedule said he'd be there until 4:45. When we arrived at 4:30, we were told he was already gone. DH was looking forward to getting his bow signed... maybe, if he's in Atlanta filming, he could sneak over to DragonCon? Wishful thinking, I'm sure, but it'd be a nice bonus!

Going to have a bit of hand-finishing to do to the duster -- my inexperience in construction order left me a few issues to deal with that didn't crop up until I was in the finishing stages. Chalking it up to needing more practice and moving on...
 
The Renner WWC appearance is ticketed (v. expensively) for both photos and autographs, so I'm assuming it will be less of a crap shoot. It better be, or I'm out a couple hundred bucks! (plus con ticket, plus hotel...)

I envy you your old Kennmore. My mom had one of those big, heavy steel beasts and that's where I learned to sew. I'd swear I'd trade my fancy computerized machine for it in a heartbeat!
 
Yeah, his auto wasn't cheap at CP, either, especially being the first con he'd ever done. We were willing to suck it up for the bow, though. They ticketed it, but I can only assume that they worked through the tickets earlier than planned. I was working the con, and had to make arrangements to duck over to get the auto, planning to buy a ticket there. Ah well... live and learn!

Got the collar finished; drafted facings for the arms, cutting them from the same fabric I used to line the collar and front panels; and then got the arms finished. All I lack on the duster now is to slip stitch the front panels to the pocket overlay and to hem it. Slip stitching I'll do this weekend; the hem, I'm not sure. Probably tomorrow. I've already patterned out the arm guards, so I'll cut those while I cut Widow tomorrow, since some of the layers are out of the same fabric.

Now if I could remember to eat while I'm working, that would be a good thing... ;)

EDIT: Oh, and the Kenmore is what I learned to sew on, too -- it belonged to my mother. She inherited my great-grandmother's sewing machine, so I got her old one. I used it for my first couple of projects, and then got a refurbished Brother NX-450. That was over five years ago. The Brother has been fussy lately, and I'm not sure how well it would have handled all the layers of cordura, so I opted to dust off the Kenmore. Had to re-learn how to use the thing!
 
Last edited:
Just a small update today -- DH has to paint some of his buckles and reducers before I can finish the arm guards.

Altering things up a bit due to personal preference, we've broken down the arm guards into two sections -- upper and lower. I finished the lower portions today:

lower_armguards_rs.jpg

I'm not entirely thrilled with them (the flaws are screaming at me, even now), and there are definitely some lessons learned to take with me on the next pair, but they're done. For now. And there will be a next pair. When I'm not leaving for DragonCon in less than three weeks, and I when I don't need to start sewing my own costume. Or prep a couple of props.

I'm so in need of a TARDIS... But I'm not in panic mode yet. That will be in about ten days, regardless of how far I've gotten. =D
 
image.jpgimage.jpgimage.jpgimage.jpgimage.jpgAmazing and awesome work. My friend and I completed my just before Dragon con. Here is a couple of pics. It was a pain but it even has the zipper in the back. I wish I could have more time for the AOU quiver and to get the strap figured out so it wasn't exposed but I didn't have enough time. Barely got it finished.
Your build is coming along fantastic. Cant wait to see yours finished.
 
This thread is more than 8 years old.

Your message may be considered spam for the following reasons:

  1. This thread hasn't been active in some time. A new post in this thread might not contribute constructively to this discussion after so long.
If you wish to reply despite these issues, check the box below before replying.
Be aware that malicious compliance may result in more severe penalties.
Back
Top