Han Solo ANH DL44 Blaster from a Blaster Factory all-steel kit

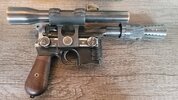
Depends on the parts; some parts are rust blued (Magazine Door, Upper Frame, Upper End Cap, Bull Barrel, Flash Hider, Scope & Mount) some are flame blued (Bolt Stop, Extractor, Lock Frame Stop, Safety, Sight Button, Sight Slide, Trigger) some are left on bare steel (Bolt, Hammer, Lock Frame, Sight Leaf & internals) and some other parts are painted black so no bluing (Lower Frame, Scope Mount Brackets & Thumbwheels)

For the rust bluing I used Brownells Oxpho-Blue, the creme version. Super easy to use (goes on with a rag) blues extra fast at room temperature, and if the color isn't correct you just apply some again. Works great on large surfaces, too. Just wear some gloves because it's super corrosive.

For the flame bluing the "correct" method is by heating the part with a torch to the temperature of the color you want: Tool Steel Temperature Color Chart | Nancy L T Hamilton

It can be tricky (to say the least) especially if you heat the part too much, too little, or unevenly, messing up the color. I really didn't want to mess up with a torch (inside the house, in winter) so I just stuck the parts in my oven, after making sure that it could go up to the needed temperature (550F, which is the color you want) It's super easy and comes out perfect and even. You can then cool the part in oil or water.
 
I just used Birchwood Super Blue for the steel parts on mine and it worked great. My only suggestion would be adhere to the procedure. Clean the parts with acetone, apply the blue, oil, let sit for a day or two. Reapply if you want it darker. I then clear-coated it when I was ready to, usually after the distressing I wanted. It might seem intimidating if it's your first time but it's easy.

I tried to take a shortcut the first time I tried bluing everything and it was a big mistake. I thought I'd ruined it. So just watch a video or two and stick with it.

Which reminds me, just keep it clean until you blue. I know you're going to want to handle it and do all kinds of test fittings and clean-up so consider wearing gloves when you do. If not, you're going to wake up one morning and it's going to be rusted as all hell and you will freak out. So just save yourself the extra cleaning work and stress.

The joys of working with steel!
 
Last edited:
One more thing, my only criticism of the kit is the springs--at least in my set--are very weak. If you want the kind of action you are imagining, consider swapping the springs for stronger versions. Just take measurements when you get it and order what you need.

I didn't think of it until I lost the spring for the sight and had to replace it. It was floppy with the weaker spring but perfect once I installed the replacement. I wished I'd known. The assembly is pretty well jammed in at this point so I can't take it apart to replace the trigger spring or anything else so just think about it
 
Thanks for the tip on the springs! I have use super blue before, it is pretty easy (used it on a real fire arm).

I am going to try rust bluing this time around.

Thanks
 
Very valid criticism on the springs. Mine are also very weak. I just stretched the sight spring to compensate after trying it out but I would've done it with all the internals knowing what I know now. The only spring that is strong enough is the long one in the bolt.
 
Last edited:
I just got the steel version. I have few questions.
1. What parts did you deburr and what did you use to do so?
2. Did you sand all the parts to make smooth and get rid of any machine marks, espically the squares on the lower frame? What did you use to sand them down? Different grades of sand paper and buffing wheel?
3. Did you treat all the steel before painting or bluing so it will not rust? Or did you just treat the parts that are not painted or blued? And if you did you use something to treat, what did you use?

Sorry I am new to all this and hoping to get as much info before I start. I am sure I will have more questions but I think these are good start.

Thank you!
 
InTheZone, Hi.

1. just run your finger over all edges, you will feel which ones need deburring. they will feel sharp and or jagged. a lot of the critical edges (like in the action) are already machined smooth.
2. Its pretty smooth already, so no, I only polished some items. And yes, if you want to sand some surfaces, you would have to use progressively finer sandpaper, but start pretty high and see what it does. even 220 would wreck a steel surface that fairly smooth already. I left the machine marks in the boxes as seen. FieldMarshal actually added those to look more like a turn of the century machined part, as the real Mauser is.
3. No need to treat the steel before finishing. If it sits a while, it MAY develop some surface rust, but that hasn’t happed to me yet.

Mine is still a work in progress. I just finished stamping the serial number and foundry marks. I plan on posting some pictures when mine is done.
 
Last edited:
InTheZone, Hi.

1. just run your finger over all edges, you will feel which ones need deburring. they will feel sharp and or jagged. a lot of the critical edges (like in the action) are already machined smooth.
2. Its pretty smooth already, so no, I only polished some items. And yes, if you want to sand some surfaces, you would have to use progressively finer sandpaper, but start pretty high and see what it does. even 220 would wreck a steel surface that fairly smooth already. I left the machine marks in the boxes as seen. FieldMarshal actually added those to look more like a turn of the century machined part, as the real Mauser is.
3. No need to treat the steel before finishing. If it sits a while, it MAY develop some surface rust, but that hasn’t happed to me yet.

Mine is still a work in progress. I just finished stamping the serial number and foundry marks. I plan on posting some pictures when mine is done.
Awesome! As for the deburring, did you just use high grade sandpaper on the the edges or something else?
Also, for the bluing you did in the oven at 550, how long do you recommend that the parts should be in there? And did you cover the parts or just lay in a backing sheet uncovered?
 
I used a pretty fine files (flat and triangle) to smooth things out. A lot of edges inside the lower frame needed work.

I also recommend assembling the action and testing it. My bolt did not even come close to fitting. I ended up filing both sides myself and now it works and looks great. Took about 2 hours with my fine flat file. Contacted blasterfactory, and never heard anything.
 
Awesome! As for the deburring, did you just use high grade sandpaper on the the edges or something else?
Also, for the bluing you did in the oven at 550, how long do you recommend that the parts should be in there? And did you cover the parts or just lay in a backing sheet uncovered?
Oh - I forgot to mention about the bluing. It depends on what kind you have. Birchwood Casey Super Blue is the easiest. It’s applied at room temp (cold blue).

I bought a rust bluing kit. Still haven’t used it, but you heat the part to 150-200 d, then apply the solution and boil it. card it down and it ends up looking like a vintage blue.
 
I used a pretty fine files (flat and triangle) to smooth things out. A lot of edges inside the lower frame needed work.

I also recommend assembling the action and testing it. My bolt did not even come close to fitting. I ended up filing both sides myself and now it works and looks great. Took about 2 hours with my fine flat file. Contacted blasterfactory, and never heard anything.
Do you recommend get stronger springs before I assemble anything? And where should I get stronger springs? If I buy them online how do I know if the are stronger?
 
Do you recommend get stronger springs before I assemble anything? And where should I get stronger springs? If I buy them online how do I know if the are stronger?
I bought a pack of springs from home depot. There was alot of them. I picked out 2 and just doubled up the main long spring and the one under the sear. The leaf sight springs were too small.

If you want to order springs, they are sized by diameter, length and wire thickness. So the thicker the wire diameter the stiffer the spring will be. Get some calipers and measure them.
 
when I put the small copper end of the scope together, I put the lens into the bigger copper end then add the smaller copper ring behind the lens inside the bigger ring. But as soon as I turn the ring the lens and smaller ring just fall out.
Can you suggest what I should do to keep the ring and lens from falling out?
20230511_091619.jpg
 
when I put the small copper end of the scope together, I put the lens into the bigger copper end then add the smaller copper ring behind the lens inside the bigger ring. But as soon as I turn the ring the lens and smaller ring just fall out.
Can you suggest what I should do to keep the ring and lens from falling out?
Had time tonight.

Mine does this as well. Mine will actually stay put enough, but rattle. If I push on it, it will fall in. I plan on putting some flexible glue where the 2 brass rings meet.
 

Your message may be considered spam for the following reasons:

If you wish to reply despite these issues, check the box below before replying.
Be aware that malicious compliance may result in more severe penalties.
Back
Top