Grizzly H8226 Paint Pot conversion

Bigturc

Sr Member
Hey guys,
Following Robn1's excellent conversion thread, I hunted down a 5 gallons paint for the modest sum of 117$ canadian.
Here's my own conversion thread!

Here's a link to the Grizzly H63329 2.5 gallon conversion thread:
http://www.therpf.com/f9/pressure-casting-grizzly-paint-pot-conversion-184777/

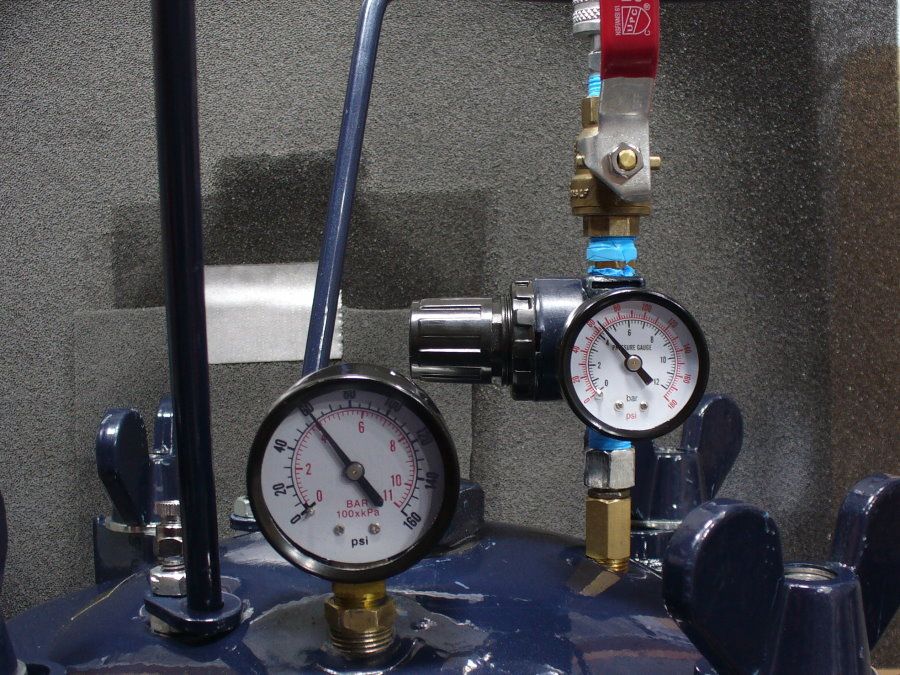
Here's the tank when it arrived
image1.jpeg image2.jpeg image3.jpeg

Center mixer detached. You basically just unscrew the big bolt from under.
image4.jpeg image5.jpeg

Paint syphon removed. Remove the valve first to get it out of the way, then the top bolt, then the bottom rod.
image7.jpeg image8.jpeg

Bought a 1/2" plumber plug for about 2$ and screw it in with teflon tape.
IMG_1060.JPG image9.jpeg

Next step is to close that center hole. I couldn't find anything at the store and they suggested going to a specialized place to get bigger bolts and seal. I'll update later!
 
Excellent, I'll be watching to see how it works. It looks like the threaded hole in the center of the lid is the same as mine, but the hand mixer on mine had the large bolt with a hole, much easier to plug.
 
Well, your thread got me going into this one robn1! Yeah, your center plug was much easier to do then mine here .. I'll see what I can do this week! Rocketeer has the same problem so I'll see if he comes up with something on his side too!
 
OK i have mine too, but I left the valve on the Paint Outlet..so I can release air with it. :) not sure where else you want to do that?

The center hole..which is not threaded by the way :( I used a big bolt, a couple washers and some rubber I cut into seals..tightened it right up..sealed it all up with some JB weld so thats never coming out... and walla its alive :) I bought the biggest bolt I could find..which could be bigger but it works, and it was about $4 worth of material. Once I move I will post pics, as the pot is now in a box and ready to get moved to the new shop
.
 
Really curious to see that bolt Curtis, I couldn't find anything that would work yet!
What store did you buy it, and was it in the plumber or hardware section?
 
Hey. Sorry been sick for a few days.

I bought the bolt and some washers at Princess Auto. But if your in a bigger city(I'm not) then there is probably a bolt supply place that would have just about any size bolt you need. I took the pot to my new shop. Hopefully the rest of my gear follows this coming week and I can test it out :)
Really curious to see that bolt Curtis, I couldn't find anything that would work yet!
What store did you buy it, and was it in the plumber or hardware section?
 
OK i have mine too, but I left the valve on the Paint Outlet..so I can release air with it. :) not sure where else you want to do that?

The center hole..which is not threaded by the way :( I used a big bolt, a couple washers and some rubber I cut into seals..tightened it right up..sealed it all up with some JB weld so thats never coming out... and walla its alive :) I bought the biggest bolt I could find..which could be bigger but it works, and it was about $4 worth of material. Once I move I will post pics, as the pot is now in a box and ready to get moved to the new shop
.

OK guys,
I reattached the release valve to the pot, so basically, just removed the under lid pipe that was the paint syphon.

I looked at the assembly of the air intake .. and notes on the picture. Basically, I don't see the use of all the hardware there. So we have the air intake from the compressor, that much I get it ...

Air intake valve .. what's the point? To seal the connection even more to prevent leaks?

A .. was going to the central mixer so was probably having the mixer turbine rotate from air pressure? That should probably go and be plugged sealed. The fact that it's a turning nub was probably to control the mixing speed?

B .. why would you need another valve there?

C .. is that supposed to go into another pressure gage? To control the intake pressure? There's already a pressure gage on the lid .. why this one?

D .. again not too sure about it!

What's the suggestions here?
Is it crazy to think that if I kept the air out plug closed, I could put the air release valve where (A) is which was my original idea.
Is it crazy to think that I should remove all that hardware and just have the air intake going straight in the lid nut?

IMG_1075.JPG IMG_1076.JPG
 
I finally figured the center nut .. plumber section, 1" double way nut + 2 caps. Teflon tape and will probably JB weld it too like Curtis did. Unless silicone fits the bill .. but I would probably prefer JB weld.

IMG_1081.JPG
 
My pot just has two ports, this one has a third to supply air pressure for the mixer. You can just plug that one. I added an extra gauge to the outlet port on mine, to show the pressure actually in the pot. The gauge on the regulator shows what the regulator is set to. This way I can check that the incoming pressure is correct before I open the valve to fill the pot.

This shot shows the set up, except I changed the valve to be below the regulator.
P1030673_zpsc14b7e5e.jpg


Actually, looking closer it doesn't appear to have an extra port in the lid. It looks like the chromed adapter attached to the regulator supplies the mixer air, correct? Anyway you can just remove that extra adapter. All you need is the regulator with a ball valve attached.
 
Last edited:
Hi there BT,
Question, I have a similar setup, the thing that's messing me up is the safety valve I think. I need to reach 50 PSI for my resin casts, but the safety valve activates at 45 PSI. and I can't find a standard size plug/cap to cover the safety valve hole. How did you deal with it? Appreciate any suggestions you might have. - Cryper
 
Hey Cryper,
I didn't have to do anything with that safety valve!! I've been pushing the pot just under 50 psi and that valve never opened yet. Gotta admit, I did wonder at what pt it was supposed to open or if it wasn't defective .. but for now, no problem!

Sorry, can't help more! Maybe TheRocketeer can help as he has the same pot as me!
 
I finally figured the center nut .. plumber section, 1" double way nut + 2 caps. Teflon tape and will probably JB weld it too like Curtis did. Unless silicone fits the bill .. but I would probably prefer JB weld.

View attachment 433382
Awesome build!
I was inspired and purchased everything you did!
Quick question (I know this is an old thread so my apologies) Did you end up going with the JB weld? Also did you purchase those rings in the picture
from the home center as well? If so what's the name?

Any answers will be highly appreciated :)
 
Happy to know it was useful!

No, I ended up using silicone and never had problem nor leaks. The biggger left one was from when I removed the mixer, so I reused it, the others, I ended up not using them I think .. they were not a great fit anyway.

Oh and that paint tank is now 300$ on amazon.ca .. I paid 127$ shipped! :)


Did you use teflon tape as well?
Ahh got mine on grizzly for 180 with free shipping :)

I goobered up my silicone gasket and used silicon tape that seems to have worked out well so far lol
knocks on wood
 
Last edited:
Yes of course, teflon tape to seal the bond on the screw and the caps!
I'm pretty sure if was 2" but you should be able to measure that yourself! :)
 
This thread is more than 8 years old.

Your message may be considered spam for the following reasons:

  1. This thread hasn't been active in some time. A new post in this thread might not contribute constructively to this discussion after so long.
If you wish to reply despite these issues, check the box below before replying.
Be aware that malicious compliance may result in more severe penalties.
Back
Top