You are using an out of date browser. It may not display this or other websites correctly.
You should upgrade or use an alternative browser.
You should upgrade or use an alternative browser.
GOTG: My own Star-Lord Build - New Boot Rockets - Post #201
- Thread starter IronManiac
- Start date

IronManiac
Sr Member
Re: GOTG: My own Star-Lord Build
Shoulder to shoulder: about 19-20"
Body length: 23 1/2"
Sleeve length: 25" But there's cuff has a nice fold about a 1 1/2" up that you can fold up into the sleeve and will stay. I'm not a big or tall guy, and folding it up like that is the perfect length for my arms.
Hope that helps! There's more room inside the jacket, but it's doesn't feel like its too big on me. I think if i had gotten a small, the sleeves would have fit tighter, but i might not have been able to zip up the front. It's a nicely made jacket, definitely worth the money.
- - - Updated - - -
Thanks for posting! I think i got a pretty good approximation with what i built out of plumbing bits from Lowes.")
Looks great man! Would you mind taking some measurements off this thing? Like shoulder to shoulder, body length, and sleeve length? Been looking into this jacket and I'm lookin for the correct size for me.
Thanks,
Aeric
Shoulder to shoulder: about 19-20"
Body length: 23 1/2"
Sleeve length: 25" But there's cuff has a nice fold about a 1 1/2" up that you can fold up into the sleeve and will stay. I'm not a big or tall guy, and folding it up like that is the perfect length for my arms.
Hope that helps! There's more room inside the jacket, but it's doesn't feel like its too big on me. I think if i had gotten a small, the sleeves would have fit tighter, but i might not have been able to zip up the front. It's a nicely made jacket, definitely worth the money.
- - - Updated - - -
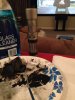
Um, here is a pic of the ankle jets.
I did NOT make this pic. I downloaded it. The metal plate is 3.5 inches long by 2.25 inches tall. The top of the rocket is 1 inch, the bottom is 0.5
I hope this helpsView attachment 342388
Thanks for posting! I think i got a pretty good approximation with what i built out of plumbing bits from Lowes.
IronManiac
Sr Member
Re: GOTG: My own Star-Lord Build
In other news: I ordered some clothes from amazon and they came today. They were ok, but overall not quite good enough, so i'm going to send them back. But i'll tell you guys what i bought and why i'm not keeping them.
Shirt: Amazon.com : ExOfficio Men's Give-N-Go Tee, Charcoal, Medium : Athletic T Shirts : Sports & Outdoors
Pros: A nice athletic shirt, fits nice, not too expensive.
Cons: Wrong color. I was hoping for more of a blue like the photo, but it says charcoal, and that's what it is: dark grey. Also not a long sleeve.
Pants: StoneTouch #A8 Men's Military-Style Cargo Pants 34x32--D.Grey at Amazon Men’s Clothing store
Pros: They have some similar stitching and pocket detailing like the movie pants. Not too expensive.
Cons: Wrong color again. I should have trusted my instinct and got black, these are grey but not really dark grey.
Very baggy. From the screen caps i've seen, Star-Lord's pants are a really good fit. These would need some serious alteration to slim the legs down to a better fit.
Very wrinkly. I would have to iron them alot to look like Star-Lord.
I think I'm leaning toward getting a lighter blue long sleeve tee, just a Hanes or something. I can distress it a bit, grunge it up, and should work. As far as pants...back to hunting for a different pair. :unsure
ItsTheRocketeer
New Member
Re: GOTG: My own Star-Lord Build
I went with this one for my Star Lord shirt Amazon.com: Hanes ComfortSoft Tagless Long-Sleeve T-Shirt. 5586 - Medium - Denim Blue: Clothing.
I went with this one for my Star Lord shirt Amazon.com: Hanes ComfortSoft Tagless Long-Sleeve T-Shirt. 5586 - Medium - Denim Blue: Clothing.
IronManiac
Sr Member
Re: GOTG: My own Star-Lord Build
HA!
Rocketeer, I ordered that exact shirt and color last night. It was my second choice after the one I ended up buying, I should have gone with that one instead. Have you received it yet? How's the color match?
HA!
Rocketeer, I ordered that exact shirt and color last night. It was my second choice after the one I ended up buying, I should have gone with that one instead. Have you received it yet? How's the color match?
Re: GOTG: My own Star-Lord Build
It's in the first post.
It's in the first post.
IronManiac
Sr Member
Re: GOTG: My own Star-Lord Build
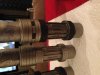
So i did some painting this weekend.

Stainless Steel duplicolor paint. I took a little steel wool to them to buff off any excess paint and smooth them out. Then I moved on to black washing and paint.

Here you can see some progress. I blackwashed the center areas to bring out the horizontal grooves, then blackwashed the area with the vertical details, to make them pop. Finally I added some details with black paint to match the movie prop.


Here's some detail. You can see the difference that black washing made between these two rockets. Also, my paint palette, from tips I got in this thread. http://www.therpf.com/f78/how-weather-helmets-216600/ Sentry02 was a huge help in getting me started on black washing.


Last i painted the center stacks. I took one of my detail files and cut a groove in the center stack to match the detail at the top, then painted them black. Also, I cut the little vent details out of craft foam with an xacto. these will be painted silver and glued to the center stack.
I will post photos of the rockets when they're finished, i'm not done detailing them. I plan on using some rub & buff on them to get a more brushed metallic finish, paint a few more details on, and then attach it all together. Thanks for looking!
So i did some painting this weekend.
Stainless Steel duplicolor paint. I took a little steel wool to them to buff off any excess paint and smooth them out. Then I moved on to black washing and paint.
Here you can see some progress. I blackwashed the center areas to bring out the horizontal grooves, then blackwashed the area with the vertical details, to make them pop. Finally I added some details with black paint to match the movie prop.
Here's some detail. You can see the difference that black washing made between these two rockets. Also, my paint palette, from tips I got in this thread. http://www.therpf.com/f78/how-weather-helmets-216600/ Sentry02 was a huge help in getting me started on black washing.
Last i painted the center stacks. I took one of my detail files and cut a groove in the center stack to match the detail at the top, then painted them black. Also, I cut the little vent details out of craft foam with an xacto. these will be painted silver and glued to the center stack.
I will post photos of the rockets when they're finished, i'm not done detailing them. I plan on using some rub & buff on them to get a more brushed metallic finish, paint a few more details on, and then attach it all together. Thanks for looking!
Attachments
IronManiac
Sr Member
Re: GOTG: My own Star-Lord Build
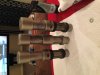
How am I doin?


How am I doin?
ItsTheRocketeer
New Member
Re: GOTG: My own Star-Lord Build
Oh yeah. I got it a few days after I ordered it. It's more on the blue side than blue-gray. I'll post a pic in a bit.
Oh yeah. I got it a few days after I ordered it. It's more on the blue side than blue-gray. I'll post a pic in a bit.
IronManiac
Sr Member
Re: GOTG: My own Star-Lord Build
I got the same shirt. Like you said, it's more blue than blue-grey. I think a few trips through the washing machine with hot water might lighten it up a bit.
I got the same shirt. Like you said, it's more blue than blue-grey. I think a few trips through the washing machine with hot water might lighten it up a bit.
IronManiac
Sr Member
Re: GOTG: My own Star-Lord Build
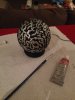
So this was a pretty quick and easy project. The 'Orb'.

You guys are either going to think i'm a cosplay cheater or a genius. While gathering craft supplies at Hobby Lobby, I saw some of these decorative orbs. You might have seen them; fancy housewives will buy a bunch and put them in a bowl on their coffee table. Hobby Lobby had a big selection, most were covered in glass or mirror fragments. This one in particular stood out to me.

See where I'm going? Brought it home and went to work. Here are my supplies: a cheap can of flat black spray paint from my garage, silver rub 'n buff from Hobby Lobby, q-tips from my bathroom, and a small paint brush.

I gave the orb a few coats of the flat black, and let it dry. It was a fast drying spray paint, fully cured in about an hour. Now to add detail. I applied a little rub n buff to the q-tip, and started lightly brushing over the high points of the embossing on the orb. The pattern on the orb was like swirling leaves, so i followed it in some places, and went in other directions to vary up the pattern. I also used the paint brush to make my own lines in places that didn't have any high points. The paintbrush gave me more control over lines, while the q-tip was a less predictible tool that gave good random results. I'm sorry I didn't get pics while i was working, but here's the finished product.


Total time spent: Spray paint: 1hour, Rub n Buff: 20 minutes. I've never worked with Rub n Buff before, so I don't know how well it sticks. In a few days i'll handle the ball, and see if I need to put a clearcoat on it to seal it. Otherwise, i'm REALLY happy with how it turned out, it's not movie accurate with the deep pits, but I think it's definitely a passable cosplay prop. The orb was only $5 bucks, the Rub N Buff was $5, but i'll be using that on my blasters, boot rockets, mask, and belt buckle. Hope you like!
So this was a pretty quick and easy project. The 'Orb'.
You guys are either going to think i'm a cosplay cheater or a genius. While gathering craft supplies at Hobby Lobby, I saw some of these decorative orbs. You might have seen them; fancy housewives will buy a bunch and put them in a bowl on their coffee table. Hobby Lobby had a big selection, most were covered in glass or mirror fragments. This one in particular stood out to me.
See where I'm going? Brought it home and went to work. Here are my supplies: a cheap can of flat black spray paint from my garage, silver rub 'n buff from Hobby Lobby, q-tips from my bathroom, and a small paint brush.
I gave the orb a few coats of the flat black, and let it dry. It was a fast drying spray paint, fully cured in about an hour. Now to add detail. I applied a little rub n buff to the q-tip, and started lightly brushing over the high points of the embossing on the orb. The pattern on the orb was like swirling leaves, so i followed it in some places, and went in other directions to vary up the pattern. I also used the paint brush to make my own lines in places that didn't have any high points. The paintbrush gave me more control over lines, while the q-tip was a less predictible tool that gave good random results. I'm sorry I didn't get pics while i was working, but here's the finished product.
Total time spent: Spray paint: 1hour, Rub n Buff: 20 minutes. I've never worked with Rub n Buff before, so I don't know how well it sticks. In a few days i'll handle the ball, and see if I need to put a clearcoat on it to seal it. Otherwise, i'm REALLY happy with how it turned out, it's not movie accurate with the deep pits, but I think it's definitely a passable cosplay prop. The orb was only $5 bucks, the Rub N Buff was $5, but i'll be using that on my blasters, boot rockets, mask, and belt buckle. Hope you like!
Attachments
IronManiac
Sr Member
Re: GOTG: My own Star-Lord Build

Making progress! The blasters are painted and I just finished assembling one. It's not done yet, but I couldn't wait to show what I've got so far! I'll post a full write up when I finish everything on the blasters.
Making progress! The blasters are painted and I just finished assembling one. It's not done yet, but I couldn't wait to show what I've got so far! I'll post a full write up when I finish everything on the blasters.
ItsTheRocketeer
New Member
Re: GOTG: My own Star-Lord Build
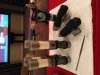
Ugh. I need those rockets!
I just got my Skechers shoes and my friend will be making the spats for me
Ugh. I need those rockets!
I just got my Skechers shoes and my friend will be making the spats for me
IronManiac
Sr Member
Re: GOTG: My own Star-Lord Build
Thanks! I'm pretty happy with how they turned out. I still need to finish a few things before i glue them into place.
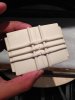
This weekend i did some more detail work on the blasters. They're almost done. While I was waiting for paint to dry on the guns, I took care of another project:

First, I started with this:

I put some parchment paper down to keep everything clean and make it easy to move the sculpt when I was done. First, I rolled a piece out with a dough roller. Using uneven pressure, I was able to leave the clay a little higher in the center, so the face of the buckle would have a nice convex shape. I used a metal ruler with a fine edge to cut the rectangle out. Next, the detailing. Rolling out the lines in clay would have been really difficult. But I found this tool at Hobby Lobby that's like a grown up version of the old Play-Doh shape presses. It's a cylinder with a crank on one end. You put some clay into the cylinder, drop in one of the shape discs included and close off the other end. As you crank the tool, it squeezes the clay out in the shape you want. Really easy to use and produced consistent results.

I cranked out enough to make the details on the belt buckle, and started laying out the design. I used very light finger pressure to get the lines in place so their round shape would be preseved.


Then, using the ruler, I chopped off the excess like a guillotine. I added the small details on the sides, and continued the buckle details over the edge. Finally, i took a tiny file tool and pressed it into the middle to get the center line detail.
Ready to go in the oven! Time to bake!


15 minutes of baking, a few hours to cool and cure, and voila.

It's not a tough as stone, but it's pretty strong. On to paint. A few coats of flat black spray paint and let dry.

And last, some silver Rub N Buff. Using a light touch, I slowly built up the silver. Once I was happy with coverage, I went over it with some #0000 steel wool to scratch and age it a bit. And here's how it turned out.


My plan is to make the belt with a blank metal buckle, and then glue this on top of it. Really satisfied with the results.
Thanks! I'm pretty happy with how they turned out. I still need to finish a few things before i glue them into place.
This weekend i did some more detail work on the blasters. They're almost done. While I was waiting for paint to dry on the guns, I took care of another project:
First, I started with this:
I put some parchment paper down to keep everything clean and make it easy to move the sculpt when I was done. First, I rolled a piece out with a dough roller. Using uneven pressure, I was able to leave the clay a little higher in the center, so the face of the buckle would have a nice convex shape. I used a metal ruler with a fine edge to cut the rectangle out. Next, the detailing. Rolling out the lines in clay would have been really difficult. But I found this tool at Hobby Lobby that's like a grown up version of the old Play-Doh shape presses. It's a cylinder with a crank on one end. You put some clay into the cylinder, drop in one of the shape discs included and close off the other end. As you crank the tool, it squeezes the clay out in the shape you want. Really easy to use and produced consistent results.
I cranked out enough to make the details on the belt buckle, and started laying out the design. I used very light finger pressure to get the lines in place so their round shape would be preseved.
Then, using the ruler, I chopped off the excess like a guillotine. I added the small details on the sides, and continued the buckle details over the edge. Finally, i took a tiny file tool and pressed it into the middle to get the center line detail.
Ready to go in the oven! Time to bake!
15 minutes of baking, a few hours to cool and cure, and voila.
It's not a tough as stone, but it's pretty strong. On to paint. A few coats of flat black spray paint and let dry.
And last, some silver Rub N Buff. Using a light touch, I slowly built up the silver. Once I was happy with coverage, I went over it with some #0000 steel wool to scratch and age it a bit. And here's how it turned out.
My plan is to make the belt with a blank metal buckle, and then glue this on top of it. Really satisfied with the results.
Attachments
Re: GOTG: My own Star-Lord Build
That buckle looks fantastic
That buckle looks fantastic
DTLSchiller
Active Member
Re: GOTG: My own Star-Lord Build
Looks Great!
Looks Great!
IronManiac
Sr Member
Re: GOTG: My own Star-Lord Build
So my blasters are just about done. Here's my build process.
I started by disassembling the blasters. I took alot of reference photos as i broke it down so I could refer back to them when reassembling. This thing has alot of screws holding it together, as well as a complex assembly to work the top and bottom barrels together.


Next up was paint. I pressed the barrel covers back together for paint so they would have a consistent finish across the top. I started with a simple flat black spray paint.


I noticed that the painted texture was a little rough and gritty, which might have been from the air where i painted them. More on that later.
Next up was rub n buff. I masked off the areas that would stay black to keep the rub n buff from going places it shouldnt.


Then using a technique found on youtube, i used an old sock as my brush. I would put a dab of rub n buff on the sock, then rub the sock on a piece of clean wood. This spreads the silver out across the sock surface, so you get a broader brush surface to work with. It also helps avoid putting down a heavy streak of silver, which doesn't really look good. I little bit of rub n buff goes a long way on surfaces, so work slowly and build up to the finish you want.


Silver'd up. Not bad.
Once i got the tape off, i reassembled the guns. However, I wasn't really happy with the black areas. As i said before, they were rough and gritty, probably from particles in the air settling on them while they dried. Since I wanted the black parts to have a sheen like gunmetal, I started by sanding the black areas down with 400 grit sandpaper, just to knock down that gritty surface and get a smoother finish. And while I was at it, i went ahead and sanded the silver areas, as those were rough from the black underneath too.

You can see that sanding the black areas left them looking even more dull and grey. I'll fix that later on.

Here is a before sanding on the right and after sanding on the left.

And here is the difference between a sanded barrel on the bottom, and on top with a new application of rub n buff. It's shinier because the surface was much smoother, but not too shiny...I don't want it to look like chrome. I still wanted a battle-worn look.
Next up, I found some metallic black acryllic paint, which i painted over the black areas to give them a slightly shinier finish. Here's the finished paint work.

But that's not the last step for me. The movie blasters have a cool carbon fiber finish on the handles. The nerf gun comes with a checkerboard texture, but I wanted that extra step of realism. So I bought some of this carbon fiber vinyl from a local pep boys.

I cut a long strip, big enough to wrap around the handles. I worked slowly, using a heatgun to soften and strech the vinyl around the curves. Then I went back with an xacto blade and trimmed it down. Even working slowly, there's no way to get the vinyl to cover 100% with a single pieces, So I went back in a few places, cut a small piece of filler vinyl, and covered spots that weren't covered with the main wrap. It all looks pretty seamless when done.


Much cooler this way. All done!
So my blasters are just about done. Here's my build process.
I started by disassembling the blasters. I took alot of reference photos as i broke it down so I could refer back to them when reassembling. This thing has alot of screws holding it together, as well as a complex assembly to work the top and bottom barrels together.
Next up was paint. I pressed the barrel covers back together for paint so they would have a consistent finish across the top. I started with a simple flat black spray paint.
I noticed that the painted texture was a little rough and gritty, which might have been from the air where i painted them. More on that later.
Next up was rub n buff. I masked off the areas that would stay black to keep the rub n buff from going places it shouldnt.
Then using a technique found on youtube, i used an old sock as my brush. I would put a dab of rub n buff on the sock, then rub the sock on a piece of clean wood. This spreads the silver out across the sock surface, so you get a broader brush surface to work with. It also helps avoid putting down a heavy streak of silver, which doesn't really look good. I little bit of rub n buff goes a long way on surfaces, so work slowly and build up to the finish you want.
Silver'd up. Not bad.
Once i got the tape off, i reassembled the guns. However, I wasn't really happy with the black areas. As i said before, they were rough and gritty, probably from particles in the air settling on them while they dried. Since I wanted the black parts to have a sheen like gunmetal, I started by sanding the black areas down with 400 grit sandpaper, just to knock down that gritty surface and get a smoother finish. And while I was at it, i went ahead and sanded the silver areas, as those were rough from the black underneath too.
You can see that sanding the black areas left them looking even more dull and grey. I'll fix that later on.
Here is a before sanding on the right and after sanding on the left.
And here is the difference between a sanded barrel on the bottom, and on top with a new application of rub n buff. It's shinier because the surface was much smoother, but not too shiny...I don't want it to look like chrome. I still wanted a battle-worn look.
Next up, I found some metallic black acryllic paint, which i painted over the black areas to give them a slightly shinier finish. Here's the finished paint work.
But that's not the last step for me. The movie blasters have a cool carbon fiber finish on the handles. The nerf gun comes with a checkerboard texture, but I wanted that extra step of realism. So I bought some of this carbon fiber vinyl from a local pep boys.
I cut a long strip, big enough to wrap around the handles. I worked slowly, using a heatgun to soften and strech the vinyl around the curves. Then I went back with an xacto blade and trimmed it down. Even working slowly, there's no way to get the vinyl to cover 100% with a single pieces, So I went back in a few places, cut a small piece of filler vinyl, and covered spots that weren't covered with the main wrap. It all looks pretty seamless when done.
Much cooler this way. All done!
Attachments
Similar threads
- Replies
- 7
- Views
- 750
- Replies
- 2
- Views
- 617
- Replies
- 7
- Views
- 366
- Replies
- 2
- Views
- 575