Full size 74-Z Speeder Bike build (ROTJ)

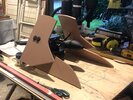
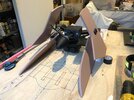
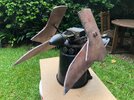
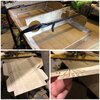
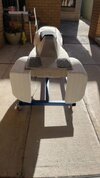
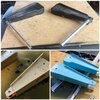
Almost completed the front section. I wanted to get a nice raised edge on the brace/bracket section so i cut the shape from ply wood then edged it with acrylic sheet.

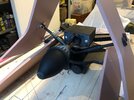
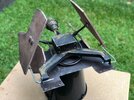
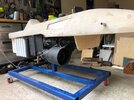
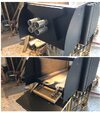
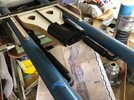
JOB sourced the base colour as being Mocha based on the Bandai kit. At the local paint shop i found out there are about 40 versions of Mocha from the various paint companies, all look quite different. I got a sample pot of one and applied it to the front section with a small roller and sanded between coats. Looks just like it has been sprayed, so pretty happy with that. The final Mocha colour is a bit light but weathering will make it much darker.
 

Attachments

  • edge detail.PNG
    edge detail.PNG
    36.1 KB · Views: 179
  • IMG_9963.jpg
    IMG_9963.jpg
    58 KB · Views: 181
  • IMG_0094.jpg
    IMG_0094.jpg
    290.9 KB · Views: 168
  • IMG_0099.jpg
    IMG_0099.jpg
    582.1 KB · Views: 186
  • IMG_0101.jpg
    IMG_0101.jpg
    712.3 KB · Views: 186
Looks good so far......I've found the trick at the end is how it's mounted to show the 'float' perspective, will be good to see how you nail it....great work...!!
 
A friend of mine in February 2020 at last Tenerife Carnival, Canary Islands, just before the pandemic.
Please, notice the speeder bike was not made with accuracy in mind. Just a way to have fun in the great carnival parade. :lol:

You will notice the main body was made with 4 layered thick pieces of hard foam esculpted.
 

Attachments

  • 20200225_171937.jpg
    20200225_171937.jpg
    2.3 MB · Views: 242
Front section now complete. Base coat of Mocha, black wash. Splatters of black and mud colours then some paint scratches along the edges. Also did a dusting with some hobby weathering powder.
 

Attachments

  • IMG_0507.jpg
    IMG_0507.jpg
    90.4 KB · Views: 166
  • IMG_0501.jpg
    IMG_0501.jpg
    92.2 KB · Views: 163
  • IMG_0499.jpg
    IMG_0499.jpg
    143.1 KB · Views: 164
We got the two sections together with some tricky cutting to match the top and bottom sections together. Some extreme surgery for the under carriage so that it could fit around the frame. The white circle where one of the pipes fits into shows the odd shape i had to cut out. After a full days work the main under carriage was completed and is totally stable with a large adult sitting on it. Tick!

Next stage is to source the poles and make these so that they will slot into place-ie removable for transport.
 

Attachments

  • IMG_0799.jpg
    IMG_0799.jpg
    139.5 KB · Views: 149
  • IMG_0803.jpg
    IMG_0803.jpg
    67.9 KB · Views: 151
  • IMG_0806.jpg
    IMG_0806.jpg
    107 KB · Views: 149
Did some ply wood bending for the front fairing section that sits under the nose. I made a card board template first to get the shape right. This also helped to work out where the bends in the ply sheet needed to be. I cut the shape then cut some grooves 5mm apart so that i could bend the sides. It was still pretty stiff so i left it our in the rain for the night. That did the job nicely so i then glued and nailed it all together keeping the tension there with some straps. This section will need to be strong due to the downward pressure due to the length of the front forks.
 

Attachments

  • IMG_0871.JPG
    IMG_0871.JPG
    1.2 MB · Views: 179
  • bike 03.JPG
    bike 03.JPG
    4.1 MB · Views: 167
Build is progressing well. I finished the back end but still need to add some small greeble details. It was such a wasted space i made the back hinged for storage, maybe for a costume (but not a helmet).

The front fairing took a bit of mucking around (like hours) but got it fixed eventually. This will need to be strong as the downward weight from the front forks will put a lot of pressure in this area.

Jet engine sides were completed by JOB and Wormy and the entire thing has been sent off for a coat of fiberglass.
 

Attachments

  • IMG_0911.jpg
    IMG_0911.jpg
    119.4 KB · Views: 141
  • IMG_1402.jpg
    IMG_1402.jpg
    110.1 KB · Views: 142
  • IMG_1173.JPG
    IMG_1173.JPG
    80.9 KB · Views: 149
Build is progressing well. I finished the back end but still need to add some small greeble details. It was such a wasted space i made the back hinged for storage, maybe for a costume (but not a helmet).

The front fairing took a bit of mucking around (like hours) but got it fixed eventually. This will need to be strong as the downward weight from the front forks will put a lot of pressure in this area.

Jet engine sides were completed by JOB and Wormy and the entire thing has been sent off for a coat of fiberglass.

I LOVE the results so far! Keep up the extraordinary work!
 
Some tricky detailing for the steering cables. This part will need to be strong as it is likely to be constantly bumped so i have decided to make a master then cast it in resin. Looking at the reference photos i think there was a left and right but i will just be making one and flipping it to save some dollars.

1652400354903.jpeg


Back flaps completed with some sheet steel and rubber bumpers for cupboards, the perfect rivet lookalike...

1652400554228.jpeg


Next step is to place the windsurfer masts and size the steering details.....For ease of transport this whole section will slide in and out..just like the old Kenner toy!
1652400636082.jpeg
 
It looks finished in pictures. I'm sure you guys are looking at it under a microscope for every scratch... but it already looks AWESIOME!!
 
So many pieces, all of the pieces. Trying to cram all of this detail in so that we can remove the forks for transport is tacking some thinking. Happy with the side swing arms. Aluminium with a sandwich of plywood and ply wood sides to help with the tapered effect.
 

Attachments

  • IMG_2438.jpg
    IMG_2438.jpg
    102.1 KB · Views: 94
  • IMG_2458.jpg
    IMG_2458.jpg
    111.9 KB · Views: 97
  • IMG_2469.JPG
    IMG_2469.JPG
    172.4 KB · Views: 90
More construction by JR with his leather skill he completed a leather seat which is far better than the wood version i had in my mind. Handlebar greeblies added by JOB and MW. JOB sourced some motorbike hand grips. We think it was a Honda that was originally used but cannot confirm this.
1654040948317.jpeg


1654040967388.jpeg


1654040985938.jpeg


1654041012659.jpeg
 
Making this random bar thing at the back. I guess it is just a big old greeblie at the end of the day-no real purpose. I used solid mild steel bar, some plumbing washers and aluminium tubing.


1654560830164.jpeg


Next is to make strong the weakest point and that is this area where the exhaust tubing comes out near the riders legs. I used some solid wood here screwed into the main body. Vacuum cleaner tube will glue onto this-or may screw as easier to repair than trying to unstick industrial glue.

1654560849233.jpeg

Finally finished this fussy piece on the cabling. Its a section i will probably remake at a later stage as i am not quite happy with it due to the lack of good reference shots.
1654561086647.jpeg


And just a photo of my chaotic work space.
1654561220148.jpeg
 

Your message may be considered spam for the following reasons:

If you wish to reply despite these issues, check the box below before replying.
Be aware that malicious compliance may result in more severe penalties.
Back
Top