Cbstudios
Sr Member
Hey guys,
Finished a new project last week, after binge watching the Nightmare on Elm Street films again. I haven't done a Freddy Glove build from scratch in over ten years, so I really just wanted to challenge myself to doing a difficult build.
Started with the Rough shapes penned out on the copper and brass plates with sharpie. The blades are a set of stainless steel butter knives.


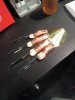
Then, the pieces get bent into shape and i tested the proportions of the cut down blades by taping them on. The yellow glove is just a temporary stand in for the final grey/natural colour glove.


Next up, Solder. The part six has the very distinctive solder spills on the armature, and a really messy job of soldering the blades. Every area that the solder needed to bond to got scuffed up with a dremel, then fluxed and hit with plumbing solder.

The last things to do were rivet the armature together, Then finish up the leather glove. As i said earlier, the yellow glove was simply just the wrong colour, so I got an old cream coloured cowhide glove, and custom built the classic ball and tape wrist closure, then weathered everything up to make everything match the screen used glove.


To finish everything off, here's my family portrait of my Metal Gloves,.
Left to right, Part 1/2 (NECA, Modified), Part 3 (NECA), Part 6 (Unfinished leathers), Vs. (Rubies, heavily modified), Remake (NECA, modified leathers.)

Cheers for looking guys, hope you guys dig it, and any Fred-heads, lemme know what you think,
Stay Heavy ////
Finished a new project last week, after binge watching the Nightmare on Elm Street films again. I haven't done a Freddy Glove build from scratch in over ten years, so I really just wanted to challenge myself to doing a difficult build.
Started with the Rough shapes penned out on the copper and brass plates with sharpie. The blades are a set of stainless steel butter knives.
Then, the pieces get bent into shape and i tested the proportions of the cut down blades by taping them on. The yellow glove is just a temporary stand in for the final grey/natural colour glove.
Next up, Solder. The part six has the very distinctive solder spills on the armature, and a really messy job of soldering the blades. Every area that the solder needed to bond to got scuffed up with a dremel, then fluxed and hit with plumbing solder.
The last things to do were rivet the armature together, Then finish up the leather glove. As i said earlier, the yellow glove was simply just the wrong colour, so I got an old cream coloured cowhide glove, and custom built the classic ball and tape wrist closure, then weathered everything up to make everything match the screen used glove.
To finish everything off, here's my family portrait of my Metal Gloves,.
Left to right, Part 1/2 (NECA, Modified), Part 3 (NECA), Part 6 (Unfinished leathers), Vs. (Rubies, heavily modified), Remake (NECA, modified leathers.)
Cheers for looking guys, hope you guys dig it, and any Fred-heads, lemme know what you think,
Stay Heavy ////