Slukaj
Member
Hello to everyone on the RPF! This is my first post here, but I'm a 3 year veteran of the 405th Infantry Division, so I more or less know how this all works!
So, the first project I am going to put up on the RPF is my Bioshock Little Sister Adam Syringe. This was inspired by Volpin's Adam Syringe build, and was made as a christmas present for my girlfriend.
Getting started, I took a leaf from Volpin's book and tracked down a vintage 1920's brass gasoline pump on eBay (about $20).

I also grabbed some epoxy putty (in the form of Aqua Mend, which is usually used for sealing bathroom leaks and stuff), PVC pipe, wooden dowel rods, a nice glass jar, brass fittings, and electronics (Red LEDs, batteries, and switches).
After cleaning the handle, I heated and formed the 1inch PVC piping onto the aluminum fuel tube, making a neat seal and a great, burnt plastic-y texture (which would help add to the distressing process later).
I drilled and tapped a brass 3/4" Male-male adapter into the back of the handle, which would hold onto the PVC pipe and the glass jar.
The end of the jar was given a few layers of Aqua Mend to form the raised, tapered surface that would contain the baby bottle nipple. After 20 minutes of sanding with 800 grit, it was perfectly smooth and flat. This being the first time I've worked with epoxy putty, I immediately fell in love with it.

Then came the painting. I used Rustoleum's bronze hammered texture spray and Testor's spray silver.

After that, I lathed and puttied the wooden dowel into place. You can't really see it, but the end of the dowel tapers into a point (which is really pointy!).

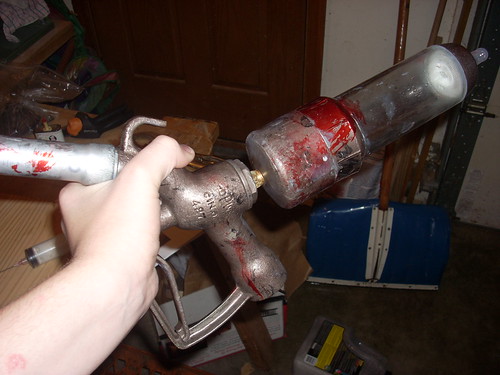
Then came the weathering. I used a mixture of Tamiya transparent red for blood and flat black for grime.


Next, I installed the electronics system. Using liberal amounts of epoxy putty and a translucent white film canister, I installed a bank of 5 red LEDs and appropriate resistors into the PVC jar housing, which was then permanently fixed to the syringe's handle.
The tough part of the electronics was finding a place for the batteries. Due to size constraints, I was forced to cut my battery size down to a pair of AAAs, and essentially cram them into the handle's grip. They aren't coming out, on account of a nasty lip holding them back. Hopefully the batteries don't die soon.

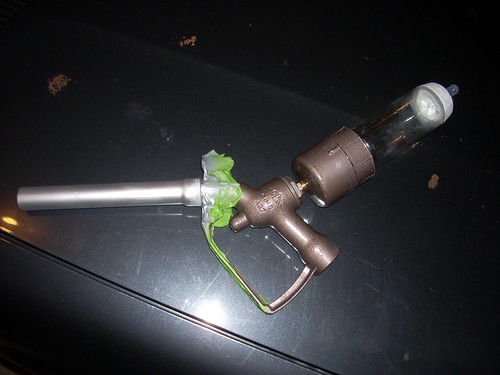
Last step was to fill the jar. I elected to go straight to red Gatorade, which had the right color and translucency. Sealing the jar with more putty and silicone caulk, this was the final product:


Hope you like it!
So, the first project I am going to put up on the RPF is my Bioshock Little Sister Adam Syringe. This was inspired by Volpin's Adam Syringe build, and was made as a christmas present for my girlfriend.
Getting started, I took a leaf from Volpin's book and tracked down a vintage 1920's brass gasoline pump on eBay (about $20).

I also grabbed some epoxy putty (in the form of Aqua Mend, which is usually used for sealing bathroom leaks and stuff), PVC pipe, wooden dowel rods, a nice glass jar, brass fittings, and electronics (Red LEDs, batteries, and switches).
After cleaning the handle, I heated and formed the 1inch PVC piping onto the aluminum fuel tube, making a neat seal and a great, burnt plastic-y texture (which would help add to the distressing process later).
I drilled and tapped a brass 3/4" Male-male adapter into the back of the handle, which would hold onto the PVC pipe and the glass jar.
The end of the jar was given a few layers of Aqua Mend to form the raised, tapered surface that would contain the baby bottle nipple. After 20 minutes of sanding with 800 grit, it was perfectly smooth and flat. This being the first time I've worked with epoxy putty, I immediately fell in love with it.

Then came the painting. I used Rustoleum's bronze hammered texture spray and Testor's spray silver.

After that, I lathed and puttied the wooden dowel into place. You can't really see it, but the end of the dowel tapers into a point (which is really pointy!).

Then came the weathering. I used a mixture of Tamiya transparent red for blood and flat black for grime.


Next, I installed the electronics system. Using liberal amounts of epoxy putty and a translucent white film canister, I installed a bank of 5 red LEDs and appropriate resistors into the PVC jar housing, which was then permanently fixed to the syringe's handle.
The tough part of the electronics was finding a place for the batteries. Due to size constraints, I was forced to cut my battery size down to a pair of AAAs, and essentially cram them into the handle's grip. They aren't coming out, on account of a nasty lip holding them back. Hopefully the batteries don't die soon.

Last step was to fill the jar. I elected to go straight to red Gatorade, which had the right color and translucency. Sealing the jar with more putty and silicone caulk, this was the final product:


Hope you like it!
