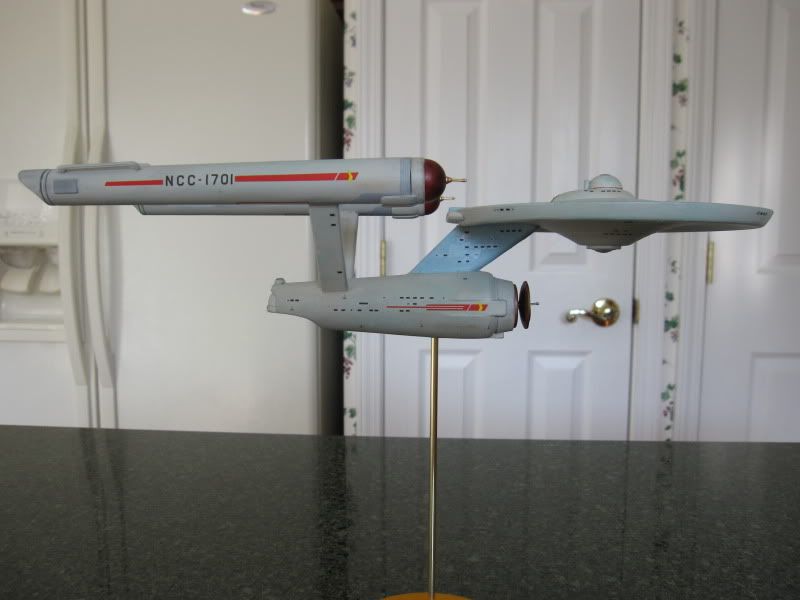
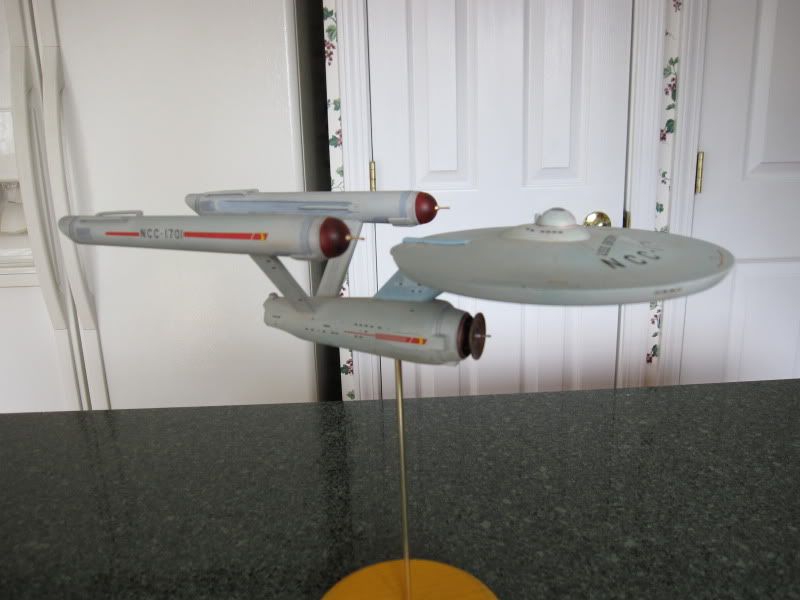
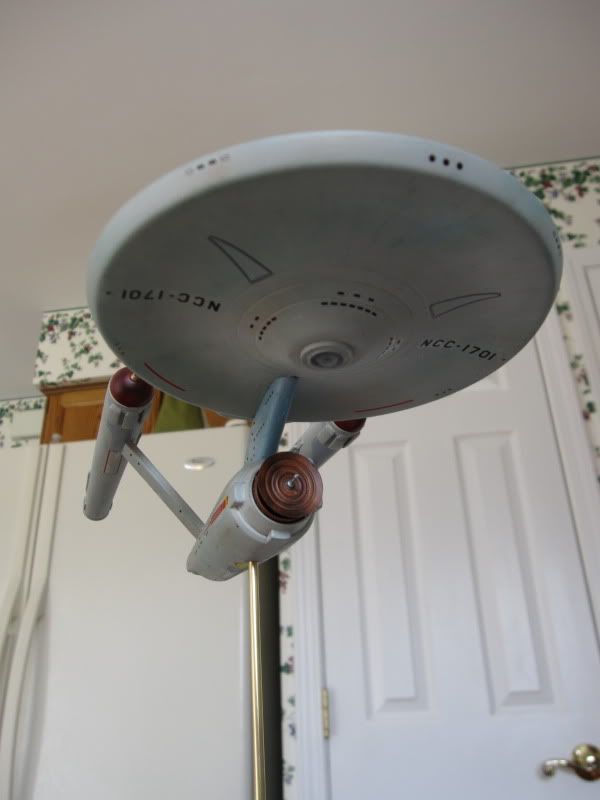
For many years, now, I've wanted to build the original Enterprise in each of its three confirgurations--first pilot ("The Cage"), second pilot ("Where No Man has Gone Before"), and production.
Polar Lights/Round2's 1/1000 kit seemed the perfect opportunity to do that. I'd done several builds of it (labeled as Consitution and Lexington) previously as a warm-up.
Well, back in the fall, I began work on The Enterprise Project, consisting of a buildup of each version of the ship. The goals were:
A) Practice on the pilot models in order to perfect my technique for the final, production model.
B) Work with other fans and solve some of the mysteries of the model, such as exactly what details changed between versions. We've had an ongoing thread at Starship Modeler to this effect, and have made a number of interesting discoveries (such as the existence of a red pinstripe around the bridge and tiny faux formation lights on the saucer of the first pilot model).
Well, I just finished my first pilot build. And, aside from some sloppiness on my part, it's turned out incredibly well. It may also be the most accurate "Cage" Enterprise ever built, in terms of detailing. I even went so far as to match the weathering patterns on the hull down to specific streaks of green, rust, and gray.
And, as an homage to the famous zoom-in opening shot in the pilot episode, I left the upper bridge dome clear, and inserted a tiny bridge interior decal beneath it (NOT off-center, mind you--I know there's no room for the turbolift that way, but the concept of an off-center bridge drives me a bit nuts).
Space, the final frontier.
These are the voyages of the United Spaceship Enterprise.
Its one-episode mission:
to explore Talos IV, to seek out survivors and rescue Captain Pike,
to boldly go where the S.S. Columbia has gone before!


http://i57.photobucket.com/albums/g212/GregKirkman/Stuff012.jpg
http://i57.photobucket.com/albums/g212/GregKirkman/Stuff014.jpg
http://i57.photobucket.com/albums/g212/GregKirkman/Stuff011.jpg
http://i57.photobucket.com/albums/g212/GregKirkman/Stuff013.jpg
http://i57.photobucket.com/albums/g212/GregKirkman/Stuff010-1.jpg
http://i57.photobucket.com/albums/g212/GregKirkman/Stuff004-2.jpg
http://i57.photobucket.com/albums/g212/GregKirkman/Stuff020.jpg
With older sis:
http://i57.photobucket.com/albums/g212/GregKirkman/Stuff015.jpg
http://i57.photobucket.com/albums/g212/GregKirkman/Stuff016.jpg
http://i57.photobucket.com/albums/g212/GregKirkman/Stuff017.jpg
http://i57.photobucket.com/albums/g212/GregKirkman/Stuff018.jpg
http://i57.photobucket.com/albums/g212/GregKirkman/Stuff019.jpg
And, of course, I just had to do this:
http://i57.photobucket.com/albums/g212/GregKirkman/Zoom-in.jpg
Polar Lights/Round2's 1/1000 kit seemed the perfect opportunity to do that. I'd done several builds of it (labeled as Consitution and Lexington) previously as a warm-up.
Well, back in the fall, I began work on The Enterprise Project, consisting of a buildup of each version of the ship. The goals were:
A) Practice on the pilot models in order to perfect my technique for the final, production model.
B) Work with other fans and solve some of the mysteries of the model, such as exactly what details changed between versions. We've had an ongoing thread at Starship Modeler to this effect, and have made a number of interesting discoveries (such as the existence of a red pinstripe around the bridge and tiny faux formation lights on the saucer of the first pilot model).
Well, I just finished my first pilot build. And, aside from some sloppiness on my part, it's turned out incredibly well. It may also be the most accurate "Cage" Enterprise ever built, in terms of detailing. I even went so far as to match the weathering patterns on the hull down to specific streaks of green, rust, and gray.
And, as an homage to the famous zoom-in opening shot in the pilot episode, I left the upper bridge dome clear, and inserted a tiny bridge interior decal beneath it (NOT off-center, mind you--I know there's no room for the turbolift that way, but the concept of an off-center bridge drives me a bit nuts).
Space, the final frontier.
These are the voyages of the United Spaceship Enterprise.
Its one-episode mission:
to explore Talos IV, to seek out survivors and rescue Captain Pike,
to boldly go where the S.S. Columbia has gone before!


http://i57.photobucket.com/albums/g212/GregKirkman/Stuff012.jpg
http://i57.photobucket.com/albums/g212/GregKirkman/Stuff014.jpg
http://i57.photobucket.com/albums/g212/GregKirkman/Stuff011.jpg
http://i57.photobucket.com/albums/g212/GregKirkman/Stuff013.jpg
http://i57.photobucket.com/albums/g212/GregKirkman/Stuff010-1.jpg
http://i57.photobucket.com/albums/g212/GregKirkman/Stuff004-2.jpg
http://i57.photobucket.com/albums/g212/GregKirkman/Stuff020.jpg
With older sis:
http://i57.photobucket.com/albums/g212/GregKirkman/Stuff015.jpg
http://i57.photobucket.com/albums/g212/GregKirkman/Stuff016.jpg
http://i57.photobucket.com/albums/g212/GregKirkman/Stuff017.jpg
http://i57.photobucket.com/albums/g212/GregKirkman/Stuff018.jpg
http://i57.photobucket.com/albums/g212/GregKirkman/Stuff019.jpg
And, of course, I just had to do this:
http://i57.photobucket.com/albums/g212/GregKirkman/Zoom-in.jpg
Last edited:
