*******************DISCLAIMER*******************
Use this tutorial at your own risk. I can not be held responsible for any damage or injury sustained from the improper use of tools or procedures that are outlined below.
******************DISCLAIMER*******************
THE BASICS
1. Buy a good digital camera. I use an Olympus D-450. I splurged and bought a macro lens set, rechargeable batteries, a tri pod and Flash Path floppy adapter for reading the smart media.
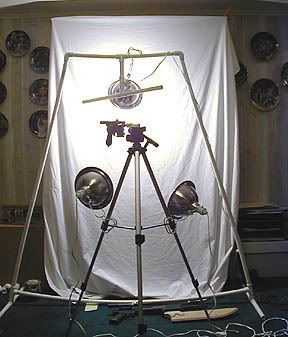
2. Shoot against a white back drop. Here is my set up. I pull the sheet tight with clamps.
3. Use white light to get rid of shadows. As you can see in the picture above I have 1 light pointing behind the blaster. This eliminates the shadows that the front lights create.
4. Use SHQ to get a prep shot. This is a smaller file size. Once you have the right picture with the correct lighting do tip 5
5. Use TIFF format for the final shot. Large file but very detailed and easier to edit.
6. Use the time delay if you have it. Even a slight shake will blur the photo. By using the time delay the camera will have time to settle before it takes the picture.
7. Move the front lighting during the time delay. I have found that even a slight variation of your lights will change the picture. During the time delay you will be able to manipulate the lights to get the optimal picture.
EDITING TIPS
I use Adobe PhotoShop Deluxe.
1. Edit the photo in its original size. Don't reduce it until you have it looking good when it is big.
2. Cut the object out of the background with white lines. It may be tempting to use a fill tool but this will give you fuzzy edges.
3. Eliminate the entire background with pure white. I cut and paste a white block from Corel Draw to use as my back ground color. This ensures that it is not tinted an off white color. Then I make sure that I eliminate all of the back ground with this color. You can use a line that is 100 pica wide to get rid of most of it, then use the brush for the small areas.
4. Reduce the photo to a manageable size.
5. Rotate the picture a few degrees back and forth to blend lines. Sometimes the picture will look edited once it is reduced. If you rotate it a few degrees and them rotate it back to the correct position it will blend the picture and make it look more natural.
6. Make sure you use the Sharpen tool if you need it.
7. Save your work constantly.
That's it, never had a class but I can take pictures all night long until it looks good.


