WindPhoenix
Jr Member
Since I still don't know what I'll do with the sword handle yet I decided to move on to the belt.

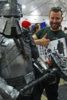
I always wondered the purpose of that belt. From the movie we can see it's a pretty wide belt with two straps and buckles in the back. However we never see the belt having to carry the load of any scabbard or holster. Having them simply for aesthetic purposes wouldn't make much sense design-wise. Then I thought that the belt might be there only to cover the attachments between the breastplate and the tassets/groin/butt plates but it still wasn't a satisfying reason in my book. The top of those plates seemed to be always covered by the belt no matter how the belt moved. I did some more research on armor design and found that the lower body plates on a samurai armor were attached at the waist by a belt. Bingo.

The plan is to make the belt and attach the lower plates to it with straps. It will allow for more mobility (sitting down during long convention days) and to remove the entire assembly easily when nature calls. The straps being in the back is not practical at all so I won't make it functional. The buckle in the front will be split along some decorative trims so they'll remain less visible.
As usual foam is my friend so I took some scrap foam board from my sword build, printed out the shape of the buckle and cut two shapes. Because I use foam board I need to reinforce the strip onto which the belt is gonna be connected to the buckles so two layers of foam board should do the trick.

I also needed to have the buckle split somewhere for easy removal. Here's the design I cam up with.


The dots on the wider piece are gonna be really strong and small magnets that will connect to magnets on the underside of the smaller piece. The bigger piece is also gonna be the one that will carry the load of the sword and scabbard.
And here's a shot of the herringbone weave I made for the belt. It's made out of 2mm craft foam strips. It needs to be dyed a blue color before attaching it to the finished buckle..

To be continued...
I always wondered the purpose of that belt. From the movie we can see it's a pretty wide belt with two straps and buckles in the back. However we never see the belt having to carry the load of any scabbard or holster. Having them simply for aesthetic purposes wouldn't make much sense design-wise. Then I thought that the belt might be there only to cover the attachments between the breastplate and the tassets/groin/butt plates but it still wasn't a satisfying reason in my book. The top of those plates seemed to be always covered by the belt no matter how the belt moved. I did some more research on armor design and found that the lower body plates on a samurai armor were attached at the waist by a belt. Bingo.
The plan is to make the belt and attach the lower plates to it with straps. It will allow for more mobility (sitting down during long convention days) and to remove the entire assembly easily when nature calls. The straps being in the back is not practical at all so I won't make it functional. The buckle in the front will be split along some decorative trims so they'll remain less visible.
As usual foam is my friend so I took some scrap foam board from my sword build, printed out the shape of the buckle and cut two shapes. Because I use foam board I need to reinforce the strip onto which the belt is gonna be connected to the buckles so two layers of foam board should do the trick.
I also needed to have the buckle split somewhere for easy removal. Here's the design I cam up with.
The dots on the wider piece are gonna be really strong and small magnets that will connect to magnets on the underside of the smaller piece. The bigger piece is also gonna be the one that will carry the load of the sword and scabbard.
And here's a shot of the herringbone weave I made for the belt. It's made out of 2mm craft foam strips. It needs to be dyed a blue color before attaching it to the finished buckle..
To be continued...


")