This is the most ambitious project I've ever attempted and is a work in progress. I am planning on doing the whole suit but right now I'm focusing on the helmet. This is also my first post here.
I always thought the Enclave armor in Fallout 3 was some of the wickedest gear ever and after being inspired by all the cool sci fi armor I saw at the last Wondercon I decided to try to make it.
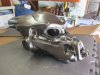
Part 1 Basic Helmet Construction
I started with Pepakura, I found a "Tesla helmet" PDO which was essentially the Adv MkII helmet and started there. This was my first Pepakura project and I probably should have started with something simpler. Overall it went OK but I would have been happier had I started with thicker card stock and pre scored all the folds to make them more precise. As a result there was some warping which I had to fix later with Bondo and in a few cases by cutting and reshaping parts of the helmet. I would say the Pepakura portion took about 20 hours. I used a low temp hot glue gun.


At this stage the helmet was in two sections, the front or mask and the bowl shaped rear section. After the Pepakura was done I painted it with a layer of "fiberglass resin", which is really polyester resin. One smart thing I did was buy a stack of cheap plastic cups for mixing resin and later rondo in. The other thing that I discovered later was buying packs of pop sickle sticks. These make great disposable stirrers.


The two pieces coated with resin and the interior coated with rondo to give them some structure. I won't go into too much detail as this isn't a tutorial, but rondo is Bondo thinned with resin. I painted this on the interior with a disposable brush. This required a few applications to get it thick enough. I also reinforced the interior with fiberglass mat.
Part 2 will be bondo, details and paint.
I always thought the Enclave armor in Fallout 3 was some of the wickedest gear ever and after being inspired by all the cool sci fi armor I saw at the last Wondercon I decided to try to make it.
Part 1 Basic Helmet Construction
I started with Pepakura, I found a "Tesla helmet" PDO which was essentially the Adv MkII helmet and started there. This was my first Pepakura project and I probably should have started with something simpler. Overall it went OK but I would have been happier had I started with thicker card stock and pre scored all the folds to make them more precise. As a result there was some warping which I had to fix later with Bondo and in a few cases by cutting and reshaping parts of the helmet. I would say the Pepakura portion took about 20 hours. I used a low temp hot glue gun.
At this stage the helmet was in two sections, the front or mask and the bowl shaped rear section. After the Pepakura was done I painted it with a layer of "fiberglass resin", which is really polyester resin. One smart thing I did was buy a stack of cheap plastic cups for mixing resin and later rondo in. The other thing that I discovered later was buying packs of pop sickle sticks. These make great disposable stirrers.
The two pieces coated with resin and the interior coated with rondo to give them some structure. I won't go into too much detail as this isn't a tutorial, but rondo is Bondo thinned with resin. I painted this on the interior with a disposable brush. This required a few applications to get it thick enough. I also reinforced the interior with fiberglass mat.
Part 2 will be bondo, details and paint.