Edward Scissorhands Halloween Costume

Doctor Octoroc

Sr Member
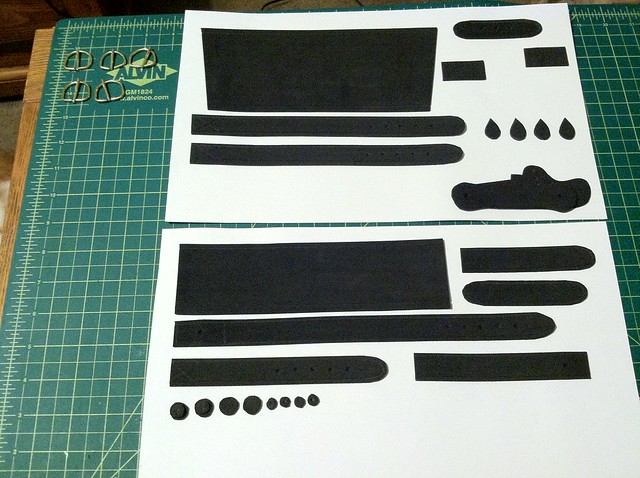
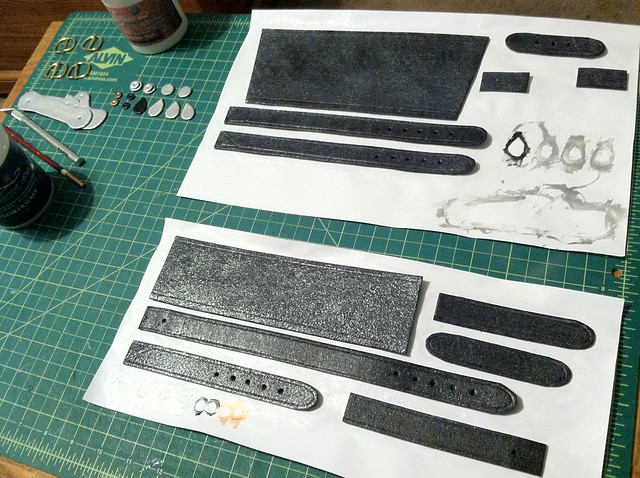
Hey all, first time poster here. I joined to see how some others went about making a pair of gloves for an Edward Scissorhands costume but decided to go my own route. They're made from bass wood, craft foam, and many other bits, like an assortment of random screws, and some bone party favors I found at a Party City that worked out perfectly for the bone hinges! If you're curious about my process at all, I posted the full set of photos on Flickr of the pictures I took during the construction.

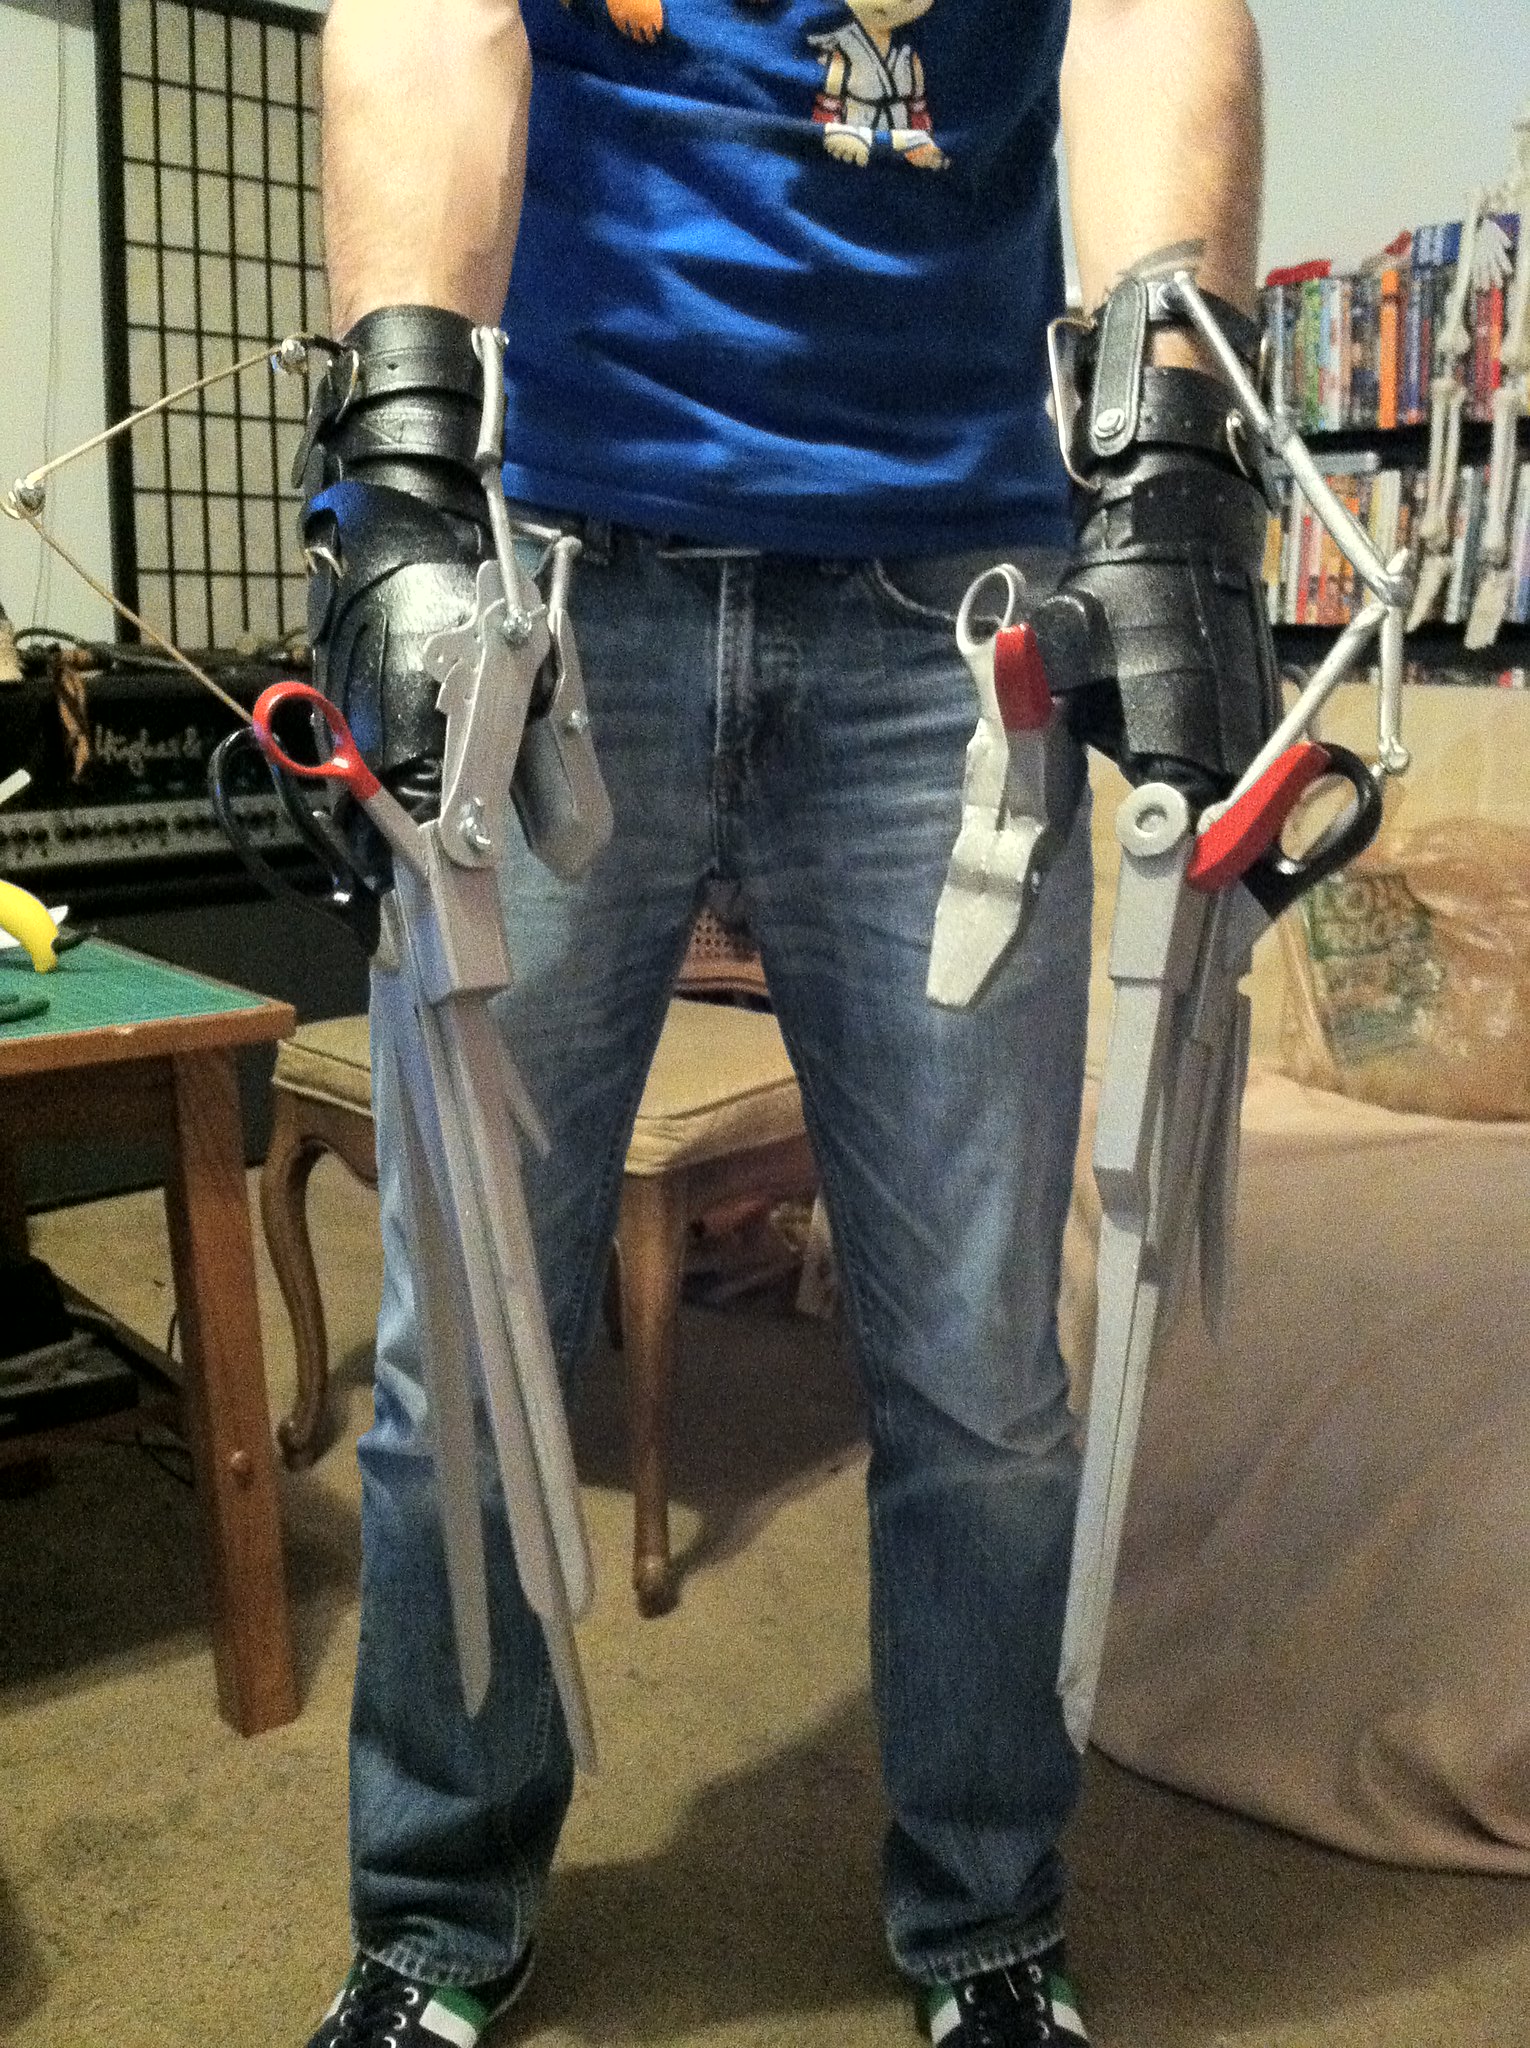
Here's the completed pair of gloves.


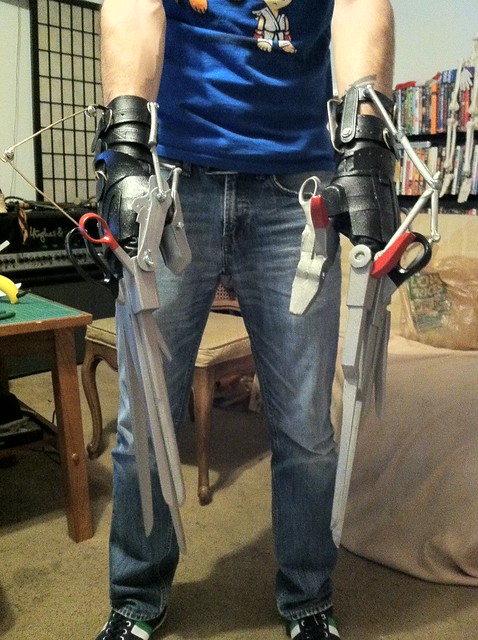
They just need some weathering, but I haven't decided how to go about that process yet. Does anyone have any suggestions for wear? I've seen some props from the film with rust on some joints, and others look discolored in other ways, but nothing very consistent between the different pairs used in the film. I actually went by the Hot Toys 12" figure for the detail and accuracy of the build and to my knowledge, they're near screen accurate (in appearance, of course, not material).

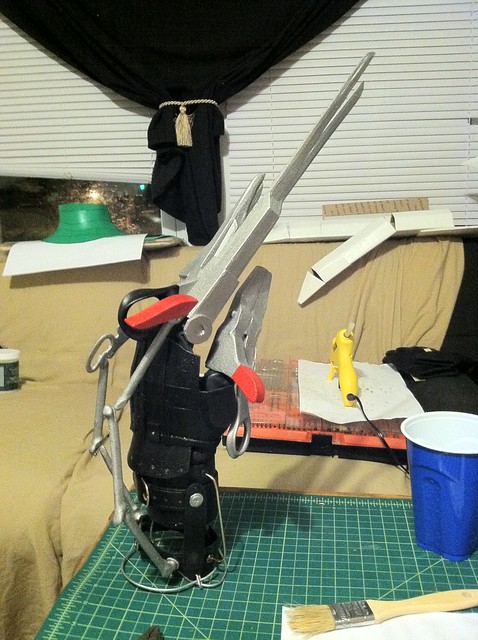
Here's one shot of the left glove on a stand I made out of heavy gauge wire bent into the shape of my hand.


And just for the fun of it, here's the neck piece I'll be wearing under the white dress shirt.


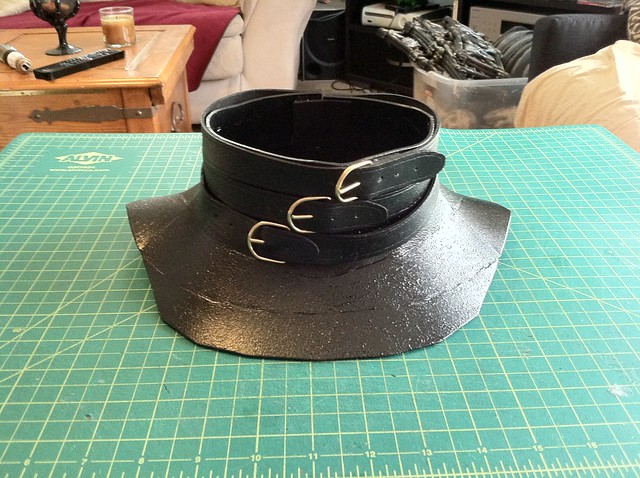
I originally was going to wear a black turtleneck and wrap three dog collars around my neck but I wanted the look and feel to match the gloves, so I made this piece out of craft foam and used the same process I did on the gloves. All the buckles are made from manipulating giant copper paper clips.
 
These look great! Are the "blades" functional or static?
They're functional. Each scissor piece is basically an extension of my own fingers, so I have full up and down movement, as far as I can bend my own fingers. I've actually been practicing moving "complementary" fingers so it looks more like I'm properly cutting instead of just flopping blades around.

Can you make a tutorial? I'd want to make a pair of these :D
I have the set on Flickr that you can check out (link in the original post) that basically documents the process but I'll shed some light on the details.

I initially created a 3-d model of everything in CAD to the proper scale with my hand I then imported to Pepakura Designer to unfold and create the patterns that I worked from for the construction of the blades and gloves, but along the way, things were tweaked to fit my hand perfectly.

Using the printouts, I cut the pieces of the blades from sheets of 1/16" and 3/8" thick sheets of basswood, and pieces for the "leather" parts from black craft foam. If you've ever done papercraft, it's a similar process, but instead of folding and gluing tabs, the pieces were glued edge to edge and the thickness of the wood was taken into account for measurements. Everything was assembled with hot glue, wood pieces were sanded and cut down to have more intricate shaping, and handles added to the appropriate fingers. That was actually the trickiest part, is finding proper looking scissors that had enough extra plastic in the handle that I could cut the plastic all the way through without hitting the metal of the scissors. I original was thinking of casting acrylic copies of all handles to use, but found that if I cut down to the metal on all sides with a hack saw, the metal part would slide out leaving the usable plastic portion intact without need to cast.

Everything got 5 coats of Modge Podge (the foam got a half watered down variation), and the foam pieces got an additional treatment that combines 2 crackle paints ("Crackle Size" and "Clear Crackle") to create the leathery texture. You can see the difference between the craft foam as-is and after treatment below. The details on the leather (the "stitching", so to speak) was just carved with a dull pencil into the face of the foam.

8103835056_2e6432dbeb_z.jpg


8103819635_3f71a55fec_z.jpg


Buckles were made from the rounded parts of over-sized copper paper clips bent and cut to size.

I used a Stainless Steel spray paint for the metal pieces, and a Satin Black for the gloves, all Krylon brand since they always seemed the best quality to me. Black and red bits got Testor's enamel model paint, as well as some of the smaller metal pieces that are silver.

The bone hinges are made from plastic bones I found at Party City that are meant to be party favors, but I shaved them down in various ways to make them all look different. They attach to the gloves by screws and to each other by 2-bead-long segments of a pen chain (you know those chains that banks put on their pens so people don't steal them), each segment of which was inserted into the end of adjoined pieces.

The rest of the materials are just nuts, bolts, screws, etc. I have a variation of older, varied screws throughout the gloves to add character, but had to hit the hardware for newer, 1/2" screws for many parts of the glove.

I still haven't figured out how I'm weathering them, but I think I'm going to go with subtle scratches and corner wear on the metal with a slightly shinier silver paint and a flat grey paint in certain areas, and maybe a very light brown dry-brushing over the "leather" portions to make them look worn down. Anyone have any suggestions there?
 
Last edited:
Awesome job on the scissors. Congrats. This is has been a prop on my "to do list" for a long time. What has stoped me so far are the handles; see you used real scissor handles - how difficult was it to cut them? IMO you should only weather the leather parts.
Thanks for the tutorial.
Here are some pics of the scissors:
 
Thanks! Yeah, I downloaded just about every single picture I could find of the actual props but ended up using the Hot Toys 12" figure as the reference. I wanted to get the actual figure but couldn't find one for a good price. I did, however, find a few reviews of the toy accompanied by tons of pictures. Toy Haven and AFHub had the best images of the toy to use, with pictures of the gloves (and the whole figure) from just about every angle.

For weathering options, however, those shots of the real deal would come in handy. I actually just got done with some effects on the blades, but nothing drastic - I just outlined the edges with a shinier silver than the base silver color to accent them from further distances, since it looked kind of bland as it was. I haven't gotten around to weathering the leather yet, I think I want a super dark brown color to dry brush that and all I have at the moment is medium brown.

What has stoped me so far are the handles; see you used real scissor handles - how difficult was it to cut them?
It was a fuss at first, but once I figured out the construction of the scissors and found the best way to cut them to get the blade loose without breaking the handle, it was a piece of cake on the other scissors.
 
Last edited:
They are amazing would you be interested in making another set for sale I would love to get a pair from you. great job :) I've performed as a professional JD lookalike and I own the great Edward Scissorhands costume the only thing I don't like is the gloves, So please let me know.
 
That depends on how much you'd be willing to spend :) In all honesty, they were a huge hassle to construct and were done so to fit my hands perfectly. Since this build, I've designed a far more accurate CAD model to 3d print and will be building them using the 3d printed pieces and faux leather material for the gauntlets instead of using wood and foam.

1619114_10152367912835772_829160874018310433_n.jpg


They weren't cheap to print due to their size but they'll be far more durable and with the proper finishing techniques, much more accurate to the screen props as well. I modeled the screws and such into the 3d prints so only connecting hardware will be required. I'm debating 3d printing the hand plates as well as the bone hinges with a snap-fit design so they only rotate on a linear hinge instead of the ball joints I fabricated for this previous version. Two of the blades (right hand forefinger and pinky) have snap-fit joints as well, the secondary forefinger blade to rotate with limits in the vertical direction and the extra pinky blade to rotate 360 degrees with a snug fit so it can be positioned as I see fit.

I'd be more than willing to make the Shapeways 3d prints of all of these pieces available to download but the price may be too hefty for a prop, costing upwards of $400 for all of the raw 3d printed pieces.
 
I've got some gloves made, but I'd really like to k how to make a stand for them. (Like in the hero display pics.) I was thinking of bending s wire into the shape of my hand, and then stapling it to a wood platform. Would that work??
 
I've got some gloves made, but I'd really like to k how to make a stand for them. (Like in the hero display pics.) I was thinking of bending s wire into the shape of my hand, and then stapling it to a wood platform. Would that work??

I used wire to make mine. Honestly, the only reason I didn't use them more was they were made in relative haste and I ran out of wire halfway through constructing the second hand.
 
This thread is more than 9 years old.

Your message may be considered spam for the following reasons:

  1. This thread hasn't been active in some time. A new post in this thread might not contribute constructively to this discussion after so long.
If you wish to reply despite these issues, check the box below before replying.
Be aware that malicious compliance may result in more severe penalties.
Back
Top