Ecto 1

JediMichael

Legendary Member
RPF PREMIUM MEMBER
So I got this for Christmas and have started a little on it. Its more supposed to be the Ecto 1a, but you can also build it as just the 1 from the first movie, which I'm doing.
However, things had to be modified to do this. Like on the 1a, theres the electrical signs, and the car has these moulded in brackets for that. The instructions even say if you build it as the 1, to remove the brackets, which I've already sanded down. While a good number of the parts on the top are in the kit, not everything from looking at it, so for that, I'll scratch build whatever I need to and add all the wires with real ones.


And the 6 brackets, 3 on the top of the pic and 3 on the bottom sanded down.


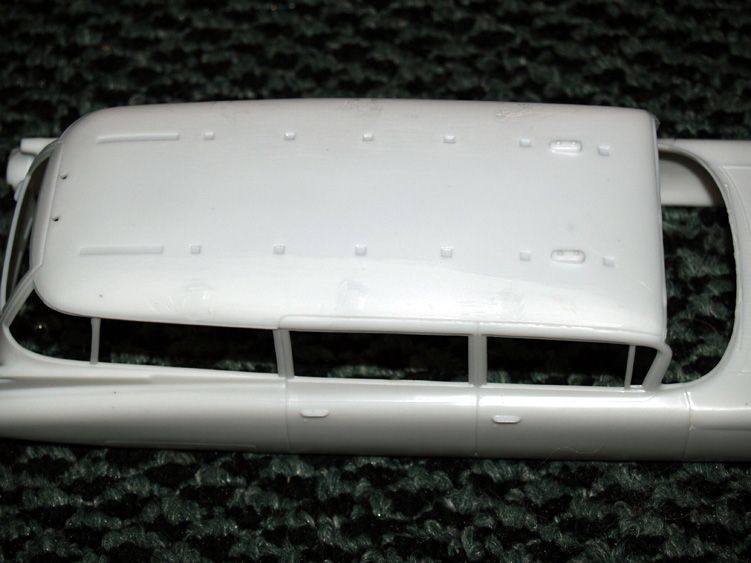
Theres rims around the doors which are a flat silvery chromeish color. I'm trying to think what would look best for that.
Also, the windows have tint on them, except for a strip in the middle of each window. I wonder if I can get real tint for them.
So here goes building a model I've wanted for a LONG time now.
 
I built one of these a while ago (the GB1 rather than GB2 version). They're good kits but the roof parts would be better in more pieces. Also, the decals are hardly exhaustive. I had to print some custom ones for the tiny warning signs, etc. The only mod I did was replace the antennas with guitar strings. I sank a surprising amount of time into the thing considering it's just a curbside kit.
 
So I found a site with tons and good close up reference pics and now I think.....what have I gotten myself into... one thing to look at movie stills, but this is a lot more. But I plan to make it as close as I can with the skills I have, which I wish were better....and a lack of funds never helps either.
Guess that why its a challenge.
 
So I decided, like most people already are saying, that the top rack is just pathetic, and so I made my own. I needed 2 millimeter wide styrene strips and found a hobby shop pretty close by that sells that kind of stuff. When I get paid again, I'll be going back and see what else I'll need.
One thing that I cannot find are the small tanks on the sides. Any google search gives me a military tank model or an actual size air tank. So for now, I'm going to cut out the ones from this model and see if I can fix them up a little.

So here are the racks it came with, with moulded in tanks which I started cutting out in the main pic.


And the new rack.


I still have more parts to try and figure out how to acquire.
 
My step-son has this wireless speaker that ended up breaking. So he threw it away, but I was quick to get it back out hoping for parts. While theres not too much inside to use, there are parts that should help. But mostly, I noticed that there was a screen mesh over the front. I ripped it off, tearing a bit more than I would have like and used it for the window tint. Hardest part was the strip in the middle of each window that has no tint.


Here it is applied. Looks better in the photos.


And the rack now painted black.
 
awesome start. i was disappointed with AMT's promise of 'build at ecto-1 or etco-1a', which is an outright lie. you can only build it out of the box as 1A, and it takes a heap of modifications to make it Ecto1, as they only added a few decals for Ecto-1. I bought Paragraphix's decal sheet and it's basically unusable, since none of the decals are actually movie correct.
i have a heap of pictures of my build it you want a bit of inspiration for your build.
http://www.thepartsbox.com/BB/viewtopic.php?f=252&t=4492
 
My step-son has this wireless speaker that ended up breaking. So he threw it away, but I was quick to get it back out hoping for parts. While theres not too much inside to use, there are parts that should help. But mostly, I noticed that there was a screen mesh over the front. I ripped it off, tearing a bit more than I would have like and used it for the window tint. Hardest part was the strip in the middle of each window that has no tint.

Amazing work! All things I wish I'd done to mine. That stock roof rack should come like that in the first place!
 
awesome start. i was disappointed with AMT's promise of 'build at ecto-1 or etco-1a', which is an outright lie. you can only build it out of the box as 1A, and it takes a heap of modifications to make it Ecto1, as they only added a few decals for Ecto-1. I bought Paragraphix's decal sheet and it's basically unusable, since none of the decals are actually movie correct.
i have a heap of pictures of my build it you want a bit of inspiration for your build.
http://www.thepartsbox.com/BB/viewtopic.php?f=252&t=4492
Thanks. And yours look quite good as well. Yeah, the whole build Ecto 1 part is so deceptive. Didn't realize half the parts would be missing. But thats what scratch building is about. Its quite fun. Still trying to figure out the 2 tanks on the side, as I can't find ANYTHING online to help. As well as a few parts on top.

- - - Updated - - -

Amazing work! All things I wish I'd done to mine. That stock roof rack should come like that in the first place!

Thanks. And yeah I know, when I saw that thing, I knew it wouldn't do at all. Wish they hadn't put the 2 tanks moulded together with it.
 
You mean the capsule-shaped yellow tanks strapped to the driver's side? I'm pretty sure I've seen ballpoint pens that are rounded at the end... Two ends glued together for each tank?

Or maybe part of a drinking straw with a ball-bearing of the same diameter in each end? You could position the straps to hide the joins.

Been thinking of stuff like that. I'll go and check out a bunch of stores and see what I can dig up and if nothing else, just cut out the existing ones.
 
I wanted to work on the light bars, and make them blue and not clear. So I looked around the house for something transparent blue. Found one of those folder separators. Cut it up and glued it in. Got a little bit too much super glue on the light bar.


I added the silver strips over it and worked up the insides as much as I could.


Then glued it altogether. Hard to get a pic with the right color.

 
For references, i used the restoration of the Ecto-1 from gbfans.com.
The tanks are aviation air tanks. i used two Nitrous Bottles from thepartsbox.com but any scale nitrous bottles should work.
some useful references here:


- - - Updated - - -

mine

Yes, thats perfect looking. The site said 25$ minimum order, which is a lot since I need about 6 dollars worth. I'll see if any closer places have this. But yes, thank you for this, I just had no idea what keywords to try anymore.
 
Also, try not to use super glue (cyanoacrylate) on clear parts, as there is a substantial risk of 'frosting.' It's less risky to use a glue like Elmer's.
 
Also, try not to use super glue (cyanoacrylate) on clear parts, as there is a substantial risk of 'frosting.' It's less risky to use a glue like Elmer's.

Yeah, found that out. Surly don't want that one the main windows.
 
Got a bunch done today. One thing I needed to do was find something for the half tank on the back. Figured I would worry about that later. But this morning I went to get a pen and found that the back had the perfect shape. So I cut it off and its now that back tank.


Got most of the dash done but still think it needs something more.


Doing the rest of the interior now.
 
Got the inside done. I stuck with how it was made from the mould, as there are not really any good shots inside the car in the movie. Any pics people have taken now could be a replica, therefore not being right, and even the real filming car has been restored with changes.
Plus, you probably won't see inside very well anyways.


Been busy, so heres an update. Found a perfect way to make the siren, cut off the cap of a sharpie marker.


Heres the fan box, made from a lego piece, another sharpe cap, paper clips, part from inside playstation 2 and 1.5 mm styrene.


And this part, whatever its supposed to be, made from.......

 
Back
Top