You are using an out of date browser. It may not display this or other websites correctly.
You should upgrade or use an alternative browser.
You should upgrade or use an alternative browser.
Dracks Ironman MK VI Build (helmet update)
- Thread starter Drack
- Start date
Drack
Sr Member
Re: Dracks Ironman MK VI Foam Build (page1 includes info on foam armour building)
Thank you man. If you search stealths warmachine build on you tube and here he has links to the foam warmachine files and am sure he would give advice if you need it. Hopefully I have included enough resources on the first post to get you started.
Cheers guys. I wouldn't have even thought of it if it it wasn't for James AKA Xrobots so a big thanks to him for the advice he gave me along the way.
Thanks for watching,
Tom.
That is a great idea mate, thanks for that. I have seen a few Ironman's kicking around my local scene but no War Machines. Well time to start looking at the Tuts and the files!
Max
Thank you man. If you search stealths warmachine build on you tube and here he has links to the foam warmachine files and am sure he would give advice if you need it. Hopefully I have included enough resources on the first post to get you started.
Helmet looks great man. It's nice to see a change and have this bad boy come from foam. Well done
You would never know that helmet came from a foam lid Drack; cracking work mate. Love seeing these updates.
Keep it up dude!")
Cheers guys. I wouldn't have even thought of it if it it wasn't for James AKA Xrobots so a big thanks to him for the advice he gave me along the way.
Thanks for watching,
Tom.
Shakeitdavey
Well-Known Member
Re: Dracks Ironman MK VI Foam Build (page1 includes info on foam armour building)
I love the suit, I love the gold detail on the abs. I love the Master Chief suit and the GRAV Hammer haha!
I'll keep an eye on ur progress mate
I love the suit, I love the gold detail on the abs. I love the Master Chief suit and the GRAV Hammer haha!
I'll keep an eye on ur progress mate
Drack
Sr Member
Re: Dracks Ironman MK VI Foam Build (page1 includes info on foam armour building)
Wow cheers man. To be included in a statement that has Xrobots name in it is an honour as his suit is beyond anything out there imo. Looking forward to see what you are up to
Great work on all the details!! Been watching both yours and xrobots build and using it for my own build as an example so cheers aswell for the added explanations
Wow cheers man. To be included in a statement that has Xrobots name in it is an honour as his suit is beyond anything out there imo. Looking forward to see what you are up to
Drack
Sr Member
Re: Dracks Ironman MK VI Foam Build (page1 includes info on foam armour building)
Finally after quite some time an update
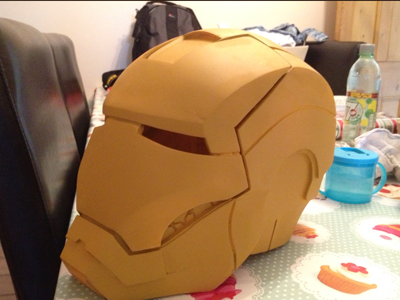
This is the helmet before the last touch ups and ear attachment (its covered in primer filler, yes yellow primer filler). Over all I am very happy with it. Was a huge learning curve for me seeing as I have only ever done foam work but seeing as the master helmet was foam to start with it came out as well as I had hoped it would.
Things left to do are. Fill the little bits that need it and sand, heat gun the top vent as too big, heat gun the visor as some how its not quiet aligned, fix the teeth, get rid of ridge by the teeth (no idea why I added it), add ears on, add in screw details, primer filler and sand till perfect
Hopefully I will have it all done in the next few days ready for paint, hinges and electronics
Thank you for watching,
Tom
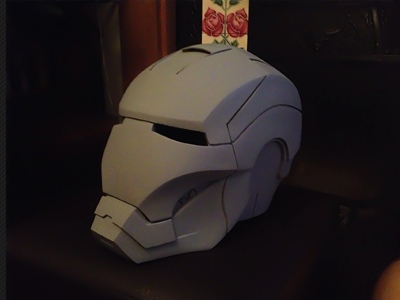
Finally after quite some time an update
This is the helmet before the last touch ups and ear attachment (its covered in primer filler, yes yellow primer filler). Over all I am very happy with it. Was a huge learning curve for me seeing as I have only ever done foam work but seeing as the master helmet was foam to start with it came out as well as I had hoped it would.
Things left to do are. Fill the little bits that need it and sand, heat gun the top vent as too big, heat gun the visor as some how its not quiet aligned, fix the teeth, get rid of ridge by the teeth (no idea why I added it), add ears on, add in screw details, primer filler and sand till perfect
Hopefully I will have it all done in the next few days ready for paint, hinges and electronics
Thank you for watching,
Tom
Last edited:
Drack
Sr Member
Re: Dracks Ironman MK VI Foam Build (page1 includes info on foam armour building)
Cheers man
lookin gooood....
Cheers man
bigjustin12
Active Member
Re: Dracks Ironman MK VI Foam Build (page1 includes info on foam armour building)
looks great, awesome work as usual
looks great, awesome work as usual
tonystarks8100
New Member
Re: Dracks Ironman MK VI Foam Build (page1 includes info on foam armour building)
Thx for the Tutorials
Bro your work is one of the cleanest and sexiest out there
JUST SO SEEMLESS
keep up rhe good work
Hi guys I have been lurking about for around a year now and thought that it was time I posted one of my builds here and as the MK VI suit is my latest I should start there. I have been building a Masterchief suit that I have on 405th which some of you may have seen. I started an Ironman MK V custom build too which I will be picking up on after I finish the MK VI so that will be resurrected before the new year hopefully.
My plans for the MK VI suit are to hopefully have a motorised faceplate and film accurate arc reactor. I have read up on the skills needed for the face plate and I doubt I will be able to do this alone so might have to call upon a kind mind to assist me, that was in no way a request as I know peoples time is precious but I will work it all out when the time comes.
So far.

Things needed to make foam armour. Click blue text for links.
First to read, read and read some more!
Pepakura. You need to download both the viewer and designer.
Tutorial: Simple Armor Scaling
Some tutorials I made on techniques I use. I hope to get some more done as not everything is covered in them. There are many others if you look around.
Dracks Foam Technique Tutorial Part 1 - YouTube
Dracks Foam Technique Tutorial Part 2 - YouTube
Nice set of techniques by JFcustom Here
A great tutorial on using the pep files for foam builds. XRobots - How to modify pepakura templates for foam
If your suit needs some lights in check this very simple guide on lighting.
Electronics Tutorial by Xrobots.
List of materials, links are UK based. I am sure you can find all these things in other countries but I thought it would be good to throw this info in the thread as a guide on what you need to make a suit of your own.
1. Foam Mats 10-12mm thick. I got a better deal than this. They seem to have gone up in price, Camping Mats 5-6mm thick & Craft Foam 1-2mm thick
2. Blades. No.11s. You can get the handles here too. Also you can get cheaper blades on ebay but they snap easy and blunt easy. Swann Morton are the best I have found so far so sticking with them. They are the best imo because they don't blunt as fast as the cheaper options. I can't offer an American alternative because I don't know what is best for you guys but if any one reading this knows of a top quality blade producer let me know and I will add to the links.
3. Glue gun I use & glue sticks.
4. Plastidip. Used for the first undercoat to seal the foam and give it that smooth base ready for painting.
5. Primer car spray and then the spray/paint you want for your finished paint scheme. Finally some lacquer to protect your piece and make it nice and shiny.
6. Webbing & Buckles for strapping.
7. There are many more materials I use/used but as you build your armour you will work out the bits needed for those extra touchs.
8. Moulding Optional but thought an armour moulding link might help people out wanting to have a go.
So with out further a due here is my progress so far.
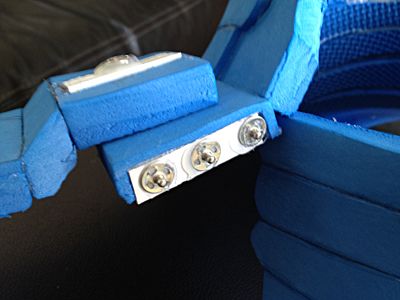
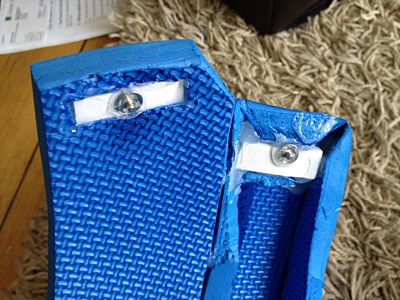
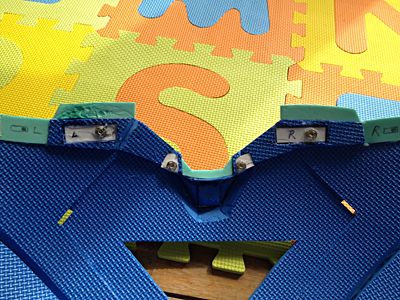
The armour pieces are attached using snap fasters. I made some 3mm thick PVC platforms to mount them on because when you try to push the snaps together with out them the foam is too soft to allow for enough pressure.

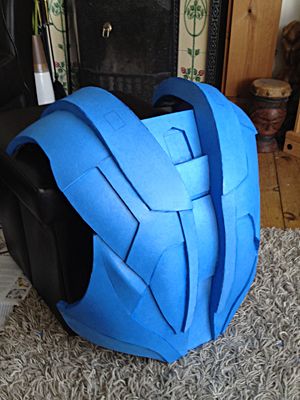
A quick lick of paint.
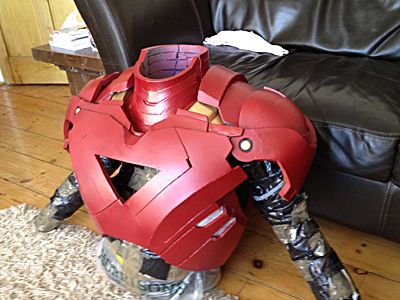
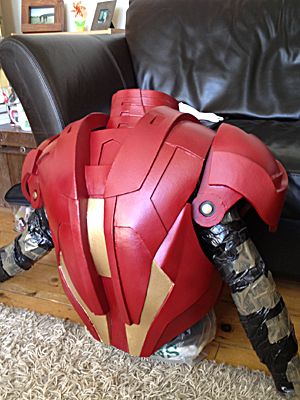
I do have 2 biceps and a forearm finished too. Once I have the second forearm made and the hinges installed I will post up an update for you all. I am not going to post step by step as there are enough Ironman builds out there but if I use an idea that may benefit people I will post more detailed pics so people can learn from them.
Good to finally be part of this community as there is some amazing work out there and look forward to seeing what all you guys are progressing on.
Tom.
Thx for the Tutorials
Bro your work is one of the cleanest and sexiest out there
JUST SO SEEMLESS
keep up rhe good work
Drack
Sr Member
Re: Dracks Ironman MK VI Foam Build (page1 includes info on foam armour building)
I'm sorry man I like to think I am as helpfull as I can be when's it comes to people questions but this one is just too lazy.......
Thank you man
Updates are slow at the moment as the helmet is slowing me down a bit, almost done with it then its full steam ahead for New Year's Eve.
What type of foam is it?
I'm sorry man I like to think I am as helpfull as I can be when's it comes to people questions but this one is just too lazy.......
Thx for the Tutorials
Bro your work is one of the cleanest and sexiest out there
JUST SO SEEMLESS
keep up rhe good work
Thank you man
Updates are slow at the moment as the helmet is slowing me down a bit, almost done with it then its full steam ahead for New Year's Eve.
bigjustin12
Active Member
Re: Dracks Ironman MK VI Foam Build (page1 includes info on foam armour building)
I'm sorry man I like to think I am as helpfull as I can be when's it comes to people questions but this one is just too lazy.......
LOL
I approve of this message :thumbsup
Drack
Sr Member
Re: Dracks Ironman MK VI Foam Build (page1 includes info on foam armour building)
Update for y'all
Got the helmet where I am happy to wear it now. It does need more work but it's not the final cast I will settle with so it will do for me as I am running out of time for new years. Will be making the ear recesses more rounded (you cant see in the pic how bad they are) then will add the ears ready for painting. Hope you like.
Once its painted up and hinged will do some proper pics not on my phone.
fyreant
Well-Known Member
Re: Dracks Ironman MK VI Foam Build (page1 includes info on foam armour building)
Looks pretty F'n topps to me Tom..
Update for y'all
Got the helmet where I am happy to wear it now. It does need more work but it's not the final cast I will settle with so it will do for me as I am running out of time for new years. Will be making the ear recesses more rounded (you cant see in the pic how bad they are) then will add the ears ready for painting. Hope you like.
Once its painted up and hinged will do some proper pics not on my phone.
Looks pretty F'n topps to me Tom..
Drack
Sr Member
Re: Dracks Ironman MK VI Foam Build (page1 includes info on foam armour building)
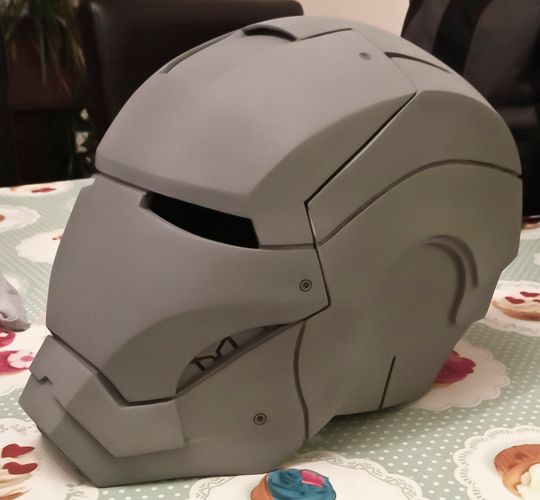
So another update on where I am at. Got the ear placements perfectly round and the screw details done. The only thing left now is to make new ears and straighten a bit on the chin.
I am not happy with the jaw screws as they are to small so will drill them out and fix bigger ones.
Part of the first picture has gone a bit weird but I think thats to do with the noise reduction I used on it.
Similar threads
- Replies
- 1
- Views
- 494
- Replies
- 2
- Views
- 594
- Replies
- 43
- Views
- 3,217
- Replies
- 1
- Views
- 779