littlebrain
New Member
Hey Everybody!
The past few years for Halloween, I decided to push myself and build something different, so 2 years ago, I built a life-size tin toy robot costume and last year I built a nice 50's style space commander type outfit. This year, I wanted to try something different. I was going to try a pep costume - and I still might at some point, but I was intrigued by the hundreds of foam Iron Man builds. Don't get me wrong, I love Iron Man as much as the next guy... but I don't think I could bring anything new or different to the foam Iron Man table... so I started looking for something else to do. In the meantime, my son (who hates Halloween) decided he wanted to be Dr. Who this year. I was elated because he found something he really dug and wanted to finally dress for the part. We got his costume all together and I decided I wanted to do something Dr. Who as well. I stumbled upon the Cyberman Foam Costume thread and patterns by Wondersquid here and thought I'd have a go at it.
Wondersquid's patterns are wonderful and it seems we are roughly the same height and weight... so seemed that I had a build idea.
I started by digitizing Wondersquid's patterns. Not that there was anything wrong with them, It's just the artist in me wanting to make all the lines perfectly straight and the arcs perfectly... arc(ish).
I went out and bought a bunch of the requisite foam floor mats from the local Harbor Freight and began tracing and cutting and gluing. This is my first foam build - although I've built many puppets in the past and the techniques are identical.
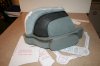
I first got the back of the head put together.


After I had the back together, I began working on the ear pods. Although Wondersquid has patterns for the top and bottom parts in 3/8" EVA, I decided to carve them from rigid pink foam. in hindsight, I should have carved one and then cat them in resin. I was stupid enough to carve all 4 of them... not once, but 3 times. First two sets weren't quite right. but I got them where I was happy with them. I then proceeded to cover them in 3 coats of Gorilla wood glue to seal them up so I could contact cement them to the ear pods.


Next, I moved on to the side and front parts. I managed to get everything cut and the front and eyebrows attached but had a difficult time figuring out how to get the side pieces attached to the front. After messaging Wondersquid, I just decided to glue everything up and test fit it. I managed to get everything together.

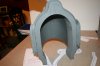
Here's all the parts glued together. I added latex caulk to all the edges to clean them up and make everything flow a little better.

The chin piece is a little off so I have to reset it. I still have to add the tubes and the forehead vent parts. I also have to redo the strip that ran from the forehead to the vent. It was on in the earlier pics but When I attached the face, I noticed the strip was hella lopsided.
So in the meantime, I decided I wanted to add a voice changer. I had an Optimus Prime helmet laying around - and having successfully used similar parts on my tin robot costume, I disassembled Optimus and got to work.

Optimus taking one for the team...

And the parts and pieces that I will add to the Cyberman to make him talk. I also plan on adding some blue LED's in the mouth that will blink when I talk.

And that's where I stand at this point. More to come!
The past few years for Halloween, I decided to push myself and build something different, so 2 years ago, I built a life-size tin toy robot costume and last year I built a nice 50's style space commander type outfit. This year, I wanted to try something different. I was going to try a pep costume - and I still might at some point, but I was intrigued by the hundreds of foam Iron Man builds. Don't get me wrong, I love Iron Man as much as the next guy... but I don't think I could bring anything new or different to the foam Iron Man table... so I started looking for something else to do. In the meantime, my son (who hates Halloween) decided he wanted to be Dr. Who this year. I was elated because he found something he really dug and wanted to finally dress for the part. We got his costume all together and I decided I wanted to do something Dr. Who as well. I stumbled upon the Cyberman Foam Costume thread and patterns by Wondersquid here and thought I'd have a go at it.
Wondersquid's patterns are wonderful and it seems we are roughly the same height and weight... so seemed that I had a build idea.
I started by digitizing Wondersquid's patterns. Not that there was anything wrong with them, It's just the artist in me wanting to make all the lines perfectly straight and the arcs perfectly... arc(ish).
I went out and bought a bunch of the requisite foam floor mats from the local Harbor Freight and began tracing and cutting and gluing. This is my first foam build - although I've built many puppets in the past and the techniques are identical.
I first got the back of the head put together.
After I had the back together, I began working on the ear pods. Although Wondersquid has patterns for the top and bottom parts in 3/8" EVA, I decided to carve them from rigid pink foam. in hindsight, I should have carved one and then cat them in resin. I was stupid enough to carve all 4 of them... not once, but 3 times. First two sets weren't quite right. but I got them where I was happy with them. I then proceeded to cover them in 3 coats of Gorilla wood glue to seal them up so I could contact cement them to the ear pods.
Next, I moved on to the side and front parts. I managed to get everything cut and the front and eyebrows attached but had a difficult time figuring out how to get the side pieces attached to the front. After messaging Wondersquid, I just decided to glue everything up and test fit it. I managed to get everything together.
Here's all the parts glued together. I added latex caulk to all the edges to clean them up and make everything flow a little better.
The chin piece is a little off so I have to reset it. I still have to add the tubes and the forehead vent parts. I also have to redo the strip that ran from the forehead to the vent. It was on in the earlier pics but When I attached the face, I noticed the strip was hella lopsided.
So in the meantime, I decided I wanted to add a voice changer. I had an Optimus Prime helmet laying around - and having successfully used similar parts on my tin robot costume, I disassembled Optimus and got to work.
Optimus taking one for the team...
And the parts and pieces that I will add to the Cyberman to make him talk. I also plan on adding some blue LED's in the mouth that will blink when I talk.
And that's where I stand at this point. More to come!