Re: Affordable Doctor Who Stunt Props (Sonic Screwdrivers, TARDIS Keys, etc.)
My personal position is accuracy over ease.
My personal position is accuracy over ease.
I was originally thinking of printing up measured stencils for those design patterns first but thought I'd throw feelers out for a potential alternate model that had raised portions. Anyone else want to weigh in?My personal position is accuracy over ease.
My personal position is accuracy over ease.

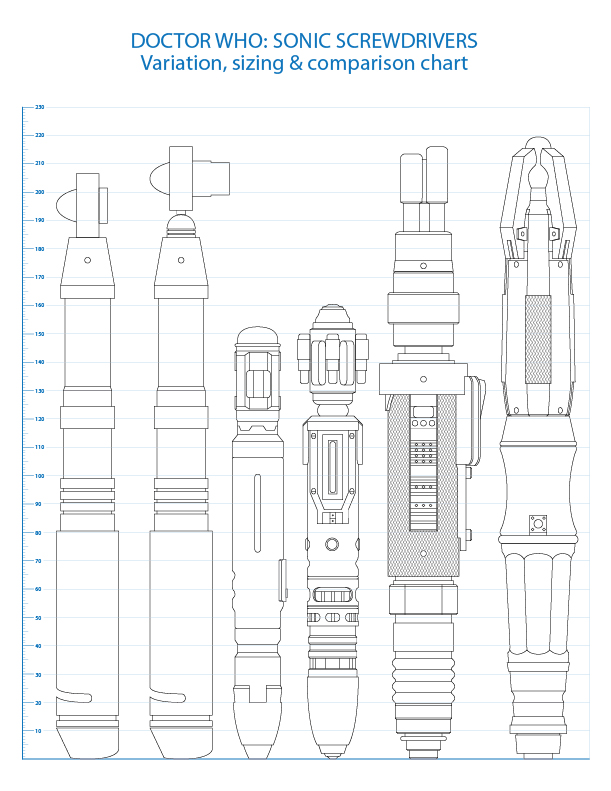
They're all as accurate to the screen props as I could get them with the reference material I gathered and the limitations of the material. The length of the extendable Tenth when closed (as well as the static 9th and 10th models) is 146.5mm without the lens, extended would be 177.5mm without the lens. Since the lens will be a found object cabochon, I don't know yet the exact length, but it should be between 149 and 151mm closed. Supposedly, the real prop differed depending on how far in or out the lens was positioned, but the average length of the real prop was 150mm so that is the aim for these models.I'm into this one as well. Love the options. One question, what it the approximate length of the 9th/10th sonic? I couldn't really tell from the pics.
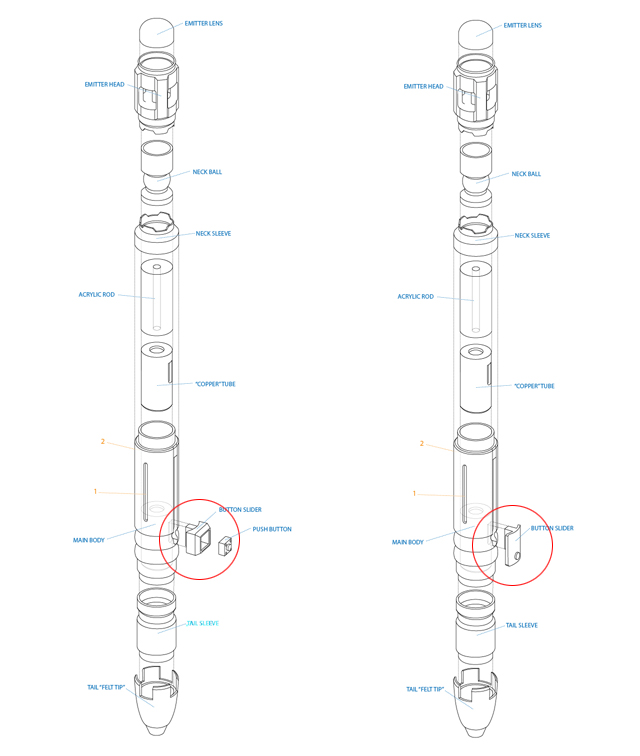
The only difference is the button slider. On the Tenth, you can see how the slider is flat and more discreet, whereas the slider on the Ninth is square and bulky. Here's a comparison shot for quick reference:I'm looking at your diagrams, but I just can't tell. What's the difference between the extensible 9th and the extensible 10th? Thanks! (Help, help, the drool is about to short out my keyboard.)
My 3d modelling skills are limited when it comes to organic forms. My background is in architecture and engineering, so that natural crackle finish is hard to model with my techniques, while angled hatching, like the claw extender posts on the 11th or the Maser's laser screwdriver body are easier. Plus, the actual prop didn't have it carved in like the CO toy and since more people seem to want accuracy first and foremost, I've resigned myself to my limitations.Have you found if there's any particular finishing technique that gives a good "crackle" finish to the 9th/10th sonics? As you pointed out, your first attempt ended up more bumpy than crackly...or are you still weighing the option of having the finish etched right into the material, a la the CO toy?
")
I plan on using this stuff. Looks very promising.Faux Painting with Crackle effectMy 3d modelling skills are limited when it comes to organic forms. My background is in architecture and engineering, so that natural crackle finish is hard to model with my techniques, while angled hatching, like the claw extender posts on the 11th or the Maser's laser screwdriver body are easier. Plus, the actual prop didn't have it carved in like the CO toy and since more people seem to want accuracy first and foremost, I've resigned myself to my limitations.
The main reason I botched the crackle finish on the first prototype is I wasn't familiar with the paint. I read a few tutorials but didn't practice enough with it. I didn't lay it on thick enough and it resulted in such a small crackle size as to be unrecognizable as crackle, hence the bumpy look. I'm going to get myself better acquainted before attempting the 9th/10th and River sonics again.