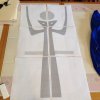
Tonight I've got details of the creation of the appliqué for the front of the shirt. I started out with an Illustrator design 1:1 scale, based on some measurements. Discovering the mirroring feature in AI was tantamount to the success of the design, since I only had to build one half of the design and the other side was built automatically and previewed live. No more drawing half, copy and flip! Hooray!
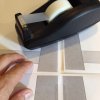
I printed out the design, across multiple sheets of paper, taped it together, cut it out and laid it on the shirt for sizing. It was good on proportions but not long enough, and the arms were too close to the collar. You can see the revised version on-screen below.


Once I figured out how much to re-size it, I printed out a new version, and tested that for size and scale.


Since this "pattern" was taped up and made from multiple pieces, I transferred it to butcher paper and made a seamless version.

 Learning Moment
: Always make sure you know what you're doing! I thought I had the steps down properly for this first appliqué, but I did not. My plan was to adhere the fabric I cut from this pattern it to the shirt with Adhesion Webbing. Unfortunately I forgot to adhere the webbing to to the fabric
before cutting out the pattern. Big Mistake! Let's continue...
So I pinned the pattern down and cut it out. You can see the results, where the fabric pulled, was cut jagged or otherwise left unusable.


That was pretty disheartening as I had only bought enough of this particular fabric for one appliqué. When I returned to Joann Fabric, I could not find the same fabric. I got close, but I really liked my initial investment. Just make sure that you know what you're doing!
So for take 2, I put the webbing on First! Yeah me! This allowed me to lay the pattern on the paper backing, trace it and get much better control.


I used an X-acto to trim out the eyes (new blade) and a new pair of scissors to cut out the pattern. I had learned that my other scissors, from v1 were pretty dull for fabric. I put the now cut-out fabric on my short to gauge the best location to iron it down. Adhesion Webbing says to use a damp cloth, and I had trouble figuring out what that means. I mean, I started with what I thought was damp, but it was not damp enough, as the next day I saw some edges that were not fully adhered. So 24 hours later I used a wet cloth and ironed the beejeezus out of the fabric to make sure there were no loose edges. This blue is a little lighter and not as shiny, but I think it worked out well. And, not too expensive of a mistake


My final steps are darkening my gloves (with potentially adding spots) and taking the cheap black wig I bought and Doctoring it [pun intended] to have the white temples, plus getting the hair to sit down a bit. If anyone knows of any good wig threads, please let me know.
Glad everyone's enjoying this build.


