JovialJay
New Member
Hi everybody, thought I'd post some images of a prop replica I've been working on for Halloween 2015. It's the 'Eye of Agamotto' from the Doctor Strange comic book. I wanted to design something that was inspired from the comics, especially the Ditko/Englehart era, but I also wanted to not be bound by the designs. I saw a version by Joy Sutton Props that had some nice functionality that I liked and wanted to incorporate as well.
I started by making a design in Illustrator and looking around for several weeks to find things that might work to build the prop from. I looked for little round beads that would be the right size for the outside, but nothing seemed to work. I finally found a link to a company called Plastruct, that sells plastic hemispheres of varying sizes and decided that plastic would be the best option.


I decided to go with 12 domes around the outside edge, with the center Eye being the 13th, as that's a nice mystical number. Since I could buy the domes in lots of 5, I ordered extras in case I screwed up. Knowing that I would be using 3/4" hemisphere's and a 2 1/2" eye, that dictated the size for the Amulet backing, which was just just over 4".
I also knew I wanted to make an 'open' and a 'closed' eye. The closed one was pretty easy, but for the open eye, I knew I'd have to be trying several things I had never done. I was able to get a 2.5" dome and a 2.25 dome, both made from clear plastic, with the smaller one fitting inside the larger. Using my design as a starting point I figured out how much I wanted the 'open eye' to be open. I used string as a pattern to trace the line, which I then dremel-ed out from the larger dome.
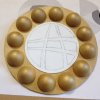
Printing out my design, I was able to trace the spots for the domes evenly around the 1/16" sheet styrene, which saved a lot of measuring. I also used tape on the inside of the smaller dome, to mask off everything but the pupil of the eye. Using a black spray paint, I painted the pupil. Painting on the inside of the dome would give me the high gloss I was looking for in the eye, without having to cast in resin, which would add to the weight significantly.


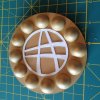
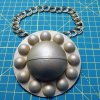
In deciding to have two eye structures, I needed a way to interchange them. It was easy. Magnets, yo! I cut a circle of super thin sheet styrene (.10 I believe) and taped a small magnet on it for positioning. I also glued down the mini-domes on the main amulet form, and cut some thin strips of styrene to use as eyelid edges. You can see on the closed eye, that I glued the magnet inside the structure so it is hidden. I then glued the styrene strip across the middle of the closed eye to indicate where the eyelids join. On the the open eye, even though I sanded the edges, a strip of styrene on the top and bottom gave a nice even eyelid edge.


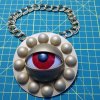
I had continued to mask the eye, further out for the Iris and spray paint that red. I completed the eye with a white spray paint for the cornea. You can see, if you look closely that the tape did not give nice edges, and bled a little, plus the red did not cover as well as I hoped, so some white was able to bleed thru, and make it patchy. I did a test fit with the open-eye to make sure everything was set appropriately. I purposefully made the eyeball off-center toward the top so it appeared to be leering out from under the eyelid. I then set up everything to get painted the same colors.
I started with a summer squash yellow, which had primer in it. In the end it gave me a texture that I really liked. After that dried I covered with a gold metallic, which I purposefully did not attempt to get 100% coverage. It ended up giving a sort of mottled look.


After painting the various pieces, and another thin circle for the back of the open eye (also with a magnet inside it) I glued the open-eye pieces together. I added a magnet to the back of the Amulet base, and two bent paperclips to hold my chain (a find in the chain section of Joann Fabrics, that is too perfect!) and tested it out. Everything fit, and the magnets are strong enough so I'm not worried that the eyeball is going to fall out. I can now walk into a party with the closed eye on the chain, and then at some point swap it out, and everyone will wonder how it opened!
I'm not completely happy with the eyeball, since I had problems with the spray paints, and have made a replacement that I'll try to post some images of later. I am hand-painting the next one, so it should look much better.
Thanks for stopping by and I hope you like what you see!
--Jay
I started by making a design in Illustrator and looking around for several weeks to find things that might work to build the prop from. I looked for little round beads that would be the right size for the outside, but nothing seemed to work. I finally found a link to a company called Plastruct, that sells plastic hemispheres of varying sizes and decided that plastic would be the best option.


I decided to go with 12 domes around the outside edge, with the center Eye being the 13th, as that's a nice mystical number. Since I could buy the domes in lots of 5, I ordered extras in case I screwed up. Knowing that I would be using 3/4" hemisphere's and a 2 1/2" eye, that dictated the size for the Amulet backing, which was just just over 4".
I also knew I wanted to make an 'open' and a 'closed' eye. The closed one was pretty easy, but for the open eye, I knew I'd have to be trying several things I had never done. I was able to get a 2.5" dome and a 2.25 dome, both made from clear plastic, with the smaller one fitting inside the larger. Using my design as a starting point I figured out how much I wanted the 'open eye' to be open. I used string as a pattern to trace the line, which I then dremel-ed out from the larger dome.
Printing out my design, I was able to trace the spots for the domes evenly around the 1/16" sheet styrene, which saved a lot of measuring. I also used tape on the inside of the smaller dome, to mask off everything but the pupil of the eye. Using a black spray paint, I painted the pupil. Painting on the inside of the dome would give me the high gloss I was looking for in the eye, without having to cast in resin, which would add to the weight significantly.


In deciding to have two eye structures, I needed a way to interchange them. It was easy. Magnets, yo! I cut a circle of super thin sheet styrene (.10 I believe) and taped a small magnet on it for positioning. I also glued down the mini-domes on the main amulet form, and cut some thin strips of styrene to use as eyelid edges. You can see on the closed eye, that I glued the magnet inside the structure so it is hidden. I then glued the styrene strip across the middle of the closed eye to indicate where the eyelids join. On the the open eye, even though I sanded the edges, a strip of styrene on the top and bottom gave a nice even eyelid edge.


I had continued to mask the eye, further out for the Iris and spray paint that red. I completed the eye with a white spray paint for the cornea. You can see, if you look closely that the tape did not give nice edges, and bled a little, plus the red did not cover as well as I hoped, so some white was able to bleed thru, and make it patchy. I did a test fit with the open-eye to make sure everything was set appropriately. I purposefully made the eyeball off-center toward the top so it appeared to be leering out from under the eyelid. I then set up everything to get painted the same colors.
I started with a summer squash yellow, which had primer in it. In the end it gave me a texture that I really liked. After that dried I covered with a gold metallic, which I purposefully did not attempt to get 100% coverage. It ended up giving a sort of mottled look.


After painting the various pieces, and another thin circle for the back of the open eye (also with a magnet inside it) I glued the open-eye pieces together. I added a magnet to the back of the Amulet base, and two bent paperclips to hold my chain (a find in the chain section of Joann Fabrics, that is too perfect!) and tested it out. Everything fit, and the magnets are strong enough so I'm not worried that the eyeball is going to fall out. I can now walk into a party with the closed eye on the chain, and then at some point swap it out, and everyone will wonder how it opened!
I'm not completely happy with the eyeball, since I had problems with the spray paints, and have made a replacement that I'll try to post some images of later. I am hand-painting the next one, so it should look much better.
Thanks for stopping by and I hope you like what you see!
--Jay


