Ah Christmas...A time for family, friends, and an office chair stacked with C4 and a CRT monitor sliding down the ol' chimney (elevator shaft) to blow up some bad guys.
To celebrate this most wonderful time of the year, here are some photos and build information on my Die Hard C4 and Detonators props I recently finished.
Thanks to RPF member Volksfrei who posted his own detonator build a while ago, which provided some great photos to reference.


Build Process:
C4 Block
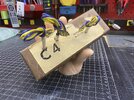
I tried out a few different materials for the block. My "Hero" version with the detonators stuck in it is made from a big 'ol block of Plastilina Modeling Clay to give it an appropriate weight and feel. For the other blocks I did one version using floral foam, but it was difficult to wrap tightly and had almost zero weight. For the others I used floral foam wrapped with about a 1/4" of Plastilina to wrap more easily and give it a better feel.
Finding the right paper for the wrap was a harder than I expected. Plain brown butcher paper didn't look right, but I found some wet wax that looked great. Unfortunately it was only available in a 900' roll, so I can pretty confidently say that I will never run short of brown wet wax paper in my lifetime.
For the label, I reconstructed the design from screen shots and Prop Store Photos. I used Barge contact cement to attach the label to the wax paper and to seal the end folds.
Detonators
I created two versions: the Hero versions are aluminum rod that I drilled on my mini lathe so that it would be solid like a real detonator. The other version is made from aluminum tube which have an open end. I did some tapering and clean up work on the lathe for both versions. The wire is solid core 18AWG wire that is heat-shrunk together, then crimped in place and sealed with UV resin at the top. Getting a quality crimp took a fair bit of trial and error, but ended up rigging up a workable solution using my bench vise and some 1/8" metal scraps.
Detonator Cases
I was originally thinking I would use acrylic tube, but the walls were too thick for the detonators to fit properly and didn't have the right "disposable" vibe. I ended up using PTFE tubes which have a super-thin wall and exactly what I was looking for, but they were harder to source (again, had to buy more than I needed). You would think that finding orange end caps would be quite easy, but boy it was not. After a number of issues with being sent incorrect sizes and colors and an attempt to paint the caps without the paint flaking off, I finally got a pack of orange caps, but they were far too light and "neon" in color. Still, they were close enough that it gave me an opportunity to try something that I had seen used in other applications and I decided to try dying the caps darker- and it actually worked really well! I put the caps in a heated bath with RIT red Synthetic dye and was able to get the exact color I wanted. It took a couple of batches to dial in the timing (they continued to darken after removing them from the bath), but after that it was easy.

I am quite happy with the end result and just a bit concerned that I made these too real looking. Thanks for checking out the project and please feel free to reach out if you have any questions, I am more than happy to share any details or lessons learned. Happy Trails Hans!

To celebrate this most wonderful time of the year, here are some photos and build information on my Die Hard C4 and Detonators props I recently finished.
Thanks to RPF member Volksfrei who posted his own detonator build a while ago, which provided some great photos to reference.
Build Process:
C4 Block
I tried out a few different materials for the block. My "Hero" version with the detonators stuck in it is made from a big 'ol block of Plastilina Modeling Clay to give it an appropriate weight and feel. For the other blocks I did one version using floral foam, but it was difficult to wrap tightly and had almost zero weight. For the others I used floral foam wrapped with about a 1/4" of Plastilina to wrap more easily and give it a better feel.
Finding the right paper for the wrap was a harder than I expected. Plain brown butcher paper didn't look right, but I found some wet wax that looked great. Unfortunately it was only available in a 900' roll, so I can pretty confidently say that I will never run short of brown wet wax paper in my lifetime.
For the label, I reconstructed the design from screen shots and Prop Store Photos. I used Barge contact cement to attach the label to the wax paper and to seal the end folds.
Detonators
I created two versions: the Hero versions are aluminum rod that I drilled on my mini lathe so that it would be solid like a real detonator. The other version is made from aluminum tube which have an open end. I did some tapering and clean up work on the lathe for both versions. The wire is solid core 18AWG wire that is heat-shrunk together, then crimped in place and sealed with UV resin at the top. Getting a quality crimp took a fair bit of trial and error, but ended up rigging up a workable solution using my bench vise and some 1/8" metal scraps.
Detonator Cases
I was originally thinking I would use acrylic tube, but the walls were too thick for the detonators to fit properly and didn't have the right "disposable" vibe. I ended up using PTFE tubes which have a super-thin wall and exactly what I was looking for, but they were harder to source (again, had to buy more than I needed). You would think that finding orange end caps would be quite easy, but boy it was not. After a number of issues with being sent incorrect sizes and colors and an attempt to paint the caps without the paint flaking off, I finally got a pack of orange caps, but they were far too light and "neon" in color. Still, they were close enough that it gave me an opportunity to try something that I had seen used in other applications and I decided to try dying the caps darker- and it actually worked really well! I put the caps in a heated bath with RIT red Synthetic dye and was able to get the exact color I wanted. It took a couple of batches to dial in the timing (they continued to darken after removing them from the bath), but after that it was easy.
I am quite happy with the end result and just a bit concerned that I made these too real looking. Thanks for checking out the project and please feel free to reach out if you have any questions, I am more than happy to share any details or lessons learned. Happy Trails Hans!