NefeniCosplay
New Member
Hi everyone! My name is June and I've started a new costume build! My very first project was Skyrim's Glass Armor and Glass Battleaxe. You can see my progress here if you'd like:
http://www.therpf.com/showthread.php?t=229233
I've chosen to make a Wizard from Diablo 3 because I love ARPGs and I've played the heck out of D3 since vanilla (RIP AH)! My favorite class is the Wizard and she really started to shine back in 2.0 with they revamped the Firebird's Finery Legendary set.
Here's my main reference picture:

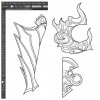
I start by making blueprints in Illustrator and here are a few. It really helps me when I start cutting into my materials since I can use it to try and get the build as accurate as possible. I also brainstorm ways to hide ugly attachments or tweak parts that may pinch and hurt in real life! This is when I can add or omit details and get the sizing just right.
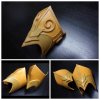
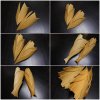
I started this project by making the leg armor. It consisted of upper leg guards and shin armor. I constructed them mainly out of Worbla's Finest Art. It's sandwiched craft foam between two layers of worbla. The edges are strips of double layer worbla and the swirly designs are leftover worbla scraps that have been casted / pushed through AMACO Tri-bead roller to get a nice and sharp bevel edge. I used Burt's Bees Almond Hand Creme as the releasing agent.

I then tackled the headpiece which is a big statement piece of this costume. I decided I wanted to make the flame parts light up and flicker like fire, so I decided to mold and cast them out of resin. I made my master using Magic Sculpt, a 2 part epoxy, which is very similar to Apoxie Sculpt. I cut large polystyrene sheets and then transferred over my Illustrator design to the sheet by covering the paper printout with a wet towel. Then I carefully hand sculpted both sides in conjunction to make sure they were symmetrical throughout the build. Then after it cured for 24 hours, i prepped it to even out the surface texture. I sprayed 2 coats of Shellac and roughly wet sanded it (~300 grit). Then I sprayed on a layer of automotive primer and wet sanded that (~600 grit). I then finished it of with few thin layers of crystal clear and wet sanded with high grit sandpaper to ensure that the surface was super smooth (~1000 grit). I buffed the surface smooth with the Novus system and then it's ready for molding!

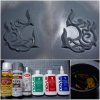
I used Smooth On's Mold Max 30 and Smooth Cast 326 with So Strong tints in yellow and orange (since red does not work well with 326). I watched a ton of videos (mainly from Smooth On's website) on how to properly mold and cast and the research payed off. The mold came out nicely and it took a couple tries to get the casting right but I'm happy with my first foray into molding and casting and I look forward to working with it more!


The headpiece was super difficult to build because it has to house LED strips and still be slim enough to sit flush against by face. After many tries and failed attempts, I managed to find a contraption that was able to properly hide the LEDs and sit snug on my head. I wanted to simulate flickering fire with the lights and decided to use an Arduino for the first time to achieve my goal.

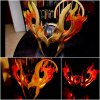

I have an background in IT and playing around with the code to get the right look was super fun! Here's a video of the results:
https://www.facebook.com/nefenicosplay/videos/vb.466449096792144/604715396298846/?type=2&theater
I used the code from http://fastled.io/ and edited the code to achieve the look I wanted. Still have to tweak it a bit more but it's super cool to see it all completed with my casted flames!
I've finished sewing the jacket and skirt and finished making the rest of the armor pieces, But I'll post another detailed update. Much work left to do, but it's coming along! Happy crafting! -June
http://www.therpf.com/showthread.php?t=229233
I've chosen to make a Wizard from Diablo 3 because I love ARPGs and I've played the heck out of D3 since vanilla (RIP AH)! My favorite class is the Wizard and she really started to shine back in 2.0 with they revamped the Firebird's Finery Legendary set.
Here's my main reference picture:

I start by making blueprints in Illustrator and here are a few. It really helps me when I start cutting into my materials since I can use it to try and get the build as accurate as possible. I also brainstorm ways to hide ugly attachments or tweak parts that may pinch and hurt in real life! This is when I can add or omit details and get the sizing just right.

I started this project by making the leg armor. It consisted of upper leg guards and shin armor. I constructed them mainly out of Worbla's Finest Art. It's sandwiched craft foam between two layers of worbla. The edges are strips of double layer worbla and the swirly designs are leftover worbla scraps that have been casted / pushed through AMACO Tri-bead roller to get a nice and sharp bevel edge. I used Burt's Bees Almond Hand Creme as the releasing agent.


I then tackled the headpiece which is a big statement piece of this costume. I decided I wanted to make the flame parts light up and flicker like fire, so I decided to mold and cast them out of resin. I made my master using Magic Sculpt, a 2 part epoxy, which is very similar to Apoxie Sculpt. I cut large polystyrene sheets and then transferred over my Illustrator design to the sheet by covering the paper printout with a wet towel. Then I carefully hand sculpted both sides in conjunction to make sure they were symmetrical throughout the build. Then after it cured for 24 hours, i prepped it to even out the surface texture. I sprayed 2 coats of Shellac and roughly wet sanded it (~300 grit). Then I sprayed on a layer of automotive primer and wet sanded that (~600 grit). I then finished it of with few thin layers of crystal clear and wet sanded with high grit sandpaper to ensure that the surface was super smooth (~1000 grit). I buffed the surface smooth with the Novus system and then it's ready for molding!


I used Smooth On's Mold Max 30 and Smooth Cast 326 with So Strong tints in yellow and orange (since red does not work well with 326). I watched a ton of videos (mainly from Smooth On's website) on how to properly mold and cast and the research payed off. The mold came out nicely and it took a couple tries to get the casting right but I'm happy with my first foray into molding and casting and I look forward to working with it more!

The headpiece was super difficult to build because it has to house LED strips and still be slim enough to sit flush against by face. After many tries and failed attempts, I managed to find a contraption that was able to properly hide the LEDs and sit snug on my head. I wanted to simulate flickering fire with the lights and decided to use an Arduino for the first time to achieve my goal.


I have an background in IT and playing around with the code to get the right look was super fun! Here's a video of the results:
https://www.facebook.com/nefenicosplay/videos/vb.466449096792144/604715396298846/?type=2&theater
I used the code from http://fastled.io/ and edited the code to achieve the look I wanted. Still have to tweak it a bit more but it's super cool to see it all completed with my casted flames!
I've finished sewing the jacket and skirt and finished making the rest of the armor pieces, But I'll post another detailed update. Much work left to do, but it's coming along!
