Destiny Hunter, first build, in FOAM, too!

Gray Silhouette

New Member
Hello everyone!
I've done this a few times, started a thread and project, gave up, started a thread, gave up, etc etc.
Not this time.This time will be different, I swear it!Mostly because I've sunk a lot of $$$ into it already. So.

First build, sorta. I've done pepakura with paper and bondo and fiberglass and the like, but never foam, so this is new territory for me.This will take the combined efforts of the 405th and the RPF to get me to finish this as perfect as my perfectionist self will want it, so comments are wanted, needed, and generally cherished forever. Ish.

Aaaaaanyways, the build!
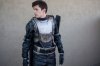
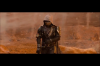
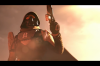
I plan on going off of Impact Props' very quick hunter build, along with the hunter from the Law of the Jungle trailer, and finally, the hunter from the live action trailer, all three are in the attached thumbnails.With all these references it shouldn't be... too bad. Hopefully.

Anyways, tips, tricks, and general help-me-do-this-faster-better-stronger ideas are much appreciated.


SO FAR: I have purchased a thorn hand cannon from Impact Props, to arrive...sometime, and a hunter knife purchased from NexusFX over on the RPF to arrive in the next few days, probably. I also bought some ski goggles, thanks to RoxyRoo on the 405th for putting a link to the goggles in her hunter build. Should arrive...I dunno. It's in like china or japan or somewhere far away and mystical. Could be Narnia for all I know. Either way, it means I'm not starting on the helmet until I get it.


QUESTIONS:
This place is for any questions I have, to be updated at any time.

What cloth to use for the cape/hood/scarf thing? And how to put designs on it?
Any ideas for strapping?


PROGRESS:
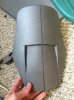
So far, I have the right shoulder bit, in the thumbnails. The right shoulder looks to be a pain since it's curved like a standard shoulder guard for like sports or something weird like that. Ideas for getting that curve?


Comments, 1,2,3, go!
 

Attachments

  • IMG_1597.JPG
    IMG_1597.JPG
    344.6 KB · Views: 1,599
  • IMG_1619.PNG
    IMG_1619.PNG
    500.7 KB · Views: 937
  • IMG_1624.PNG
    IMG_1624.PNG
    380.2 KB · Views: 611
  • IMG_1626.JPG
    IMG_1626.JPG
    1.1 MB · Views: 514
Last edited:
in foam, to get the curvature of that right shoulder you're going to need to make several cuts to get a smooth transition, then sand down foam a bit to make it more round. im not too familiar with using eva foam, but thats what i'd do with bluecore foam when i used to use it
 
I've heard/seen for curving foam some people use heat guns on the foam and then just curve the piece into shape. Correct me if I'm wrong though.

There is a Hunter Pep file over on this thread if that helps at all:
http://www.therpf.com/f24/destiny-pepakura-files-hunter-helmet-188622/?highlight=destiny

It may be good for you to be doing that in between whilst waiting for other things. But it sounds like you may already have other plans for the helmet.

For the cape, I recently saw somebody who had one one and they had simply painted the pattern/emblem on with some fabric paint and had just masked/painters taped off the emblem they wanted. Here's the link which will make my explanation much clearer. (She explains a bit in the comments of her picture how she did it)
http://instagram.com/p/sXoFQ9LmmV/
 
I do indeed have a heat gun! Very helpful piece of hardware.


Alright, so, progress!
Get both shoulders done, along with the little bicep band things that go under them. Worked a little on the boots.
But let me tell you.
I've never made a chest/torso armor thing out of foam.
It is not fun to shape. Even with a heat gun.


Pictures for all of this will be up later today, since I have classes in about half an hour.


Thanks all!

EDIT:
Oh, look. Pictures.

Here we have the shoulder and bicep arm band thingies. Yes, they fit. I have skinny arms
IMG_1628.JPG

Next if the front chest plate, with an emblem made out of foam, probably gonna go on the front, not sure yet.
IMG_1629.JPG

And finally, the back plate.
IMG_1630.JPG

Let me tell you guys, I really hate molding this thing. It's also bringing up problems like how to seamlessly attach the plates, and still be able to put it on. Ugh.
Still molding them. Next thing to work on will be the armor that goes on top, along with detailing of the torso. Hopefully something I ordered will show up soon, because as soon as Destiny comes out (TOMORROW OHMAHGAWD), this will probably see slower progress.

Thanks for the tip for the cape, JoshOTI. I'll have to find some fabric paint... Actually, I forgot I have some. Neat. Still not sure what kind of material to use for the cape, though.

Thanks all!
 
Last edited:
Double post cuz I want some comments and advice. I also have progress, so a bump is acceptable...hopefully.

Finally finished the stupid freakin' torso base. Here. Look at it.
IMG_1639.JPG
I don't know why the picture is rotated like that. The only one that hasn't been rotated has been taken sideways. Now I know.

Anyways, more angles.
IMG_1632.JPG
IMG_1636.JPG

I protect my identity with the power of Morokei!


Did a quick n sleazy attachment of the shoulders by hot gluing a rubber band on the inside of them. It worked pretty well for the five minutes I needed it to, but I need an idea for a more permanent strapping system.
Next up is torso detailing. Pics will come eventually.

Thanks!

EDIT:

OMG LOOK WHAT SHOWED UP
IMG_1640.JPG

Huge thank you to NexusFX here on the RPF, this thing is AWESOME.
It's also really big compared to my small stature. I mean, look.
IMG_1641.JPG
That's from the tip of my middle finger to the inside of my elbow. Dayum.
Got it wet sanded, time to paint it up!
 
Last edited:
Well, no comments, so triple post it is. Have mercy on my soul.
Got some progress done tonight. I made it through two RT Podcasts, so I think now is a good time to slow down.


Knife got spray painted silver, and black/brown washed.Not done painting just yet, but almost.
IMG_1643.JPG

Got the chest basically finished. Might do more details, but not sure what else to add at this point.
IMG_1644.JPG

There's going to be a belt, indicated by where I have my fingers here
IMG_1646.JPG

And then between the belt and the chest there's a mini ab plate thing, so there isn't so much space.

DESTINY COMES OUT IN 3 HOURS.

Well, that's all the progress today.
Thanks!
 
Gonna go ahead and bump this, AGAIN. Comments, guys. Anything.

Anyways, progress. Finished the knife. Goggles came in the mail, so started the mask.
IMG_1653.JPG
#hunterselfie


My only concern is that the mask looks almost too big. And also that foam is bendy and doesn't like holding it's shape like I want it too.
IMG_1657.JPG


I'm debating about scrapping the foam and just making the mask out of paper and using the goggles, but the scale could be wrong and I don't want to make it three times in a row. Ugh.
Thoughts? Ideas? Critiques?
 
What you may want to try for both the mask and armor is styrene sheet or worbala both work pretty well just make a make shift maniquinn out of ahold tshirt or wrap your torso in sedan wrap then wrap duct tape around your self until the desired strength and thickness if using the duct tap method be sure to leave a small gap so you can get out! :) hope this helps let me know how it goes.
 
Armory Props used Plasti-Dip spray when the foam parts are ready, a heat torch to lightly heat the thicker faom to hold its curve in place. There Halo tutorials should help, if not there are links to making and shaping foam parts
 
Armory Props used Plasti-Dip spray when the foam parts are ready, a heat torch to lightly heat the thicker faom to hold its curve in place. There Halo tutorials should help, if not there are links to making and shaping foam parts
I bought six cans of plasti dip just for the occasion ;)

The only thing I'm having trouble making is the damn mask... I can't scale very well and I can't find a pep file for it in foam :(

Anyways...Guess who got Thorn?
Got him as a raw cast. Sanded him, painted him, put him together, painted again, and BOOM!
image.jpg
I'm still not totally satisfied with the paint on the little green bits. Might work on those.


Still not sure of two things
1. What cloth to use for cape
2. What to do about the scale on the mask


Help?
 

Attachments

  • image.jpg
    image.jpg
    546.3 KB · Views: 292
Double post like a boss.

PROGRESS, YO!
IMG_1698.JPG
IMG_1700.JPG
IMG_1701.JPG
IMG_1702.JPG

So, got the chest and mask plasti dipped. Still a little suspicious on the scaling.

Well, that's all the progress for today, thanks all!
 
So I just made an account on here since I'm in desperate need of some answers. I also have a lot of questions. So to start, I want to make a cosplay of my hunter from Destiny but I can't find any pep files of the specific armor I want. So is there someone that can possibly make me these files? I have no idea how to make a 3D model on a computer. I've been watching lots of videos and reading things about making clay/silicone casts for costume pieces but I much rather start with pepakura and go from there with the resin coatings and what not. I'm more of a hands on person, and great at sewing. I've made a few cosplays but soley from sewing and I've made (and not finished yet) and Nightingale armor from Skryim completely out of pleather. Which is tough. So I'd like to make my destiny build from scratch using pepakura. But I really need the files. If someone on here could PLEASE make the files for me, I'd love you forever. I'm looking for a Mask of the third man helmet file as well as the legs, gauntlets, and chest piece from the raid (Crotas End) I hope to hear from someone soon! Thank you!
 
You may want to try a couple groups on FB; The Tower (Destiny Prop Builders) and The Vanguard (Destiny Cosplayers). Also, try the search function here as there is someone that created a fantastic Mask of the Third Man and is selling casts.
 
Are you working off files for the chest piece or is it just from your reference pics? if from the reference pics what measurements are you using?
 
Back
Top