You are using an out of date browser. It may not display this or other websites correctly.
You should upgrade or use an alternative browser.
You should upgrade or use an alternative browser.
Darkside501st's Iron Man Mk VII pepakura files - Password in First Post
- Thread starter darkside501st
- Start date
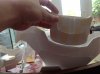
Just woke up,checked my box of paper and it's not hard at all. It's the same thing like I put water on the paper with a brush and left it to dry...
Maybe I put to little paste or maybe it's supposed to be like that. I don't know,it's just like I painted it with water colors.. Would this box be ready for fiberglass now or ?
Maybe I put to little paste or maybe it's supposed to be like that. I don't know,it's just like I painted it with water colors.. Would this box be ready for fiberglass now or ?
stang67
Active Member
Probably not! but what will it hurt to try. If it doesn't hold its shape it Looks like your going to have to try another route. Other thing to try is hair spray. Many many thin layers Might work. I've also heard polyurethane spray applied the same way. You may want to build a new helmet with card stock. I know you said your printer doesn't take it. So you may want to transfer the printed file to the card stock manually. Maybe adhere your print to the card stock using contact adhesive?Just woke up,checked my box of paper and it's not hard at all. It's the same thing like I put water on the paper with a brush and left it to dry...
Maybe I put to little paste or maybe it's supposed to be like that. I don't know,it's just like I painted it with water colors.. Would this box be ready for fiberglass now or ?
Probably not! but what will it hurt to try. If it doesn't hold its shape it Looks like your going to have to try another route. Other thing to try is hair spray. Many many thin layers Might work. I've also heard polyurethane spray applied the same way. You may want to build a new helmet with card stock. I know you said your printer doesn't take it. So you may want to transfer the printed file to the card stock manually. Maybe adhere your print to the card stock using contact adhesive?
This took me like a week how can I throw this away

Why do you think I can't put fiberglass on regular paper?
stang67
Active Member
It's not that you can't. Regular paper will not provide as much stability and deform much more than the card stock. Even card stock warps when it is fiberglassed. Almost everything I've built so far had to be heated with a hairdryer or heat gun to bring it closer to the original shape. Then the bondo fixed the rest.This took me like a week how can I throw this away
Why do you think I can't put fiberglass on regular paper?
Another idea for you. You could use krazy glue to add small pieces of card stock to the interior to help stiff it up. You would likely need additional supports made of card stock or wood rods to help keep the shape as close to original.
It's not that you can't. Regular paper will not provide as much stability and deform much more than the card stock. Even card stock warps when it is fiberglassed. Almost everything I've built so far had to be heated with a hairdryer or heat gun to bring it closer to the original shape. Then the bondo fixed the rest.
Another idea for you. You could use krazy glue to add small pieces of card stock to the interior to help stiff it up. You would likely need additional supports made of card stock or wood rods to help keep the shape as close to original.
Thanks for the tip! I'd rather try that then rebuild it. So basiclly I could make interior support and fiberglass it and bondo and everything then remove the inside cardboard..
That would work for the helmet but what about the face plate,I don't know how that is supposed to be shaped. hmm
Attach it to what? Helmet? How will I separate it later? I will have to cut it? I thought of fiberglassing and adding bondo separately.You attach the face plate before you harden. You separate the face plate after you have got all your bondo done.
stang67
Active Member
Yes to the helmet. You carefully cut it off. Do a search on it, there are a ton of good threads on here showing how it is done. Look at my thread, you will see I attached the face plate and cut it off later in the process. It's not up there with the masterpieces but I am proud of it for my first build. I learned how to do it from all these threads and youtube. Do some research!
Yes to the helmet. You carefully cut it off. Do a search on it, there are a ton of good threads on here showing how it is done. I learned how to do it from all these threads and youtube. Do some research!
Ok,awesome! Thanks for answering to all my questions,and sorry for alot of questions
I'll most likely post a picture in some time when I add the support and then get back to you after I added the fiberglass!
Thanks again.
ShaunDark80
Well-Known Member
Aaaaaaaaaarrrrrrrrrrrrggggggggggghhhhhhhhhhhhhh!
Two weeks to go, and I discover that although I scaled the abs and cod the same, they're completely different sizes. The lowest ab plate doesn't come close to filling the gap in the cod, and there's no way I'm getting it around my waist. The top section does fit, and the next one down is tight.
Not sure what to do. Was planning to pep the last couple of pieces tonight, fibreglass like crazy over the weekend, then get everything ready for paint.
Any idea what I did wrong? I scaled both pieces to 26, and I'v just measured parts on both to confirm that the printer didn't mess it up. If I scale the abs up to 29, the bottom section looks like it will fit the cod, but then the top will be way off.
Any ideas?
Attachments
Aaaaaaaaaarrrrrrrrrrrrggggggggggghhhhhhhhhhhhhh!
Two weeks to go, and I discover that although I scaled the abs and cod the same, they're completely different sizes. The lowest ab plate doesn't come close to filling the gap in the cod, and there's no way I'm getting it around my waist. The top section does fit, and the next one down is tight.
Not sure what to do. Was planning to pep the last couple of pieces tonight, fibreglass like crazy over the weekend, then get everything ready for paint.
Any idea what I did wrong? I scaled both pieces to 26, and I'v just measured parts on both to confirm that the printer didn't mess it up. If I scale the abs up to 29, the bottom section looks like it will fit the cod, but then the top will be way off.
Any ideas?
Not sure what happened there. It should print out just like you see it in the 3D model. In the model if all parts were printed at the same scale then they fit together perfectly.
The front of the midsection plates don't have to be connected since the ab plates will cover up the rest.
ShaunDark80
Well-Known Member
Not sure what happened there. It should print out just like you see it in the 3D model. In the model if all parts were printed at the same scale then they fit together perfectly.
The front of the midsection plates don't have to be connected since the ab plates will cover up the rest.
Is it possible that if rescaled multiple times, they could get out of whack? I'll download both parts again, rescale straight to 26, and see how they measure up.
In the mean time, as I'm out of both time and foamboard, I'm hoping to carefully disassemble the ab rings, and add some extension pieces front and back. Not sure how to fix the bottom ab plate width issue, but one step at a time.........
I'll also try to figure out if I can get away with just three sections.

My progress..
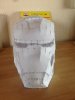
Glued it all up ready for fiber glass here are a few pictures before fiber glassing. I think with alot of sanding this helmet might not be for trash!


I'd love to hear your comments! Also can someone tell me what I need to do with the black lines? The ones near the cheeks,the ones that people call teeth. (2nd pic.)
Glued it all up ready for fiber glass here are a few pictures before fiber glassing. I think with alot of sanding this helmet might not be for trash!
I'd love to hear your comments! Also can someone tell me what I need to do with the black lines? The ones near the cheeks,the ones that people call teeth. (2nd pic.)
Attachments
Is it possible that if rescaled multiple times, they could get out of whack? I'll download both parts again, rescale straight to 26, and see how they measure up.
In the mean time, as I'm out of both time and foamboard, I'm hoping to carefully disassemble the ab rings, and add some extension pieces front and back. Not sure how to fix the bottom ab plate width issue, but one step at a time.........
I'll also try to figure out if I can get away with just three sections.
I don't see how it would have gotten out of whack. Let me know how they measure up... you can use the measurement tool to check before you print them out.
My progress..
Glued it all up ready for fiber glass here are a few pictures before fiber glassing. I think with alot of sanding this helmet might not be for trash!
I'd love to hear your comments! Also can someone tell me what I need to do with the black lines? The ones near the cheeks,the ones that people call teeth. (2nd pic.)
The black lines are the grooves. After you bondo the helmet then you can print out a template for the black lines again and trace them back onto the helmet and then cut the grooves. for the teeth it might be easier to cut out the raised sections and glue them on a flat base using the black lines as a template.
TheOneWhoIam
New Member
alright, now i am doing the finishing stage on my helmet. now i'm trying to add in the groove and i notice that the grove mapped on it doesn't print out together with the template. what's the problem?
alright, now i am doing the finishing stage on my helmet. now i'm trying to add in the groove and i notice that the grove mapped on it doesn't print out together with the template. what's the problem?
There is a setting to either print with surface shading or without... I think it is referred to as surface shading. It is talking about the any images that are mapped onto the model. In this case it is just some black lines.
TheOneWhoIam
New Member
There is a setting to either print with surface shading or without... I think it is referred to as surface shading. It is talking about the any images that are mapped onto the model. In this case it is just some black lines.
Alright. I tried and it's working. Thanks
Sent from my GT-N7100 using Tapatalk
ballanux
Member
Hi!
I finished painting my helmet almost a year now, but due to my laziness I didn't install the eye lights until today
So here it is:

For anyone who is interested, I used two lcd backlights from adafruit: http://adafru.it/1622 connected in series and powered by a small 3S lipo battery with a current limit circuit so I won't exceed the maximum current of the leds (20mA). The circuit is a simple LM317 connected this way: http://users.telenet.be/davshomepage/current-source.htm
Right now I have the leds at the maximum current, but I can limit them more with a potentiometer. At maximum current I can barely see, but at lower currents you can see pretty well.
The backlights can be bent easily to adapt to the contour of the faceplate heating them with a hot air gun, you just have to be careful not to peel off the reflectors on the edges
I finished painting my helmet almost a year now, but due to my laziness I didn't install the eye lights until today
So here it is:
For anyone who is interested, I used two lcd backlights from adafruit: http://adafru.it/1622 connected in series and powered by a small 3S lipo battery with a current limit circuit so I won't exceed the maximum current of the leds (20mA). The circuit is a simple LM317 connected this way: http://users.telenet.be/davshomepage/current-source.htm
Right now I have the leds at the maximum current, but I can limit them more with a potentiometer. At maximum current I can barely see, but at lower currents you can see pretty well.
The backlights can be bent easily to adapt to the contour of the faceplate heating them with a hot air gun, you just have to be careful not to peel off the reflectors on the edges
Similar threads
- Replies
- 1
- Views
- 804
- Replies
- 1
- Views
- 516
- Replies
- 2
- Views
- 613
- Replies
- 43
- Views
- 3,308