Dark Knight Cowl: Mold/Casting

DarthKnight

New Member
Hey Guys,

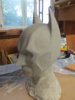
I've been looking through these forums for quite some time now and I've seen some really cool stuff on here. I finally signed up and I just want to introduce myself and show the project I've been working on. After seeing TDKR I decided it would be sweet to have my own batsuit to display. So several months ago I began sculpting a cowl. Unfortunately i didnt take pictures of the sculpting process but I did take pictures of the end result and I decided to document the molding/ casting process In case anyone else wants to give this a shot.
 
Here are some pictures of the final sculpt:

IMG_0001.JPG IMG_0002.JPG
IMG_0003.JPG IMG_0004.JPG
IMG_0005.JPG IMG_0006.JPG
 

Attachments

  • IMG_0007.JPG
    IMG_0007.JPG
    1.8 MB · Views: 211
  • IMG_0008.JPG
    IMG_0008.JPG
    1.9 MB · Views: 194
  • IMG_0001.JPG
    IMG_0001.JPG
    3.2 MB · Views: 189
Last edited:
First I cut off the unnecessary parts so I wouldnt be wasting material molding and casting the neck:

IMG_0009.JPG
IMG_0010.JPG
IMG_0011.JPG

I also added in a pour spout for the slush casting

IMG_0012.JPG
IMG_0013.JPG
IMG_0014.JPG
IMG_0015.JPG

Finally I sealed the entire bust with spray can cleat coat. Note: plaster doesn't bond to water-based clay, so this wasn't important as a mold release. It was important, however, because to make the parting line I used water based clay. the two parts need a barrier between them so that the parting line can be peeled off without damaging the surface of the sculpture.
 
Last edited:
Thanks! I finally got my liquid latex in the mail today and I started slush casting, I did two coats so far. I plan on spraying it with plastidip when it's all trimmed and detailed. I should have more pictures up in a couple days!

-Greg
 
Here are some pictures of the first pull! I already cut out the eyes, mouth, and parting line. All in all it turned out pretty good, there was a little trouble on the left ear because the latex didn't get in there all the way. So now I am in the process of building up any divots before finishing the mask off with a dremel.


IMG_0074_zps11378968.jpg
 
Hi Greg,

First of all, as a newbie to all of this, your sculpt and the finished cowl are fabulous!

My wife and I were thinking about embarking on a similar project.

Can you advise where to begin in terms of what clay we should use?

We have a toddler so our free time is limited. It will need to be a clay that we can work with over a period of time, probably a week or two from beginning to end of the sculpt!

I appreciate your help in getting us started!

Andy
 
Hi Andy,

For this sculpt I just used a water-based clay from a ceramics store. I used it because I have done alot of work with pottery and sculpting in ceramics and yhis is what I am used to, also its only about 15 bucks for a 25lb bag. The draw back is that you have to keep it covered when you are not working on it to keep it from drying out, but you can always re-wet the clay with some water if your sculpture gets too dry. I completed mine working on and off for about a month, and then I didnt get around to molding it for another 6 months.. so letting it sit is not a problem at all.

Good luck on your project!

-Greg
 
Heres the pics of the whole molding process, I must have forgot to put them up lol

enjoy!

IMG_0016_zps7671fb1b.jpg
I used some burlap to strenghtne the mold:
IMG_0017_zps9254de5d.jpg
I just cut off some slabs of a fresh block of water based clay to build the parting line:
IMG_0018-Copy_zpsc4934ead.jpg
I tried to find the position where the parting line would be least noticeable and also the position where it would not create undercuts in the mold:
IMG_0019-Copy_zps7fd5d6a3.jpg
Next I added some keyholes to make the two halves of the mold fit together.
IMG_0020_zpsd655d811.jpg
The plaster all mixed up:
IMG_0022_zpse4941331.jpg
IMG_0023_zps50430c2b.jpg
IMG_0024_zpsacfdd52e.jpg
peeling off the parting line:
IMG_0025_zps3f3b6882.jpgIMG_0026_zps2decaccb.jpg
getting ready to lay up the second half of the mold:
IMG_0027_zps6e2a0c9c.jpg
IMG_0029_zps8186aecb.jpg
IMG_0031_zps5bb726e1.jpg
The back half came off really easily:
IMG_0032_zps9cc6f0f2.jpg
I wish I could say the same for the front half lol:
IMG_0033_zps7664a9e8.jpg
** the reason the front was such a pain to remove was because it had some slight undercuts, which required me to dig out and destroy the original sculpt. I understood this when I made this. If I wanted to eliminate any undercuts I would have had to make a 3 part mold which would have been too much work, and would create ugly parting lines on the face of any mask pulled from it. The undercuts wont be a problem for the final cast because latex is flexible and you can just flex the part out of the mold
IMG_0034_zpse5acf12a.jpg
Here is a picture of the first pull again:
IMG_0074_zps11378968.jpg
 
Here is the finished cowl:

First I cleaned it up with a dremel and a polishing wheel, then I sprayed it with a few coats of plastidip

What do you guys think?

IMG_0133_zps68e1fe71.jpg
IMG_0134_zpsa0360713.jpg
IMG_0135_zpsa9e66d2e.jpg
IMG_0136_zpsff103e99.jpg
 
This thread is more than 10 years old.

Your message may be considered spam for the following reasons:

  1. This thread hasn't been active in some time. A new post in this thread might not contribute constructively to this discussion after so long.
If you wish to reply despite these issues, check the box below before replying.
Be aware that malicious compliance may result in more severe penalties.
Back
Top